10.2 Speaker Setup
The speaker being used to amplify the computer’s audio is a key factor in this project’s success. The speaker needs to be loud enough to be heard from one or more rooms away and ideally should be heard throughout the house if possible. Let’s take a look at both wired and wireless approaches.
The quickest way to connect a Mac computer up to a home stereo is by using a male-to-male 3.5mm stereo headphone to an RCA adapter cable. This cable will run from the Mac’s headphone jack to the stereo amplifier and/or receiver’s audio input jack. If your home stereo doesn’t support a 3.5mm input jack, you will need a 3.5mm female-to-RCA-male audio cable. The length of the cable needs to comfortably run from the computer to the stereo, so take that into consideration when purchasing the cable from your preferred audio-video supplier.
If the computer and stereo are separated by several rooms, you will be running a lot of wire and probably need to drill a few holes in the process. If you don’t want to operate the computer in the same room as the stereo and don’t like the idea of fishing wiring through walls to connect the two, consider a wire-free alternative. If this is your situation, I recommend using the external Bluetooth speaker option since it offers the most flexibility.
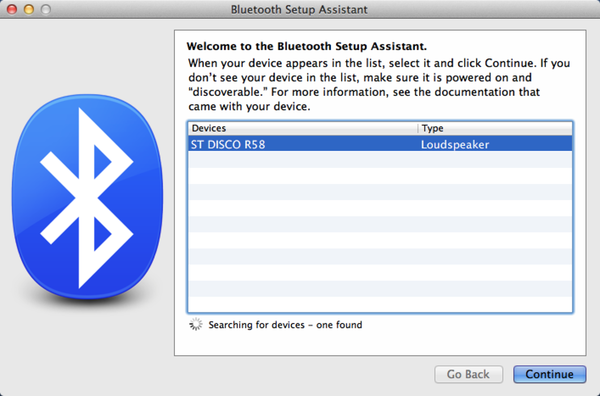
Pairing an external Bluetooth speaker with the Mac is easy. Simply turn on Bluetooth on the Mac via the Bluetooth System Preference pane. Then power up the external Bluetooth speaker and set it to pair with your computer. This is typically done by holding down the power button on the speaker until the speaker’s Bluetooth indicator light starts flashing. Then click the Set Up New Device... button on the Mac’s Bluetooth Preference Pane. This should auto-detect the Bluetooth speaker. In the case of the Supertooth DISCO speaker, it displays “ST DISCO R58” on my Mac, as shown in Figure 45, Bluetooth wireless speaker pairing.

Figure 45. Bluetooth wireless speaker pairing
Select the speaker name. Depending on the Bluetooth speaker you are connecting to, it may automatically establish a connection or it may require a four-digit confirmation code such as 0000 or 1234 to be typed in on the screen. In the case of the Supertooth DISCO speaker, my Mac automatically configured the speaker without requiring any confirmation codes.
If the discovery and configuration went smoothly, you should receive a confirmation message on the screen that pairing with the speaker was successful. Go to the Sound option in System Preferences and select the speaker in the Output tab. Then use the iTunes music application on your Mac to play back audio and verify that you can indeed hear the sound reproduced on the paired speaker. Conclude your pairing confirmation testing by entering the Speech option in System Preferences and then selecting the Text to Speech tab. Click the Play button. If you hear the TTS playback on the speaker, your talking Mac hardware setup is successfully configured. Set the volume on the speaker and dial up or down the output volume level on the Mac to get the sound output just right for the audio coverage area you have in mind.
There are trade-offs between these wired and wireless audio configurations. If you need the convenience of a wire-free audio transmission, the external Bluetooth speaker option is the way to go. But if you value high fidelity sound over wireless convenience, a wired connection to a dedicated stereo amplifier/receiver offers the best sound reproduction to multiple speaker outputs. If you are fortunate enough to have already prewired the rooms in your home for stereo sound, the wired computer-to-stereo approach is the obvious choice.
Next we’ll configure the Mac to listen for voice commands and respond with a high-quality voice response. Then we will write an AppleScript script that will leverage OS X’s built-in speech recognition server to listen for specific commands and act on them accordingly.