8.1 What You Need
The parts required for this project are fairly straightforward. Sensors for light and temperature, a stepper motor, and an Arduino board are the primary components. Then it’s just a matter of mounting and powering the assembly. Refer to the photo in Figure 30, Curtain Automation parts. Specifically, we will need the following:
-
Four 2-inch angle brackets to mount the stepper motor in place
-
A 12V bipolar stepper motor[78]
-
Arduino motor shield[79]
-
A 12V power supply[80]
-
Double-sided foam tape to dampen the vibration of the mounted stepper motor
-
A grooved rubber pulley wheel to grip and move the curtain drawstring
-
Wire to connect the sensors and stepper motor to the motor shield
-
A TMP36 analog temperature sensor (for a close-up image of a photocell and a temperature sensor, see Figure 31, Curtain Automation sensors)[81]
-
A 10k ohm resistor (usually coded with brown, black, orange, and gold bands)
-
A photoresistor (the same type we used in Chapter 5, Tweeting Bird Feeder)
-
An Arduino Uno
-
A small breadboard to mount the photocell and temperature sensors
-
A standard A-B USB cable (not pictured) to connect the Arduino to the computer.
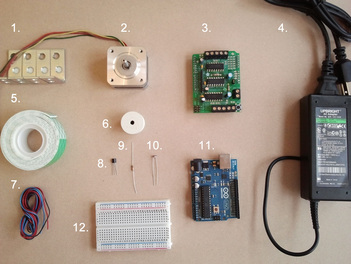
Figure 30. Curtain Automation parts
This project assumes you already have curtains hung on a pulley-based system. If you don’t already have curtains in place, there are a number of how-to sites on the Web to assist with hanging curtain rods and setting up the pulley system. The project works best with the continuous drawstring, traverse rod-based hanging curtains. That is, as you pull down on the left side of the string, the right side goes up, and vice versa.
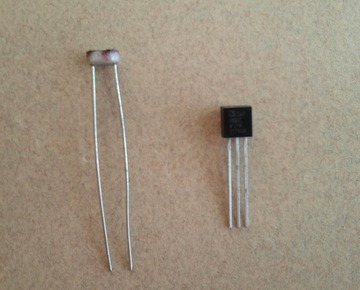
Figure 31. Curtain Automation sensors
You will also need find the size of pulley wheel that best suits your curtain configuration. For simple curtain rod/drawstring-based systems, a 1-inch-diameter grooved rubber pulley wheel should do just fine. You can obtain a variety of pulley wheel sizes from home hardware, auto parts, and even some craft stores.
Ideally, the center hole of the pulley wheel should snuggly slip onto the stepper motor’s drive shaft so that it doesn’t fall off or slip when the shaft is rotating. If you have a home improvement store nearby, bring your stepper motor and try the various pulley wheels at the store to save time and hassle. Once you’ve found the perfect size and fit, you’re ready to start assembling the project.