VIDEO: USING FLASH TO LIGHT FOREGROUND OBJECTS
Here I’ll show you how flash can be used to liven up a dull, overcast scene. (3:16)
As the sun set across this idyllic scene at the Vermilion Lakes near Banff, in Alberta, Canada, I encountered a challenge that only a flash could solve. Because I wanted a deep depth of field, I chose an aperture of f/22 on my 16–35mm Nikkor zoom lens. With my focus preset to 3 feet, I simply aimed the camera to the sky and adjusted my shutter speed until 1/60 sec. indicated a correct exposure. As you can see in the first example, the landscape is silhouetted except for a small part of the mountain illuminated by the low-angled sidelight of the setting sun. I felt the visual weight of this composition was unbalanced. It needed some “sunlight” on the small rock in the foreground.
I grabbed my flash and set it to f/22, which produced a flash-to-subject distance of 5.6 feet. However, because the low-angled sunlight on the distant mountain was very warm, I needed to ensure that my flash would produce that same warm light. I added an amber-colored gel to the flash head, turning the normally white light of the flash into a much warmer tone. The amber gel causes a 2/3-stop loss of light from the flash, much like a filter, so I needed to shorten the flash-to-subject distance accordingly.
With the flash pointed at the small rock in the foreground from a distance of about 3 feet, and with the same exposure as the previous photo (f/22 for 1/60 sec.), I pressed the shutter release. Just as I had hoped, the foreground rock lit up for a much more balanced and pleasing composition.
Here, the visual weight feels
unbalanced.
16–35mm lens, f/22 for 1/60
sec.
Using flash, I lit the foreground for a more balanced
composition.
16–35mm lens, f/22 for 1/60 sec. with Nikon
SB-900 flash
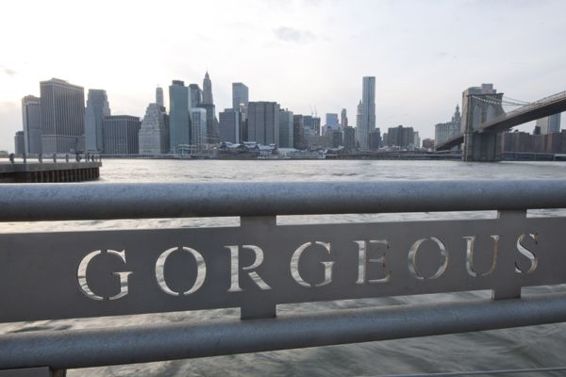
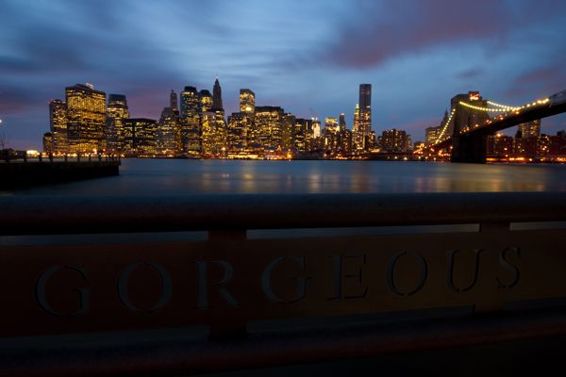
Standing just next to New York City’s Brooklyn Bridge, my eyes caught sight of the word GORGEOUS on the fence along the pier, with the Manhattan skyline in the background. This was a classic storytelling image, so f/22 was the clear aperture choice. With my Nikon D3X and 16–35mm lens at the 19mm focal length, I manually set the focus to 3 feet (1 meter) on the distance scale and then took a meter reading off of the sky. At this point, it was 20 minutes after sunset. With my ISO set to 100, my meter indicated a shutter speed of 15 seconds for a correct exposure of the ambient light.
As you can see from the second image, however, this correctly exposed the skyline but not the foreground, which was lost. So out came my Nikon SB-900 flash. I placed an amber gel on the flash to warm up the blue-gray railing. With the flash set to manual exposure mode, I set the aperture dial on the back of my flash to f/22 and zoomed the flash to 18mm. The flash indicated 4.6 feet as the flash-to-subject distance for a correct exposure. I fired the camera, and during the 15-second exposure of the ambient light, I manually tripped the flash that I held about 4 feet above GORGEOUS at about a 30-degree angle. The third image shows the result. Easy stuff, really.
A daylight view of the scene.
With flash, the foreground was lost.
16–35mm lens, f/22 for 15
seconds
The desired result, thanks to flash.
16–35mm lens, f/22 for 15 seconds with Nikon
SB-900 flash
TIP: Record Bluer Skies with Your Flash
Here’s a tip for recording bluer skies with your flash. When using your flash in the great outdoors, set your white balance to Tungsten/Incandescent and place an amber gel on your flash. The areas lit by the flash will record as daylight, but the distant sky will record a more vivid Tungsten Incandescent blue.
Lying down between several rows of tulips, I set my aperture at f/11 and metered off the distant sky, adjusting my shutter speed until 1/125 sec. indicated a correct exposure. This correctly exposed the sky, but the tulips in the foreground would have been underexposed since they are not as bright as the sky above.
Using my flash to light the tulips, I was presented with two options: (1) record the sky naturally (2) record a much bluer sky. Fortunately, I could do both thanks to a simple white balance change and an amber gel.
When using gels it is important that you know how much the flash output is reduced by the gel. In the case of this gel, which was a medium amber, the loss of flash output was about 2/3 stop. I was approximately 2 feet from the tulips, and at f/11, I had to power down the flash to 1/16 power to get 2 feet as the correct flash-to-subject distance. However, I had to adjust for the amber gel, which would eat some of that light, so I turned the flash back up to 1/8 power, which yielded a flash-to-subject distance of 3.4 feet. In effect, the flash was telling me to back off to 3.4 feet, but because I was using the gel, I could shoot from only 2 feet away without overexposing the subject. Holding the flash along with an attached PocketWizard, I pointed it up a bit at the tulips and clicked the shutter at f/11 for 1/125 sec. As you can see in the first image, I made a correct exposure of the tulips with a faint blue sky. The warm tones on the tulips are because of the warm flash output from the amber gel.
Are you ready for a blue sky? All I needed to do was change the white balance from Cloudy to Tungsten/Incandescent. As you can see in the second image, this produced a much bluer sky.
Exposing for the sky, I used flash to light the
tulips.
16–35mm lens at 20mm, f/11 for 1/125 sec.,
white balane set to Cloudy
Tungsten white balance creates a much bluer
sky.
16–35mm lens at 20mm, f/11 for 1/125 sec.,
white balance set to Tungsten


