CHAPTER 9
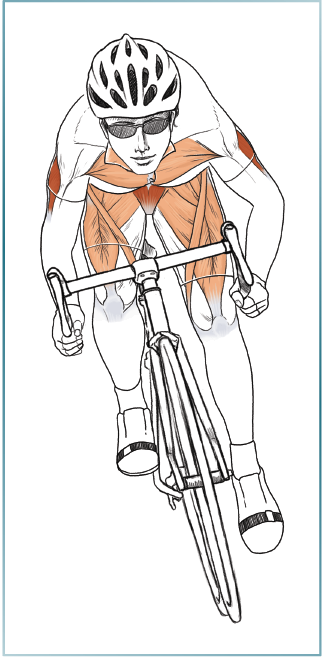
Whole-Body Training for Cycling
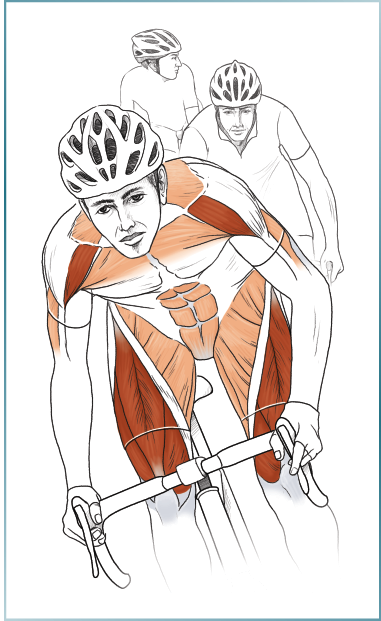
The exercises in this chapter are the most engaging of the entire book. The previous chapters all focused on various parts of your body—arms, back, legs, and so on. Even though chapter 8 provided exercises for working multiple leg muscles together, the focus was always on the lower extremity. This chapter provides exercises for training multiple muscle groups simultaneously, combining both upper and lower body movements. You’ll be focusing on total-body fitness, flexibility, and strength. Not only will you be gaining muscle strength and increased power, but because you’ll be using so many different muscles simultaneously, you will also be gaining excellent cardiorespiratory fitness. Certainly, this is my favorite chapter of the book, and I always try to include some of these exercises in my workouts.
As previously mentioned, one of my fundamental training principles is that people must use their workouts efficiently and effectively. With the exercises in this chapter, you will be making good use of the time you spend in the gym. By combining various movements into one exercise, you will simultaneously train many of the key cycling muscles. With oxygen and blood flow in higher demand, your body will have to become more adept at utilizing the scarce resources. Distribution of fuel and removal of muscle by-products will force your entire system to work more efficiently.
These combined exercises are not only multidimensional but also interesting and entertaining to perform. Keeping your mind fresh and motivated can become a chore as the season progresses. Hopefully these exercises will help keep you fired up for your gym workouts. Remember that if you start to feel bored with your routines, you need to change things. Just going through the motions will surely limit the potential gains of your workout.
Coordinated Training: Muscles Working Together
Although it is important to train each muscle in isolation, as stated previously, it is also fundamental that you train multiple muscle groups in unison. When you are riding your bike, your body will be in a dynamic state. You’ll never be relying on just one muscle or muscle group. Your body works as an entire coordinated system. The whole-body exercises will help you train for this concerted effort and prepare you for the stressors of the road. After focusing on these exercises in your training, you’ll definitely see improved performance while riding.
To perform the fluid movements of these exercises, you must rely on your solid base and core while using the full mobility of your arms and legs. With every extension, twist, and flexion, you’ll be training not only the muscles working against the resistance, but also the dynamic stabilizers and movement antagonists. These are the muscles that are vitally important when you are fatigued and hitting your maximal effort on the bike. When you leave the gym, you’ll feel as if you’ve been worked over—and that’s the point!
The importance of efficiency was discussed earlier in this book. Any wasted motion results in decreased performance. Since even the best cyclists are only 27 percent efficient, you can see that every little improvement in movement increases power transfer to the bike. If you want to get the most out of your pedal stroke, you need to apply force to the pedals for the entire revolution of the crank. While trying these workouts in the gym, concentrate on smooth, constant force motion. Don’t jerk or cheat by bouncing or overusing your stronger muscle groups. Keep the movements uniform and consistent.
Both sides of your body work together to drive the bike forward. One side pulls on the pedal while the other side pushes. This combined effort keeps forceful tension on the chain and rear wheel. Although the power delivered to the pedals will vary through each rotation of the crank, your focus and goal should be to decrease this variation. Figure 9.1 compares the power input for a choppy pedal stroke versus a more smooth power delivery. Note that the first graph shows deep valleys between the peaks—there is a wide variation between maximal and minimal power input. The lower image shows the ideal situation. Only a small variation is shown between the maximum power and minimum power provided by each leg. While working all the exercises in this book, you should focus on performing a smooth and well-coordinated movement. Keep abrupt movements and jerks to a minimum. Think about applying a constant power input throughout the entire range of motion.
![Figure 9.1 Sine curve comparing (a) a choppy pedal stroke caused by unequal effort by the legs and (b) a smooth stroke resulting from equal power delivery. Adapted, by permission, from bar graphs generated by the CompuTrainer SpinScanTM Pedal Stroke Analyzer. Original image available at www.racermateinc.com/spinscan.asp [September 9, 2008]. SpinScanTM is a registered trademark of RacerMate, Inc.](/epubstore/S/S-Sovndal/Cycling-anatomy//Images/09_E4578_Sovndal_Ch9_167-187_0.jpg)
Figure 9.1 Sine curve comparing (a) a choppy pedal stroke caused by unequal effort by the legs and (b) a smooth stroke resulting from equal power delivery. Adapted, by permission, from bar graphs generated by the CompuTrainer SpinScanTM Pedal Stroke Analyzer. Original image available at www.racermateinc.com/spinscan.asp [September 9, 2008]. SpinScanTM is a registered trademark of RacerMate, Inc.
As with all your workouts, make sure that you’re properly fueled for the task. Don’t skip meals prior to your workouts, and make sure you have plenty of hydration. Once finished with your training, you should try to eat within 30 minutes. The timing is important because your metabolism is revved up and the calories will be used more efficiently. Your body uses the protein consumed to rebuild the muscle damage from weightlifting, and the carbohydrates you eat will replenish depleted energy supplies.
Warm-Up and Stretching
As mentioned previously, you must warm up properly before engaging in these exercises. You will be using your entire body for these exercises, so you’ll have to do some whole-body movements such as rowing or jumping rope. After a cardio warm-up and some stretching, you should perform the movements of each exercise without using weights. This loosens up all the various muscle groups and will help you focus on proper form. If you are doing multiple sets, start with a lighter weight and then increase the weight for successive sets. This gives your muscles more time to warm up to the challenge of the workout. These exercises are very taxing, so cutting corners in the warm-up could lead to injury. Remember, weight training is all about building on previous gains. Slow and steady wins the race. Injuring yourself in the gym is totally demoralizing, especially since proper warm-up and graded effort can alleviate much of the possibility of hurting yourself.
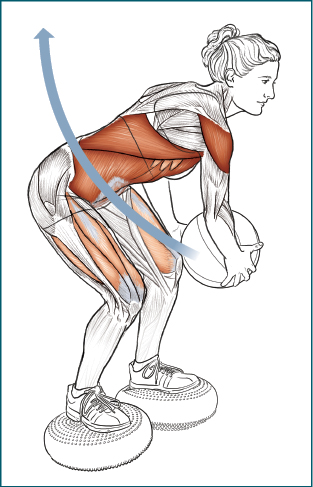
Goalies

Execution
1. Holding a medicine ball at your chest, stand in front of a platform.
2. With a forceful movement, step onto the platform. Drive your non-weight-bearing knee upward while extending your support leg. Simultaneously extend both your arms above your head. When finished, you should be standing on your tiptoes (on one leg) and holding the medicine ball over your head.
3. With controlled movement, step backward off the platform and return to your starting position.
4. Alternate your step-up leg.
Muscles Involved
Primary: Quadriceps, gluteus maximus, gluteus medius, gluteus minimus, gastrocnemius, soleus, deltoid, triceps, pectoralis major
Secondary: Hamstrings, erector spinae, trapezius, serratus anterior
Cycling Focus
This exercise trains you to maintain your form while putting in a hard effort. When you step up and thrust the medicine ball above your head, all your stabilizer muscles fire. Because you’re standing on only one leg while holding a load over your head, your pelvis must lock into position. This is similar to putting in a hard effort while riding. Whether you’re seated or standing on the bike, your pelvis must provide a solid foundation to counteract the different actions of each of your legs. Because goalies involve the added effort of your torso and upper extremities, you’ll also be training for the many hours of supporting your body weight over the handlebars.

Variation
Stairs and press: If you have access to stairs in an arena or stadium, this is an excellent alternative to goalies. Hold a dumbbell in each hand. Skip every other step as you ascend the stairs. While climbing, perform an arm press with each dumbbell above your head. You can do this with both arms together or arms alternating.
Deadlift With Push-Up
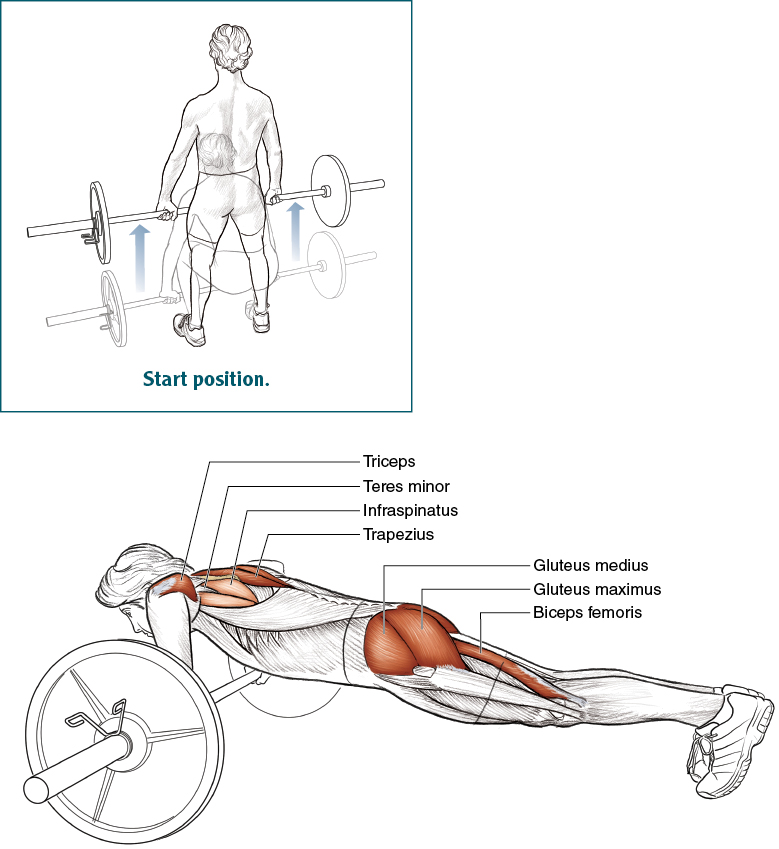
Execution
1. With the barbell on the floor, squat down and grasp the bar with a palm-down grip. Your shins should be touching the bar.
2. Straighten to the upright position. The barbell should slide up your shins and then your thighs.
3. Lower the barbell back to the starting position.
4. Jump back with both feet so you are in the push-up position.
5. Perform a push-up, jump to the starting position, and repeat the entire cycle. Never release your grip on the bar.
Muscles Involved
Primary: Hamstrings, gluteus maximus, gluteus medius, gluteus minimus, trapezius, triceps, pectoralis major
Secondary: Erector spinae, deltoid, supraspinatus, infraspinatus, teres minor, rectus abdomini
Cycling Focus
This exercise prepares your body for the load of cycling training. Because of the standard bent-over position that you assume on your bike, riding places extreme pressure on the entire back side of your body (from your neck down to your calves). A difficult workout or race only multiplies this stress. At the end of a long climb, you’ll note the strain of your neck, back, and hamstrings—all the muscles trained by this combination exercise. The deadlift with push-up will also condition your arms and prepare them for supporting the load of your body when you are in the riding position. Make sure you don’t use a weight that is too heavy. The exercise may seem easy for the first couple repetitions, but the difficulty will increase exponentially as you approach the end of the set. You’ll really feel the effects of this exercise the next day after training; take care that you don’t overdo it.
Medicine Ball Throw

Execution
1. Hold a medicine ball in both hands, and stand about 8 to 10 feet (2.4 to 3.0 m) in front of a wall.
2. Twist your trunk and bring the ball back to one side. You should stand with one foot slightly ahead of the other.
3. With an explosive movement, heave the ball at the wall.
4. Catch the ball after it bounces off the wall and rapidly repeat the action on the opposite side. Continue alternating until you finish the set.
Muscles Involved
Primary: External oblique, internal oblique, rectus abdominis, deltoid, quadriceps
Secondary: Biceps, trapezius, pectoralis major, gluteus maximus, hamstrings, gastrocnemius, soleus
Cycling Focus
Cycling is all about surges. A surge at the right time can create a gap that may give you the opportunity to win the race. Imagine being on your bike and climbing with your competitors. You decide the time is now, and you make an explosive jump. After your acceleration, you’re able to hold the speed for two minutes. Slowly, you back off and return to your previous pace. Although you may be climbing at the same speed as your competitors, you’ve got yourself a significant gap. Now you can try to hold it to the finish. The medicine ball throw will help you develop the explosive surge needed in order to make this kind of successful race move. Focus on the explosive nature of the throw. The word heave accurately describes what you need to do in this exercise. Throw that ball with all your might!

Variation
Squat with front throw: Start in a squat position while you hold a medicine ball at your chest. Surge to the standing position. At the same time, throw the ball at the wall in front of you. (Use a pushing motion on the ball, as if you’re making a basketball pass.) Return to the starting position and repeat the action in rapid succession. To mix it up even further, you can perform the same exercise but throw the medicine ball forward from behind your head. The motion is similar to throwing a soccer ball over your head.
Lunge With Biceps Curl
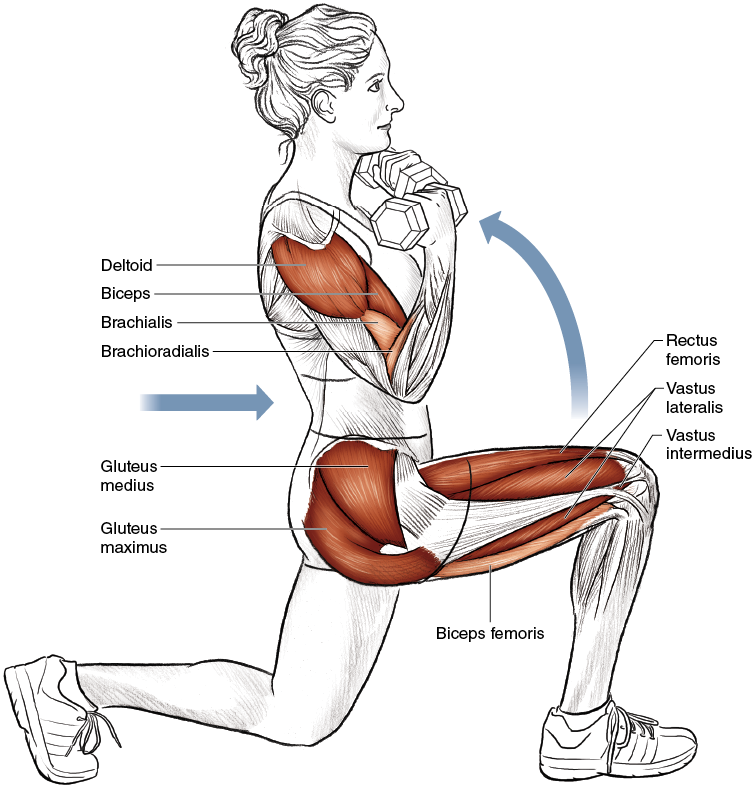
Execution
1. Stand erect with a dumbbell in each hand.
2. Perform a lunge, stepping forward with one leg.
3. While in the lunge position, perform a curl with both arms simultaneously.
4. Reverse the steps and repeat with the opposite leg.
Muscles Involved
Primary: Quadriceps, gluteus maximus, gluteus medius, gluteus minimus, deltoid, biceps
Secondary: Hamstrings, brachialis, brachioradialis, forearms
Cycling Focus
The next time you attack while riding, note the downward force of each pedal stroke. Also feel your biceps pulling up on the bars as you stand to deliver maximum power with your legs. Throughout your entire acceleration, you’ll need a strong foundation—from your chest to your pelvis—to provide support as you drive your legs through their rotation. The lunge with biceps curl combines a primary exercise used in cycling training—the lunge—with an exercise for strengthening the core and arms. With this combination exercise, you’ll definitely be getting a lot of work in a limited time.

Variation
Side Lunge With Shrug
Hold a dumbbell in each hand. Perform a side lunge by stepping out to the side with one leg. While in the downward position, shrug with the dumbbells. Return to the starting position and repeat the action on the other side.

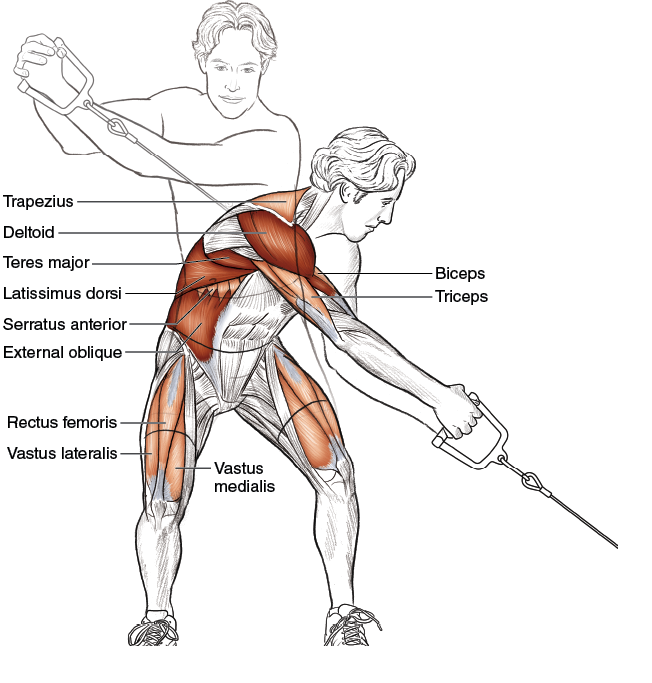
Woodchopper

Execution
1. Stand sideways next to a high pulley and grasp the handle with both hands. Your arms should be extended above your head and off to the same side as the pulley.
2. Start by pulling your arms downward. As your hands pass your shoulders, begin to twist and crunch your abdomen. Continue pulling downward as you flex your knees into the squat position.
3. You should finish the movement with your knees bent, your trunk twisted, your abdominal muscles crunched, and your arms extended downward to the opposite side of where you started.
4. Using controlled movement, return to the starting position.
Muscles Involved
Primary: Rectus abdominis, external oblique, internal oblique, latissimus dorsi, deltoid, pectoralis major
Secondary: Quadriceps, gluteus maximus, gluteus medius, gluteus minimus, teres major, serratus anterior
Cycling Focus
As discussed in the chapter about training the abdomen, cyclists need to ensure that they have adequate core conditioning. Because you will spend so much time bent forward on your bike, your back strength can overwhelm your abdominal muscles. This may lead to knee, hip, or back pain. The woodchopper exercise is very effective because it works most of your anterior (front-side) muscles. I’m a big fan of cable and pulley systems. These systems allow you to quickly change from one exercise to another, and they provide minimal stabilization while you are performing a movement. Remember, any instability during motion will force your body to work harder and train all the stabilizing muscles.

Reverse Woodchopper

Safety Tip
Be sure to warm up and limit the weight used. It is easy to hurt yourself when powerfully uncoiling your body in this exercise.
Execution
1. Stand sideways to a low pulley and grasp the handle with both hands. Your arms should be extended toward the ground and to the same side as the pulley. You should be bent over and twisted to the side of the pulley.
2. Start by pulling your arms upward. As your hands cross knee level, begin to straighten and untwist your abdomen. Continue pulling upward as you extend your knees.
3. You should finish the movement with your knees extended and your torso straight and upright. Your arms should be extended upward to the opposite side from where you started.
4. Using controlled movement, return to the starting position.
Muscles Involved
Primary: Latissimus dorsi, external oblique, internal oblique, deltoid, teres major
Secondary: Quadriceps, gluteus maximus, gluteus medius, gluteus minimus, trapezius, rhomboid, triceps, serratus anterior, biceps
Cycling Focus
Although this exercise seems similar to the standard woodchopper, it works a different group of muscles. Whereas the standard woodchopper works the front of the body, the reverse woodchopper works the back of the body. As discussed, cyclists develop strong back muscles. The reverse woodchopper will help you build the fitness and strength that your legs, back, and arms need in order to sustain power for long periods of time. During this exercise, you should work on exploding from the starting position.

Variation
Medicine Ball Reverse Woodchopper
You can perform the same exercise with the medicine ball. Instead of using a pulley system, hold a medicine ball low and off to one side. With a surge of power, raise the ball upward and across your body until the ball is above your shoulder on the opposite side. Imagine uncoiling a spring as your body moves the ball from the starting position to the finish. You can also stand on stability disks to increase the difficulty.
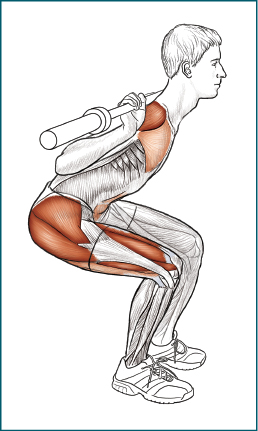
Squat Press

Safety Tip
The importance of keeping your back straight during this exercise cannot be overstated. Throughout the movement, you should keep your chin up and focus on your form. As you tire, you’ll be tempted to “cheat” on the movement. Doing so can lead to undue stress and can result in injury.
Execution
1. Hold a barbell across your chest with a palm-out grip. Start in the squatting position.
2. Extend at the knees and bring yourself to an erect position.
3. Push the barbell upward, performing a shoulder press.
4. Reverse the two separate motions to return to the starting position.
Muscles Involved
Primary: Quadriceps, gluteus maximus, gluteus medius, gluteus minimus, anterior deltoid, triceps
Secondary: Hamstrings, hip adductors, erector spinae, rectus abdominis, trapezius, upper pectoralis major
Cycling Focus
Perform this exercise with some gusto! Make sure you’re warmed up and that your form is correct—but then let it rip. The idea is to develop explosive power. You can also work on your endurance by doing increased repetitions. The squat press helps you build the type of power and endurance you’ll need when you attack your competitors on a climb. As you stand to surge on your bike, you need to put a small gap between you and your rivals. This prevents your competition from getting a free tow up the road. Once you have a gap, dig deep and try to free yourself from the frantic chase behind.
Variation
Behind-the-Head Squat Press
Perform the same exercise as described, but start with the barbell behind your head. After standing from the squat position, press the bar over your head.
Floor Wiper
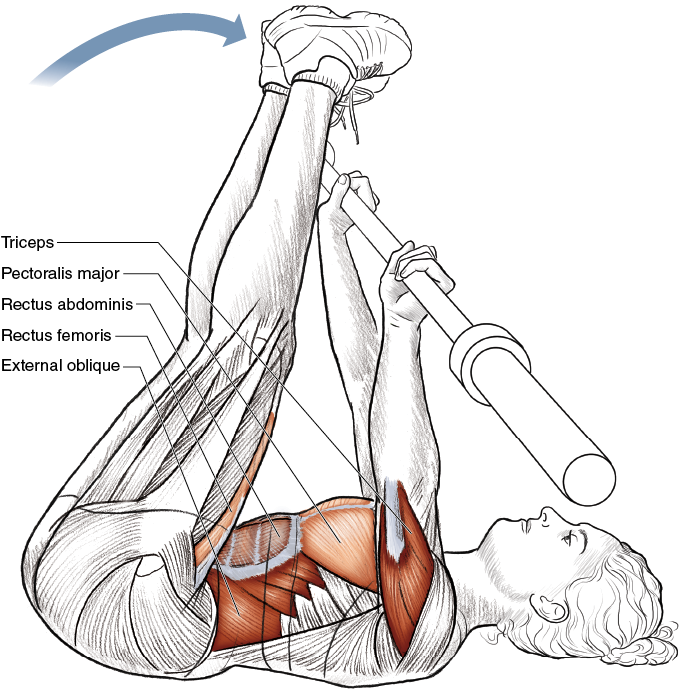
Execution
1. Lie flat on your back on the floor. Hold a barbell with your arms extended above your chest.
2. Keeping the barbell stationary, perform a straight leg lift, bringing both feet toward one end of the barbell.
3. Lower your feet back to the floor.
4. Repeat the exercise, bringing your feet to the opposite side. (The barbell remains stationary for the entire set.)
Muscles Involved
Primary: Rectus abdominis, external oblique, internal oblique, triceps
Secondary: Iliopsoas, pectineus, sartorius, rectus femoris, pectoralis major
Cycling Focus
The floor wiper exercise conditions all your fundamental core muscles. These are the muscles that provide a solid base for your efforts on the bike. As mentioned, to apply proper power to the cranks, your lower extremities rely on the support of the rest of your body. Be mentally prepared for this exercise—it’s tough! Floor wipers simultaneously limit your ability to breathe and condition both your large and small core muscles. You’ll not only be improving your power, but also your ability to ventilate during extremely hard efforts such as a sprint or a steep climb.
Variation
Dumbbell floor wiper: Instead of using a barbell, you can place a dumbbell in each hand. Keep your arms stationary and your elbows extended. Perform the leg lift from side to side as described.
Kettlebell Swing
Finish position.


Safety Tip
Many athletes have a tendency to lean forward during the kettlebell swing. You should focus on keeping your back straight. As you swing the kettlebell upward, try to keep your torso as stable and vertical as possible.
Execution
1. In a squat position with your feet shoulder-width apart, grasp a kettlebell resting on the floor between your legs.
2. Using primarily your lower body, surge to an erect stance while swinging the kettlebell out in front of you.
3. Keeping your arms straight, bring the kettlebell to just above shoulder height.
4. Let the kettlebell swing back down between your legs, ending in the starting position.
Muscles Involved
Primary: Quadriceps, gluteus maximus, gluteus medius, gluteus minimus, erector spinae, deltoid, rectus abdominis
Secondary: Hip adductors, hamstrings, trapezius, pectoralis major, forearms (grip strength)
Cycling Focus
When you sprint for the finish at the end of a race, your body screams in pain. You give your maximal effort to propel your bike forward as fast as possible. The kettlebell swing, like many of the other exercises in this chapter, helps you train for your maximal power output. The key moments in cycling—sprinting, attacking on a climb, and establishing a breakaway—all require explosive power, and this exercise prepares you for these tremendous efforts. While in the gym, remember to surge from the lower extremities. This force will help bring the kettlebell upward toward your shoulders.

Variation
Single-Arm Kettlebell Swing
Perform the same exercise while holding the kettlebell with only one hand. You should use a lighter kettlebell for this variation. The asymmetry of the exercise will enhance the training of all your core stabilizers.
