Preparation and planning arm you with the tools you need to make it through a crisis alive and well, not to mention that they strengthen your psychological state. And among pre-trip tasks, none is as crucial as putting together your personal survival kit.
Most people take the time before heading into the backcountry to obtain the necessary basic equipment such as proper clothing, a tent, and a stove. But you may not realize that your basic survival kit could be the single most important thing you carry with you on any expedition. At various times, I’ve ventured into the world’s most remote areas with different sorts of survival gear: fully stocked survival kits, basic “whatever I can carry” survival kits, and sometimes even no kit at all. Survival items have dangled from my belt or hung around my neck. Sometimes they’ve been in fanny packs I barely noticed and other times in fanny packs so heavy I would have preferred not to carry them at all (but did anyway).
How you set up your kit is limited only by your imagination. Why not fill the hollow end of your fishing rod with a lighter and some kind of ignitable tinder such as cotton balls? Or if you’re a mountain biker, pop off your handlebar grips and fill your handlebars with a few items, such as fire starter, some cord or rope, or a multi-tool. Once I even had a kit that was drilled into the stock of a rifle.
Take Responsibility for Your Own Survival
WHILE TEACHING SURVIVAL COURSES, early in the week I would announce to my students that we were going for a wilderness hike the next morning. When they asked me what they should take along, I would casually tell them, “Whatever you think you need for a hike in the bush.”
The next day, midway through the hike, I would stop and ask everyone to show me what they had brought. There was always one person armed to the teeth with survival gear. A few more would be carrying a few basic survival items, and others would be carrying almost nothing.
I was often struck by how many people would go out not expecting the unexpected. Here they were, hiking into the bush, and most were carrying very little to help them if disaster struck. When you’re in the wilderness, you never know when or where or how an emergency may occur. Disaster often strikes in mysterious ways. And you may be separated from your travel companions at any time. Just as you shouldn’t rely completely on your guide, you shouldn’t rely completely on your partner or partners.
This kind of wrong-thinking was never more obvious than when couples took my course. They were usually proud to show off their one very well-equipped pack, invariably carried by the husband. In those instances, I would pull the wife aside and say, “So, now…what do you have?” Only then would it occur to her that she had nothing that would help her in a survival situation. She was relying on her husband, not on herself.
Creating a survival kit is a personal undertaking and one that should never be left to someone else, no matter how close you are to them. To be left alone without a few basic survival items is to court death.
Make It Yourself
WHEN IT COMES TO SURVIVAL KITS, most of us are faced with two options: buy a prefab kit at our local outdoors store, or make it ourselves. To my mind, there is no question which route to go: Make your own.
There are a few reasons I feel this way. First, the primary motivation for the company that makes the prefab kit is profit, not necessarily your survival. They’re going to try to cut costs wherever possible. This means the kit may not contain the best of everything. Something in there is going to be cheap or unnecessary, and take up precious room and weight. It might be the flimsy plastic whistle that cracks the first time you drop it, or matches that snap when you try to strike them. With a prefab kit, something is bound to let you down when you need it most.
Second, most people who buy a prefab kit never become acquainted with the proper use of its contents. Some never even open the kit before setting off on their adventure. Why? Because they trust it. They just throw it into their day-pack and forget about it, feeling sure they have done the right thing just by bringing it. I’ve seen people walk around with a flint striker on their belt or a compass in their pocket that they’ve never tried and haven’t a clue how to use.
Third, I have yet to see a prefab kit that contains all the necessities from top to bottom.
Your personal survival kit should be based on the suggestions I make in this chapter, but even more important, it should be your own creation—one that takes into account the region you’ll be traveling in, the season, the weather, and your anticipated activities. If you are leading others, the kit’s contents should also reflect the fact that you may have to help others in the group survive.
My recommendation is that you purchase your kit items individually so that you know what you’ve bought will stand up to the rigors of a survival situation. The mere fact that you take the time to select the items increases the chances that you’re going to check them out, make sure they work, and get to know how to use them.
Your Personal Survival Kit
A personal survival kit isn’t a separate pack that you carry in addition to the everyday gear on a wilderness expedition. In fact, your personal survival kit is not really a “kit” at all but the most important survival gear you should carry with you at all times—on your belt, in your pockets, or around your neck. Why? The answer is simple: You may leave a fanny pack behind on a portage or when you stop for a snack. It happens all the time. But you’ll never leave a pocket behind.
Your personal survival kit starts with a sturdy belt knife, which has a multitude of uses. Consider it a survival kit unto itself. The biggest benefit of a belt knife is its strength, which allows it to be used to pry and twist objects you might not otherwise be able to manipulate. Used properly, a belt knife will split wood. It will easily whittle and shape wood components for traps, snares, and shelters.
Don’t underestimate the importance of keeping your knife sharp. If you’re not overloaded in terms of weight, carry a sharpening stone in your complete survival kit (which we discuss later in this chapter). In a pinch, however, you can sharpen your belt knife on just about any smooth stone you find in the bush. Sandstone is quite effective, and quartz and granite also work well.
Here is a list of the personal survival kit items that you should carry at all times, whether you stash them in your pockets or wear them clipped to your belt or around your neck. Each member of a group should have his or her own
- bandana
- compass
- flashlight (small, LED)
- garbage bags (2, preferably orange, large)
- lighter (my preference is a butane lighter that works like a little blowtorch)
- matches (strike-anywhere type) in a waterproof metal case (with a striker, just in case) magnesium flint striker (hey, I like fires!)
- metal cup (folding; for boiling water)
- multi-tool or Swiss Army–style knife (make sure it has a small saw blade)
- painkillers (a few)
- parachute cord or similar rope (about 25 feet [7.5 m] of 1/4-inch [0.6-cm] cord)
- protein bar (e.g., PowerBar)
- sharp belt knife
- solar, or “space,” blanket (small)
- whistle
- Ziploc bag (medium or large)
This may sound like a weighty list, but remember that you can also carry a couple of these items, such as the whistle and magnesium flint striker, on a piece of rope or parachute cord around your neck. Remember, too, that when everything is spread out on your belt or among your various pockets (obviously, wearing clothes with lots of pockets is helpful) you’ll hardly notice them at all.
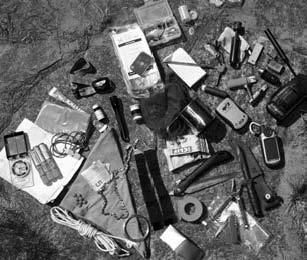
Your Complete Survival Kit
Now that you’ve ensured your survival by strategically stowing a few basic—yet supremely helpful—items on yourself, it’s time to build your complete survival kit. Just because you’re carrying the same thing on your body (a lighter in your pocket, for example) doesn’t mean you shouldn’t put one in your complete survival kit. The items in your pockets are your fail-safes; always double up on these items between your personal and complete survival kits. When building your complete survival kit, keep in mind that the heavier and bulkier you make it, the more likely it’s going to be a hindrance rather than a benefit. And as soon as your kit becomes a burden, you increase the chances that you won’t take some of the items with you in the first place or that you’ll leave them behind during a trip. If it’s a screaming hot day and I’m climbing a mountain, do I want to be carrying around 20 pounds (9 kg) of extra gear? You have to strike the balance: the kit needs to be large enough to carry certain essential items, but small enough that it doesn’t become a nuisance. Leave the gear hording to the gear geeks; your job is not to impress your partners but to enjoy your trip or adventure…and to survive if you need to.
You can choose any sort of carrying case into which your survival gear will fit, but you want the container to be large enough to hold items of various sizes, easy to stow and carry, durable, and, if possible, waterproof. I like using a coffee can with a lid as my survival kit because it holds almost all the items I need and can also be used to boil liquid or cook food. Assuming the lid fits snugly, I can even use it to carry water or hot coals.
What follows is a list of the items essential to any kit (some can be used for more than one purpose). You can gather all of them quickly by consulting the Complete Survival Kit Checklist before setting out on your adventure. Remember that you will have to modify this list depending on your particular destination, season, weather, and activity:
Bandana: This multi-purpose garment will protect your head from the sun, but it can also be used as an emergency bandage or, when dipped in water, as a cool compress.
Belt knife (with sharpening stone): If you happen to lose your knife, having a backup in your survival kit could be a big help.
Candle: A candle can help you get a fire going if you light it and allow the wax to drip into the tinder.
Cup (metal, collapsible): A cup can be used for drinking or to boil water.
Dried food: Most survival kits contain everything under the sun except extra food. I realize dried food adds to the weight and bulkiness of your kit, but nothing will give you a physical and psychological boost like knowing that you have an energy bar or two on hand. Fat is important. Peanuts are an excellent and compact source of fat and protein.
Duct tape: The wonders of ultra-durable and super-sticky duct tape have long been lauded in the outdoor community, with good reason: it can repair just about any kind of outdoor equipment. And it can also be useful in bandaging wounds and other minor injuries. Just make sure you use it in conjunction with a piece of cloth; don’t apply it directly to a wound.
Recent years have seen the introduction of colored duct tape. And while you may have a problem with patching your gear with pink or yellow, keep in mind that it’ll stand out more than battleship gray. Duct tape is also excellent as a fire starter; it holds the flame the way a candle would.
Fire-starting devices: Fire is one of the most beneficial things you can have with you, no matter where you find yourself. It doesn’t matter if you’re in the desert or the jungle, for even in the world’s hottest places, fire makes all the difference to survival. Fire-starting devices should be a priority in your kit.
I am always asked what my favorite fire-starting method is. Is it flint and steel? Magnesium flint striker? Fire and piston? What I can tell you is that making fire without a fire-starting device is extremely difficult, so make sure you give yourself options. I love knowing that I have several options with me and that I’m prepared for almost any situation.
STROUD’S TIP
Some people think it’s a good idea to waterproof their matches by dipping them in wax. Leave that to the gear geeks. Instead, buy solid strike-anywhere matches and invest in a good waterproof container.
My preference is a butane lighter, the kind that shoots a flame like a propane torch. These work upside down and in the wind, two great advantages. A lighter will eventually run out of fuel, but only after a few hundred fires. Furthermore, in a survival emergency, the first fire is the most important.
Always carry a high-quality lighter, because depending on where you are, it may well be a challenge to keep your fire going. You don’t want to add the stress of fire-starting to your list of worries.
In addition to a lighter, I like to carry a magnesium flint striker (which in a pinch can be used as a signaling device), a fire piston (if weight is not an issue), and some solid strike-anywhere matches with a striker (just to be sure) in a waterproof container such as a film canister. Note that plastic containers can be unsafe to keep matches in because, though a remote possibility, static electricity can ignite the matches. A metal container is best.
Just make sure—as with everything in your survival kit—that you know how to use these fire starters. Take the time to practice making a fire with them before disaster strikes. I recommend that you carry at least one of these fire starters on you, as part of your personal survival kit (for example, in a pocket), and a couple more in your complete survival kit. See “Fire,” Chapter 6, for more on this topic.
Fire-starting tinder: There are a few different types of commercially available tinder, including pellets, pastes, and shavings. I like having three or four wax-and-cotton fuel wads. A small piece of this added to the tinder you collect in the bush will flame up from a simple spark and keep going like a candle flame until your fire is roaring. You should also add bits of tinder, such as birch bark or dried grass, to your survival kit as you come across them during your travels.

The wax-and-cotton cube, one of the best commercially available tinders you can buy, holds a flame for a long time.
First-aid kit:
- antidiarrheal tablets and painkillers: If you get diarrhea on vacation in Mexico, you’re disappointed. Get it in the jungles of Borneo and you could be dead. Pain, on the other hand, won’t necessarily kill you, but painkillers such as ibuprofen or acetaminophen can increase your chances of survival if you have to make your way down a mountain with a small injury or even a pounding headache. For a really nasty injury such as a broken leg, powerful painkillers such as Demerol (meperidine) can save an injured person from slipping into fatal shock. Pack all medicines in waterproof, airtight containers.
- antihistamines: They are handy for allergies, as well as for insect bites and stings.
- bandages and antiseptic ointment: An “ouch” kit can help prevent infection.
- butterfly sutures: These will hold together deeper and more serious wounds.
- prescription medicine: Always bring extra.
- surgical blades: Light and small, these are for more than just dressing wounds.
- They can be used for whittling, cleaning fish, or skinning and gutting game.
- triangle bandages: Use these as wound dressings or as slings.
Fishing lures (3), hooks, sinkers, a leader, and fishing line: As a rule, you’re better off keeping heavier line in your survival kit. The weight and volume difference between 10-pound and 30-pound test is nominal, but the difference in strength is significant. Most people avoid lures, but they don’t add much weight to your kit and can significantly improve your chances of catching dinner. Throw in a leader as well, just in case you want to try for “the big one.”
Flares: You want to be found, right? The more compact the flare, the better. They can also be used to start fires.
Flashlight (small, LED): These little lights can be very bright, which makes them good not only for locating things at night, but for signaling too. You might also consider packing a couple of extra batteries. When you buy a flashlight, make sure you get one with a white, yellow, green, or blue light (red LEDs are not very bright).
GPS (Global Positioning System), in addition to a map and compass: The GPS has revolutionized wilderness travel. The beauty of a GPS is that it provides you with precise, real-time information regarding your location, at all times and in all weather conditions. As long as it has enough battery power, a GPS will determine your latitude, longitude, and altitude.
Garbage bags (2, orange, large): Garbage bags can make the difference between life and death because of the multitude of purposes for which they are useful. They fold down to practically nothing, don’t weigh much, and fit easily into a pocket. But make sure you get the 45-gallon (170-L) orange ones (which can be readily seen), not green bags (which can’t).
You can turn a garbage bag into a raincoat, or a makeshift jacket to protect you from cold and wind, by tearing or cutting a hole in the top for your head and holes in the sides for your arms. You can signal with it because it’s bright and highly visible. Your wondrous, orange plastic sheet can also act as a rain-catch if you need water or be used in the construction of vegetation and solar stills (although the best type of bag for a vegetation still is a clear plastic one. See “Water,” Chapter 5).
My favorite use for garbage bags is as waterproofing for a shelter. No matter how adept you are, it is exceptionally difficult to build from scratch a shelter that is completely waterproof. If you have a garbage bag on hand, just cut it open so that it forms a single sheet (the 45-gallon ones will be 4 feet x 6 feet [1.2 m x 1.8 m]) and you have a ready-made roof.
Hand lens (small): A small hand lens such as a Fresnel lens is essentially a magnifying glass that can be used to start fires or inspect small injuries.
Map and compass: Topographical maps are your best source of detailed information in the backcountry; carry them whenever possible. If you are carrying one, you owe it to yourself also to carry a high-quality compass that you know how to use. There are many excellent books and college courses on compass use and map reading. See “Survival Travel and Navigation,” Chapter 9.
Marker or “surveyor’s” tape: Bright red or orange tape can be hung from your shelter to help attract rescue or be used to mark a trail.
Money: A $20 or $50 bill won’t help you procure water in the wilderness, but it sure comes in handy when you eventually make your way out to a highway. Once you scramble out of the bush, the money in your kit will allow you to buy something to eat and drink, and take care of any immediate needs. You may also want to put a credit card in your kit.
Multi-tool: When I set out for a week of survival, I believe there’s nothing more crucial than a multi-tool. A twist on the classic Swiss Army–style knife, the multi-tool takes things to the next level with the addition of an integrated set of pliers, which has many uses in the wilderness. I often use the pliers on my multi-tool to take a pot of boiling water off a fire.
Make sure that the multi-tool you choose includes a saw blade. You won’t use it much for felling trees, but a saw blade is excellent for making traps and snares. Scissors also come in handy in a survival situation, so make sure your multi-tool has a pair. And remember, quality counts! Don’t buy a cheap model or you will regret it.
Needle and thread: It’s a good idea to carry a needle and thread, yet in all the years I’ve been participating in survival-related activities, I think I’ve used these only once, to mend a torn canoe pack. Bring a needle with a very large eye so that it can be threaded with thick materials, such as sinew and coarse thread. Perhaps the best use for the needle is in first aid, to remove splinters and slivers.
STROUD’S TIP
You can magnetize a needle by rubbing it in one direction on a magnetic item, such as the speaker of a radio. When you float the magnetized needle in water, on a leaf or on a piece of paper, the needle will point north/south. Once you determine which end is north, color that end of the needle with a marker.
PLB (Personal Locator Beacon) or EPIRB (Emergency Position-Indicating Radio Beacon): While these units do not contact your family at the same time as they contact search and rescue organizations (the way SPOT does), they are excellent for notifying emergency personnel or the military, and have saved many lives.
Parachute cord or similar rope (about 50 feet [15 m] of 1/4-inch [0.5 cm] cord): As romantic as it may sound to make rope out of bark and roots, the fact is that the process is slow, tedious, and often difficult. On the other hand, having a good spool of parachute cord can make a tremendous difference in a survival situation. You can use it to make shelters, fire bows, signals, snares or traps, and for countless other purposes.
I’ve singled out parachute cord here because it is legendary for its strength. Constructed of an outer sheath surrounding seven inner strands, true parachute cord is one of the strongest and lightest ropes you can find, and it’s rated at 550-pound test.
Parachute cord can be bulky in large quantities, however, so it helps to come up with innovative ways to carry it. Some travelers wrap it around the handles of their belt knives; others use it in lieu of shoelaces, as every little bit helps when it comes to lightening your load.
Pencil and notebook: Use these to write your personal survival log, in which you take note of efforts and discoveries you’ve made. It will help boost your morale, act as a reference guide, and support your memory should it begin to fail. Perhaps its most important use is in leaving a note for potential rescuers if you move on, to let them know where you have gone.
Safety pins: These are helpful when making repairs to clothing and other gear. Safety pins can also be used as fish hooks.
Saw (folding): Here’s an item I really love, although admittedly a folding saw is bulkier and heavier than most items you’ll see in a typical survival kit. Nevertheless, it’s worth its weight in gold, because it completely transforms how you can build shelters or keep a fire going, both of which are crucial (physically and psychologically) in a survival ordeal.
It used to be that you could get only poor-quality folding saws, but they’ve come a long way in recent years in terms of quality and durability. My favorites are the one-piece units with a blade that folds into the handle. When folded they’re about 10 inches (25 cm) long.
Signal mirror: When choosing a signal mirror, you have a couple of options. Personally, I prefer hand mirrors that are designed to act as signaling devices. You can distinguish these by the small hole in the middle, which is used for sighting passing aircraft.
Like any item in your survival kit, your signal mirror can also serve other functions, such as grooming or first aid. If you get something in your eye (which happens more often than you’d think), a little mirror is invaluable. Something as seemingly innocuous as a pine needle in your eye can cause intense pain if you can’t get it out. A good signal mirror can also serve as a fire starter by reflecting the sun’s rays.
Snare wire: Like parachute cord, snare wire has a multitude of uses, the most important of which is catching your potential dinner! Snare wire meant for rabbits is the most appropriate.
Solar or “space” blanket (small): A solar blanket reflects your own body heat back to you, which is effective if you need to get warm in a hurry. Granted, it doesn’t feel warm and cozy, but it works better than anything else you can get for the weight.
The potential danger with solar blankets is that they do not breathe or permit perspiration to escape, so they have the potential to leave you damper and colder than when you started. Don’t roll up in one or use it as an under-layer inside a jacket; simply wrap it around you.
Solar blankets are terrific reflectors and can be used for signaling if necessary, as a makeshift tarp to waterproof your shelter, or as a rain-catch. While surviving in the Canadian Rocky Mountains outside of Revelstoke, British Columbia, I used one as a roof, and it made for the warmest shelter I can remember. Be careful with solar blankets around fire, however. They can melt within seconds when touched by flames.
SPOT satellite messenger: The SPOT enables you to send e-mails by satellite, and includes your latitude and longitude coordinates. It will even track you and send your coordinates to 10 contacts by e-mail or text message every 10 minutes. The SPOT goes beyond a GPS to the next level of safety. A GPS will tell you where you are. The SPOT will tell your rescuers where you are.
Water purification tablets: Each iodine-based water purification tablet will purify 1 to 2 quarts (1 to 2 L) of water, depending on the level of contamination.
Iodine-based tablets can also be used in first aid. Simply crush one tablet and add about a teaspoon of water. This will yield a strong topical solution of iodine, which can be used to disinfect wounds.
Water-purifying straw: A relatively new innovation, the water-purifying straw uses a combination of iodine and resin to purify water as you drink. Each straw is good for 20 to 25 gallons (75 to 95 L) of water, depending on how dirty the water is. Some of these nifty little straws claim to reduce bacteria and viruses by as much as 96 percent!
Whistle: Get the sturdiest, loudest, brightest, and most obnoxious one you can find. My favorites are manufactured by Fox 40.
Ziploc bags (large): In a pinch, these bags have many uses, including storing and carrying water. Ziplocs can also be used for keeping sensitive items, such as fire-starting tinder, dry. You can even fill them with snow and put them under your coat to melt the snow into a drink of water.
Your complete survival kit items should help you make it through almost any situation, provided you know how to use them.
A well-planned, complete survival kit will help you make it through the toughest situations.
Tailor Your Kit to Your Destination
THINK OF YOUR COMPLETE SURVIVAL KIT as something that should evolve and change according to your needs, rather than as something that you assemble once and toss into your pack each time you travel. The complete survival kit I’ve listed above should help you through most emergencies, but survival is situation-specific, and certain tools that may help you in the Arctic or the boreal forest will do you little good in the desert or jungle.
And as you’ll soon see, different forces are at work in different areas. Ignore them at your peril. If I’m going tripping in the boreal forest of northern Ontario in the middle of May, the first thing I know I need is bug netting, which is specific to that region and time of year. Do I need to pack bug netting if I’m skiing across the Arctic tundra in the middle of November? Nope. It’s important that you take these factors into consideration before every trip.
Arid Regions, Deserts, and Canyons
Acquiring water is paramount when traveling in these areas, so your survival kit should address this critical fact. Make sure you carry a clear garbage bag in your kit in case you need to construct a solar still or vegetation still. A long, thin drinking tube is useful too. You might also consider carrying a small trowel or collapsible shovel to make digging for water easier.
Boreal and Other Temperate Forests
Blackflies and mosquitoes were reputed to have driven many of the early Canadian explorers insane. So I highly recommend bug netting for any region where you expect to be dealing with insects. Why netting as opposed to bug spray? Several reasons. Bug spray is bulky and heavy, whereas netting is light and can be folded to take up very little space. Also, while you will eventually run out of bug spray, your netting will last indefinitely, provided it doesn’t tear (and even then, you can repair it).
You may also consider taking along a bug shirt and bug pants, a variety of which are now on the market.
STROUD’S TIP
LES’S TOP FIVE SURVIVAL KIT ITEMS
Be sure you have the equipment you need to do the following:
- start a fire
- boil water (requires some sort of container)
- create a shelter
- hunt or fish
- split wood
The Arctic and Polar Regions
Most of the drinking water you’ll find in the world’s polar regions comes from snow and ice, which is notoriously devoid of vital mineral content. This deficiency won’t hurt you over short periods of time, but over the course of a few weeks it can begin to seriously affect you. You can offset this problem by carrying mineral tablets, which can be either chewed, or dissolved in drinking water.
In summer, bug netting is a vital addition to your survival kit. And in the spring, sunglasses will protect your eyes from snowblindness, which can result when the sun reflects off the snow all day and all night.
On the Sea or Open Water
As in arid regions, the most important aspect of survival on open water is procuring drinking water. For this reason, it is essential that you carry a desalination or distillation device. Clearly these are too bulky to carry in a standard survival kit, but you will need one or the other nonetheless.
Jungles
One of the most critical—yet frequently overlooked—items you need in the jungle is foot fungus medication. The constant rain and humidity of the jungle environment is murder on the feet, and foot fungus is inevitable. Let it become too severe and it can impede your ability to walk, which could threaten your life. And always carry more than one pair of socks.
Shelter is crucial in the jungle, so take an extra garbage bag or two. Insects can be a huge problem in certain areas and at certain times of year, so take bug netting too.
Coastal Regions
You’ll greatly increase your chances of eating well in coastal regions if you add a small, folded fishnet to your survival kit. This will also come in handy if you expect to be near a river or lake.
Your Vehicle Survival Kit
RANKING HIGH IN THE MOST-IGNORED-BUT-MOST-NEEDED CATEGORY of survival equipment is a vehicle survival kit. Every driver should have one, but it is even more important if you live in (or travel through) areas of remote wilderness, or places prone to extreme weather, such as snowstorms and thunderstorms, where the risk of finding yourself in a survival situation is greater. Regardless of how well stocked your vehicle survival kit may be, make sure you bring additional food and drink with you on any extended journey.
As a rule, if you get into trouble, you should stay with your vehicle until help arrives, especially now that you’ll have a well-equipped vehicle survival kit. And if you’ve got gas, then you have a source of fuel for fire-starting. Your primary concern, however, should be to get your vehicle back on the road and let it carry you to safety.
If you decide to leave your vehicle, do so only when the weather permits and if you feel confident in your ability to travel by land. And don’t leave your car or truck without cutting, ripping, and tearing anything and everything out of it that you think may help you in your quest to survive. One day you will be able to buy a new vehicle; buying a new life is not an option.
I once had the privilege of re-creating for television the survival scenario faced by James and Jennifer Stolpa, the couple who became lost with their car (and baby) in a mountain blizzard. In my re-enactment, I made sure I used everything the vehicle offered before I bade it farewell, a strategy the Stolpas failed to employ, even though they had no winter gear with them and only casual shoes. For instance, I cut the foam from inside the seats of the truck, covered it with the vehicle’s seat covers, and secured it to my feet with seat-belt material. The result was a set of warm makeshift boots that allowed me to travel on top of the snow, rather than through it, as if I were wearing snowshoes. It may seem like overkill, but it saved my feet from frostbite. The Stolpas were not so lucky.
Your vehicle survival kit should have an appropriate case. If budget is a consideration, any backpack or duffel bag will suffice. Ideally, you should get something that is both sturdy and waterproof. Always keep the kit stowed in your vehicle. See the complete Vehicle Survival Kit Checklist.
Your vehicle survival kit should include all of the items in the complete survival kit plus the following:
Cell phone: The problem with a cell phone is that if you’re stuck in a remote area, chances are you won’t have cell coverage. You can, however, carry speaker wire. Secure the wire to the highest point you can reach (or climb to) and attach it to your phone’s antenna. You might not get enough coverage to make a call, but because text messaging operates on a weaker signal, the wire may bring help.
Clothing (warm) and blankets: Pack an extra set of weather-appropriate clothes, including socks, gloves, and hats for every passenger, as well as blankets, sleeping bags, sleeping pads, and a solar or “space” blanket.
Cook set: Cook sets (also known as “mess kits”) are compact sets of pots and/or pans. They allow you to boil up a hot brew, or cook food.
Cook stove and fuel: This is a luxurious extra, to be sure, but one that will greatly increase your chances of survival if you’re stuck for any length of time.
Drinking water: Make sure there is enough room in the bottle to allow for expansion should it freeze.
Flares: These are great for signaling but can also be used, if necessary, to start a fire. You will likely have just a few of these, so use them only when needed.
Flashlight (small, LED) with extra batteries: Also available are flashlights you can crank by hand, which never need batteries. Some of these even come with sirens and cell-phone chargers. Make sure the one you buy is compatible with your phone.
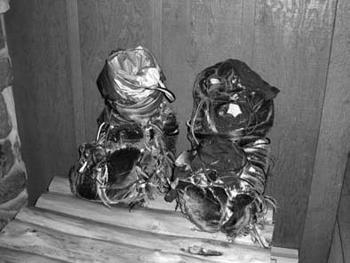
They’re not pretty, but boots such as these—which I made from the foam of a truck’s seats and some seat-belt webbing—might just save your feet from frostbite.
Food, including MREs: MREs—or Meals Ready to Eat—are available at most camping stores and Army & Navy supply shops. This stuff lasts forever and often comes with its own fuel source for heating. Energy bars are also a good option; look for ones that pack the most calories. Many people ignore the importance of salt in their diets. Carry some with your extra food or take along powdered energy drinks high in sodium to replenish electrolytes.
Road maps (local): Make sure you carry maps of regions in which you travel frequently, and before traveling to a new area, add a map of the region to your kit.
Snow shovel (collapsible or folding) and tire chains: You likely won’t need these if you live in Florida, but freak snowstorms have killed people in places where snow hadn’t been seen in years. If your vehicle gets stuck in the snow, you can use your hands to dig, but a shovel will do the job faster and better. Tire chains can help you when road conditions are slippery.
Tarp: Throw in an orange one, for visibility, sized roughly 8 feet by 9 feet (2.5 m x 2.7 m).
Toilet paper: It’s an often overlooked item, but toilet paper can sure come in handy—not just for the obvious purpose. It can be stuffed into your clothes to increase their insulating power, and it can be used as tinder for fires.
Tools: Useful tools include a screwdriver, pliers, a wrench, a hatchet or axe, and jumper cables.