Demonstration
Fierce
Creative Destruction
If you love the way wind, weather and time add depth to everyday objects, then you’ll love using clayboard and mark-making tools to create a moody setting for one of your characters. Plus, let’s face it, some of us take great pleasure in scratching, denting, distressing and generally just coloring outside the lines. Let this project feed your inner “fierce” child. This is your chance to practice creative destruction!

Materials used to create Fierce. Be sure to wear latex gloves to protect your hands from the steel wool.
WHAT YOU NEED
SURFACE
clayboard, 5" × 7" (13cm ×18cm)
ACRYLIC PAINT
Hansa Yellow Light, Napthol Red, Neutral Gray, Payne’s Gray, Phthalo Blue, Phthalo Green, Raw Sienna, Raw Umber, Titanium White
BRUSHES
nos. 00, 01 rounds
1" (25mm) flat
OTHER SUPPLIES
artist-grade oil-free steel wool, coarse and fine weights
latex gloves
needle-point clay tool
paint chips or color book
palette knife
palette paper
paper towels
pencil
reference materials: peacock feather
scissors
sketchbook
spray bottle
stencil
tape
water
wax-free transfer paper (black)

STEP 1: Paint the Background
Paint a 5" × 7" (13cm × 18cm) clayboard with a coat of Neutral Gray using a 1" (25mm) flat. Set it aside to dry.

STEP 2: Sketch the Character
On a piece of clean drawing paper, trace around the clayboard to create a same-sized border for your drawing. Use either the same character you created in chapter 2 or create someone new. For Fierce, I decided to reinvent the same character I created in the "drab to fab" makeover sketches.

STEP 3: Add Details to the Sketch
Add details to the character’s clothing to imply her personality. I chose a peacock feather theme because she seemed strong and flamboyant.

STEP 4: Transfer the Sketch to the Background
Once the background is completely dry, transfer your sketch to the painting. Cut a sheet of wax-free transfer paper slightly larger than the drawing. Tape the transfer paper mark-making side down on the clayboard, then position the drawing over it. Press firmly with a pencil over the lines of the drawing.

STEP 5: Check the Transfer
When you lift the transfer paper, you’ll see a nice graphite outline of your character. Draw a line under her feet so she is standing on the ground.

STEP 6: Sketch the Landscape
Next add some trees to the landscape with a pencil. I used my Love Story stencil from StencilGirl as a guide, but you can also sketch them in by hand.
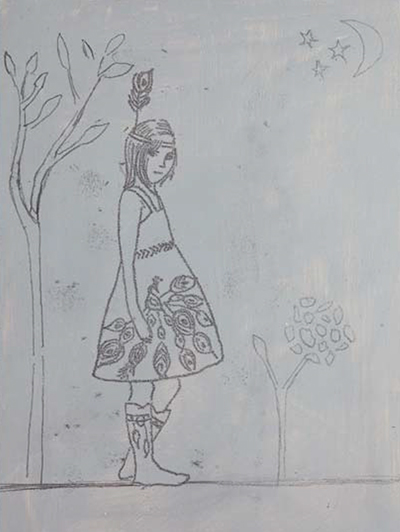
STEP 7: Add More Details
Add a flower, moon and stars using the Love Story stencil (or draw them in by hand).

STEP 8: Fill Out the Landscape
Draw additional flowers and grasses by hand to fill out the landscape.

STEP 9: Begin Etching Lines
Lightly mist the drawing with water. With a needle-point clay tool, etch into the lines of the drawing on the painted surface. As you etch into the gray background, you will see white lines where the scratching reveals the white underbase of the clayboard. You will end up with what looks like a white-on-gray engraving of your character on the support.

STEP 10: Apply Paint
Using a 1" (25mm) flat and Payne’s Gray, plus a touch of water, completely cover the surface of the sgraffitoed painting. Do not let it dry!

STEP 11: Wipe Away the Paint
Before the dark wash dries, quickly wipe away the Payne’s Gray using a slightly damp paper towel. You will see a black outline of the entire drawing in the painted surface.

STEP 12: Scratch the Surface
Once the surface is dry, don your latex gloves, grab your coarse steel wool and make interesting scratches on your painting. As these are white, they may look like shooting stars or other surprise story elements! (Note: latex gloves are recommended for safety when working with steel wool.)

STEP 13: Choose Your Palette
Choose a palette for your painting using either paint chips or a color book. Tape these chips next to your original drawing and make notes on where the colors should go. For this piece, use an array of turquoises, greens, neutrals and a bit of orange.
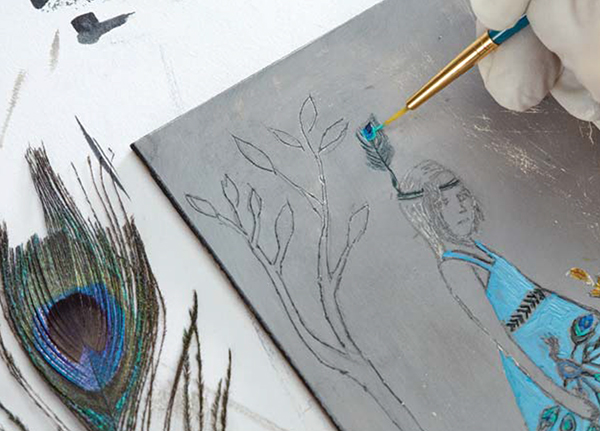
STEP 14: Add Color to the Painting
Using no. 00 and no. 01 rounds, add color to the painting. Use Phthalo Blue mixed with Titanium White for the dress and feather, with accents of Phthalo Green mixed with Hansa Yellow Light. Using a real peacock feather as reference helps to match the colors.

STEP 15: Color the Background
Fill in the grasses with Raw Sienna and paint the tree with Raw Umber. Mute the main color palette with white for the remaining flowers. Color the little bird a bright Napthol Red to balance the composition.

STEP 16: Paint the Hair and Face
Using a no. 00 round, fill in the hair and facial features with Payne’s Gray.

STEP 17: Paint the Ground
Using a 1" (25mm) flat, fill in the ground with Payne’s Gray mixed with a touch of Phthalo Blue. Keep this mix slightly watery.

STEP 18: Etch the Grass
To add more depth to the painting, grab the needle-point clay tool and etch a few white lines into the dark grass.

STEP 19: Texturize the Ground
Dab and wipe the Payne’s Gray ground to create interesting marks to add more depth.

STEP 20: Create a Vignette
As a final touch, finish the sides with watery Payne’s Gray, letting it seep into the painting for a vignette effect.

Tell the Story
Who is the main character? Does she live in the woods or is she playing dress up? Is she happy? Why is she so “fierce”? What kind of feeling does the gritty background evoke for you? How could you change the story by adding more characters?

WONDER GIRL
Encaustic on wood panel
8" × 8" (20cm × 20cm)
I worked with encaustic—a process of painting with melted beeswax—to create similar sgraffito and mishima effects in this painting. I began by applying clear beeswax to a wood support. Then I scratched my drawing into the surface before filling the lines in with Payne’s Gray oil paint. With its malleable and multi-layered surface, encaustic has great potential for adding emotional depth to your stories.