Chapter 13. Sharing Your Sketches with Others
As fantastic as it is to bring sketching into your product direction, management, and design work, the last thing you want is to be stuck doing lots of sketching while everyone else in the team has finished up and gone for cocktails to celebrate.
Let’s look at how we can be efficient in the way we sketch at work. This chapter is packed with tips for to do the following:
-
Capturing your sketches professionally
-
Storing and sharing your sketches
-
Reusing and getting the most out of your sketches
There’s Magic in the Making, Not Just What’s Made
Sketching in product management and design, like a lot of things, is best done with others rather than just alone.
It’s well established that involving others in a solution is the best way to get their endorsement and approval. But I’m not talking about the well-worn phrases of the workplace, like “collaboration” and “stakeholder buy-in.” I’m talking about involving all types of people on whom your product is going to have an impact. Your customers. The sales staff. The call center staff.
And I’m not just talking meetings and pitching sessions. I’m talking about involving their hands as well as their ears, minds, and mouths. It’s one thing to show a room full of stakeholders your lovely storyboards, but it’s quite another to get them sketching storyboards, too.
So, when it comes to sharing your sketches, think about how you might share the experience of sketching with others, as well as sharing your actual sketches. There’s magic in the making, not just what’s made.
Capturing Your Sketches
Whether you’re sketching alone or with others, you’ll want to capture what you’ve sketched as efficiently as possible so that the rest of your team can see it, use it, and reuse it. So, what are the best ways of capturing what we sketch, and getting it into formats we can use and share?
Is It Time for You to Swap to Digital Sketching?
Efficiency is a big advantage of sketching digitally in the first place rather than scanning or taking photos of a paper or whiteboard sketch to then process it as digital files. Digital sketching techniques can take some getting used to, but if you’re finding that you have to capture and digitize a lot of sketches, it might be time to roll up your sleeves and get good at sketching on a tablet.1
Think About How You’re Going to Use the Sketches
That said, it’s good to think about why you want to capture your sketches (Figure 13-1). It’s all about where your sketches will end up:
- High-resolution printing
-
You’re going to need to scan your sketches for maximum quality.
- Instant sharing on social media or your intranet
-
Snap away! That camera on your smartphone is fine.
- Capturing for project work or for a presentation
-
You’ll want your images nice, white, and clean, in a way that fits your workflow.
- Enhancing, coloring, and editing
-
A smooth vectorized image is best.
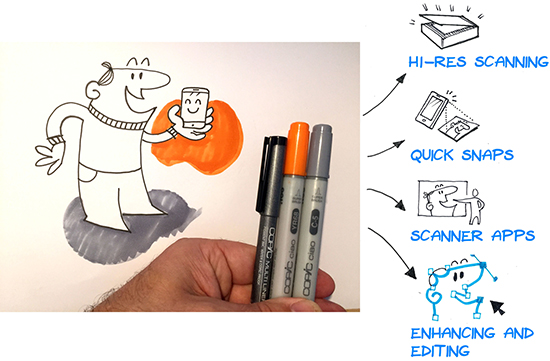
Figure 13-1. Think about how you’re going to use your sketches: How you’re going to use your sketches can drive how you capture them, whether it’s a high-resolution scan or a quick snap using a smartphone camera or scanner app.
High-resolution printing
Nothing beats a good quality desktop scanner—or office printer with a scanning function—for capturing your sketches in a nice, crisp 300 dpi (or higher) format. Always check the glass for blemishes, and invest in a scanner that can either send you the scans via email or save them to a network drive for more convenient access.
Instant sharing
If you just want an image of your sketches to share on Instagram, Twitter, and so on2 (or maybe your work intranet or chat room), the camera app on your smartphone is fine. Here are some pro tips:
-
Go for maximum light; always photograph your sketch in as much light as possible.
-
Watch out for shadows of either you or your smartphone.
-
Try dynamic angles for added interest.
-
Show a bit of process behind your magic. Include the edges of the paper or sketchbook, and the markers you used; people love to know more about how you created that sketch.
Capturing for project work or for a presentation
The camera on your smartphone probably won’t give you a sharp, clean, bright, squared-off image, so go for a scanner app like CamScanner or Office Lens.3 Both of these are mainly meant for document scanning (as well as receipts and business cards), but their image scanning is great, too. Both have great edge detection and perspective fixing (Figure 13-2), so no more wonky images at odd angles to tidy up!
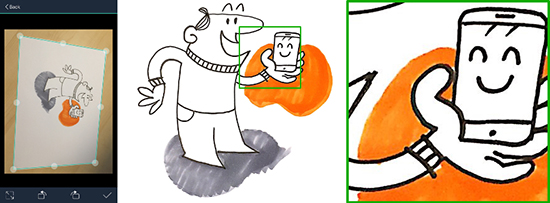
Figure 13-2. Capturing a sketch using CamScanner: Note the edge detection for squaring up the image (left). The picture retains the color nicely (middle), and the close-up shows nice enough resolution to be useful for screen presentations (right).
What’s more, both include optical character recognition (OCR) capability, so depending on how neat your writing is, they will automatically capture that in an editable format, too.
Office Lens is perfect if you already use OneNote or OneDrive, and you can export your scans as editable Office files. It also has a great feature of being able to toggle between Photo, Document, and Whiteboard modes. The Whiteboard mode view can give amazing results of your scrawls on a whiteboard, even in a dim room. But beware! As you can see in the image in Figure 13-3, colored shapes end up looking pretty janky.
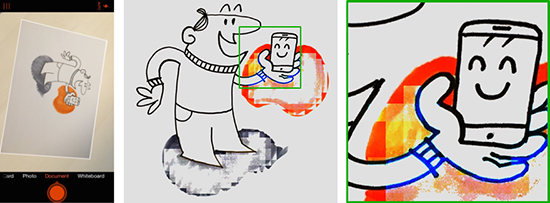
Figure 13-3. Capturing a sketch using Office Lens: The Whiteboard mode is very useful for enhancing a picture of dry erase ink on a whiteboard (middle), but can struggle with colored shapes (right).
Enhancing, coloring, and editing
If you need to capture your sketches to refine in an image editing application, or create something that combines several sketches together, any of the aforementioned scanning apps are fine—but if you can, try Adobe Capture CC and capture your sketches as vectorized images. It does a tremendous job of cleaning up, clarifying, and smoothing out the lines of the sketch (Figure 13-4).
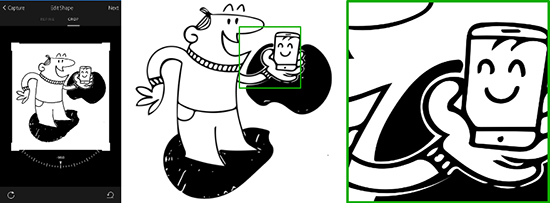
Figure 13-4. Capturing a sketch using Adobe Capture CC: This app knocks out the color, but cleans, clarifies, and processes your sketch as a vector image. Lovely!
Perhaps you need to augment an existing sketch with further digital sketching over the top (or underneath)? There are loads of digital drawing apps that let you import existing images (either from the camera or the albums on your smartphone), but a favorite of mine is SketchBook by Autodesk. SketchBook not only lets you import an image as a new shot from your camera, it lets you erase the color of the paper behind the sketch so that it sits on a transparent background. This is super useful if you want to add layers of color “behind” your sketch.
Storing and Sharing Your Sketches
If you’re sketching regularly at work, before too long you’ll have a growing stack of sketchbooks and sketches on loose-leaf paper lying around. If you’re doing lots of whiteboarding, your smartphone will rapidly fill up with photos, too.
Before things get out of hand, it’s a good idea to plan how you’d like to store your sketches for referral and reuse later on. If you’re in the habit of filling sketchbooks with sketches (and what a commendable habit that is), consider dating the front of each one, or make up a color-coding system using colored sticky dots, where each dot represents a different subject or project.
If you’re storing your sketches digitally, there are loads of places you can keep them securely in cloud storage, depending on what you’re after:
- For you and you only
-
Personal cloud storage solutions like Box, OneDrive, and Dropbox are great, but you might not get to see thumbnails of your images. With services like Flickr, Google Photos, Photobucket, Apple iCloud, and Amazon Prime Photos, you can set up private folders of images. Look for services that automatically synchronize content across your devices, like OneDrive, Google Drive, Dropbox, and Evernote.
- For you and your team
-
Your sketches will love having a home on whatever online collaboration platform your team happens to use, like Confluence, Yammer, Slack, or SharePoint. If you’ve worked hard at helping your team explore problems and generate concepts visually, ensure that all that hard work doesn’t die in obscurity; keep it alive by including sketches in your online chats and work documentation, as well as links throughout relevant intranet pages to your sketches.
- For you and an audience
-
Unless your sketches are confidential to your business and clients, it’s a great idea to store and share them online for others to see and say nice things about them. There are loads of hugely popular services you can use, like Flickr, Twitter, Facebook, Pinterest, and Instagram, but consider using more niche creative places like Behance and DeviantArt. All of them allow hashtagging, so you not only can index your own work, but you can make it available for others to find by searching by topic.
Popular hashtags include: #art, #dailydoodle, #dailydrawing, #doodle, #doodleaday, #doodles, #drawing, #graphicfacilitation, #graphicrecording, #realtimegraphics, #scribing, #sketch, #sketchbook, #sketches, #sketching, #sketchnote, #sketchnotes, #sketchnoting, #todaysdoodle, #visualpractice, #visualthinking, #vizthink, #whiteboard, and #whiteboarding.4
- For you to build a portfolio
-
Consider building up a groomed portfolio of your work (especially if there’s a story you want to write about each sketch you’ve done), using any of the host of blogging platforms such as WordPress, Wix, Squarespace, or Tumblr.
- For you to store and sell
-
There are some pretty sophisticated services around that let you store and sell your sketches (or anything visual, really), like Etsy, Zenfolio, SmugMug, Gumroad, PhotoShelter, and 500px.
Reusing Your Sketches
As you store (and share) more and more of your sketches, think about separating them into different collections that reflect the different types of work you do, and reasons why you might want to reuse them. Index all the collections in different ways (using tags or labels) to make it easier to search by topic across all of them.
Here are some ideas from how I catalog and reuse my sketches that might help you:
- Sketched icons
-
Save each icon as a separate clean file (.png or .jpg), to duplicate and reuse in storyboards, slide presentations, Journey Maps, and other visual communication pieces (Figure 13-5).
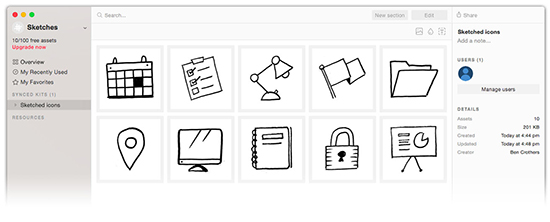
Figure 13-5. Store your sketches in a digital asset manager: Slice, dice, and store your sketches as separate assets in a digital asset manager, like Lingo (in this figure), Asset Bank, Smartimage, Evolphin, or Templafy.
- User interface components
-
Turn your own hand-drawn sketches of screen frames, navigation elements, form elements, and other UI components into a reusable visual library to “build” interfaces in graphics and presentation software like Illustrator, Photoshop, and PowerPoint. That way, you can have the best of both worlds: a sketchy look and feel together with digital drag-and-drop speed.
- Storyboards
-
Save all your storyboards together for future reference, especially if there are frames with particular shots, angles, poses, and so on of which you’re particularly proud
- Whiteboard conceptual sketches
-
The visual patterns you saw in Chapter 10 to Chapter 12 all came from various workshops and whiteboarding sessions I’ve done. At some point for each of them, I looked at photos from each whiteboarding session, redrew each new visual pattern in a neat, repeatable way, and saved it in a visual facilitation playbook for later reference.
- Canvas templates
-
As you might have picked up on by now, I’m a bit of a nerd for visually organizing structured information about something as a canvas. In the same way as the aforementioned whiteboard conceptual sketches, I’ve formalized and saved each canvas I’ve either made up or borrowed from someone else (attribution notes included, of course) as a template sketch for use in later workshops and sessions.
- House style
-
If you’re part of a team on which there are more than one of you sketching, consider pooling the best of your work and formalizing a “house style.” The aim isn’t to get everyone sketching exactly the same, as if they’re a collective robotic source of the same icon library (that would be a bit weird); it’s about agreeing on a certain visual voice and tone (formal versus friendly), markers and materials used, line style (smooth and even versus rough and textured), use of color (a restricted color palette used in a certain way), and visual contrast (large vivid blocks of color versus tints and washes of subtle color).
As you get better at capturing, storing, indexing, and reusing your sketches, you’ll find that you truly will get the best of both worlds: the warmth and character of hand-drawn imagery with the speed and copy/paste efficiency of digital. You’ll spend less time doing repetitive sketching and more time thinking and synthesizing.
And that, my dear Presto Sketcher, will be a huge win for visual thinking and communication.
Some Questions for You
What treasures does your smartphone’s photo app hold?
Go through the photos on your phone. Are there any photos of sketches (yours or anyone else’s) that you would want to copy into a sketchbook to have them all in one place? Are there any screenshots or photos of anything else visually inspirational that you could turn into a sketch for your sketchbook?
Do you have the start of a sketch icon library?
Look over the sketches you’ve been doing while you’ve been reading this book. Are there any with which you want to start populating your own sketch icon library?
What sketches could you use in your work presentations?
I guarantee you that including your own sketches in your presentations at work will make them more appealing and more memorable. What text in the slides of your latest presentation could you replace with a sketch?
What recent sketch makes you proud?
Go through some recent sketches you’ve done. Which one stands out to you as one that you’re pleased with, and why?
Why not share it on social media right now? Be sure to use hashtags so that we can all find it!
1 Don’t forget, Chapter 4 has a rundown of digital products to use as well as a discussion on blending the material and digital worlds.
2 And, y’know, tag them with #prestosketching so that we can all see how awesome they are!
3 For links to these apps and others (like Scanbot, TinyScanner, and Evernote’s Scannable) in Mac, Android, and Windows flavors, see the Presto Sketching blog post “Capture Photos of Your Sketches like a Pro” (http://prestosketching.com/blog/2017/04/03/capture-photos-of-your-sketches-like-a-pro/). New and improved scanning apps are coming out all the time, so try searching your platform’s app store for “scanning” for other apps available.
4 And #prestosketching. Did I mention #prestosketching?