COMMON PITFALLS
CREATIVITY, SENSITIVITY AND INSTINCT can’t be taught – these are left to the reader of this book. The book, however, can set the framework. An important part of the framework is to point out the various mistakes one can make in the process of designing with light. It is important to show the mistakes that can be avoided easily by using the right design detail, method or specification. Some of the pitfalls described are obvious but can still happen when one is in a rush or during a negligent moment.
On the other hand, some pitfalls are less obvious and require a constant awareness. The aim of this chapter is to list the common pitfalls and to show how they can be prevented. All the points of this chapter can form a checklist, allowing those interested to go through it before submitting a project.
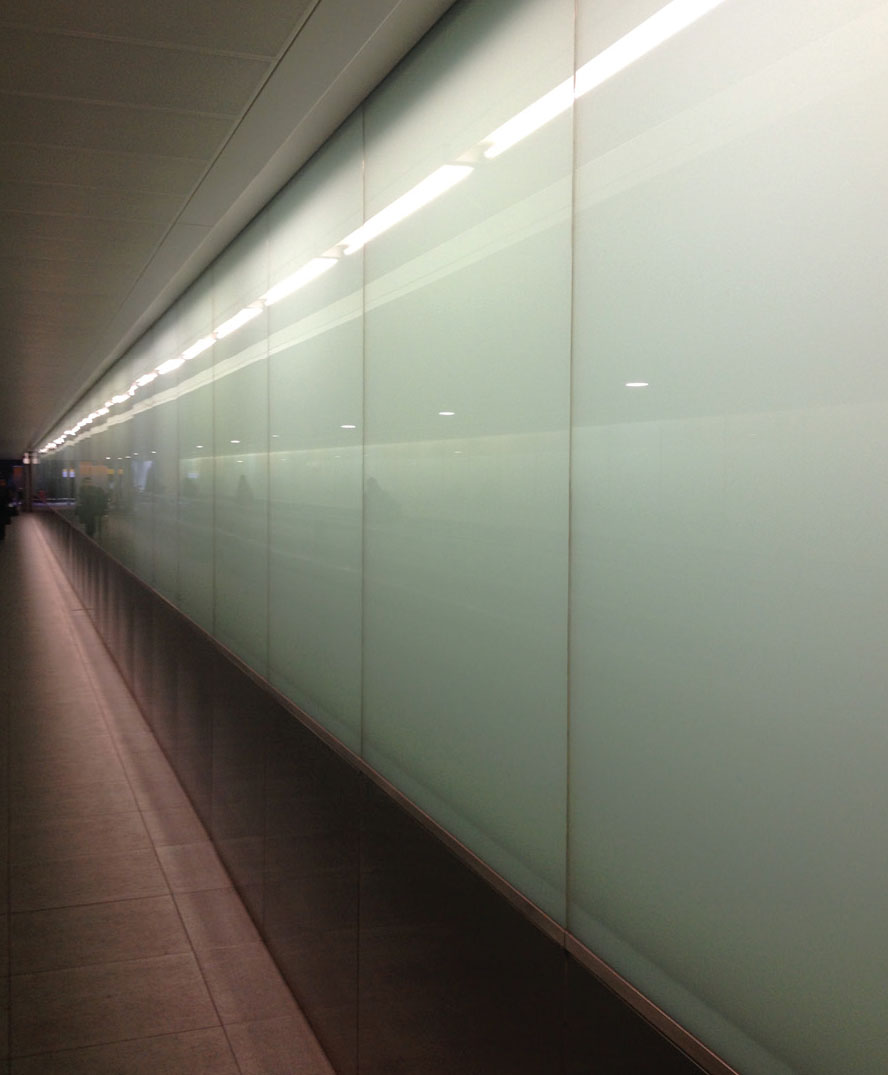
Figure 6.01 An example of luminaires unintentionally reflected off glass panels.

VISIBILITY OF LIGHT SOURCES
Light makes everything visible but that doesn’t mean that the direct light source needs to be in the line of sight. Good lighting design lives through indirect light bouncing off surfaces. It is, of course, all right to see light sources if they are of a decorative nature. A beautiful incandescent or replacement lamp in a restaurant or at home does look appealing. The same applies to pendants, table- and floor-standing lights. When designing, however, within a detail like a niche, slot or cove, the visibility of the actual light source or its reflection is often unwanted. One can distinguish here between two lighting approaches: direct and indirect.
The direct lighting method is more efficient and precise while the indirect method allows for a softer lighting effect. Both have their pitfalls.

Figure 6.03 Two lighting methods in a recess.
Directly lighting out of a recess
Lighting directly out of a recess means one wants to push controlled light into a space or onto an object without major losses. But it also means that the luminaire has to be placed in such a way that it is not visible to the observer. The light has to hit the desired object out of a recess without major loss of the quality of light. Linear lights and spotlights can be used either directly or indirectly in recesses. Spotlights highlight objects while linear lights graze surfaces. Everyone who has played hide and seek as a child knows that it is easier to hide in the dark than in a bright space. It is also easier to disguise oneself in big and busy spaces, but it gets harder to hide in a small location without being quickly spotted.
Consider these possible pitfalls when lighting directly out of recesses.
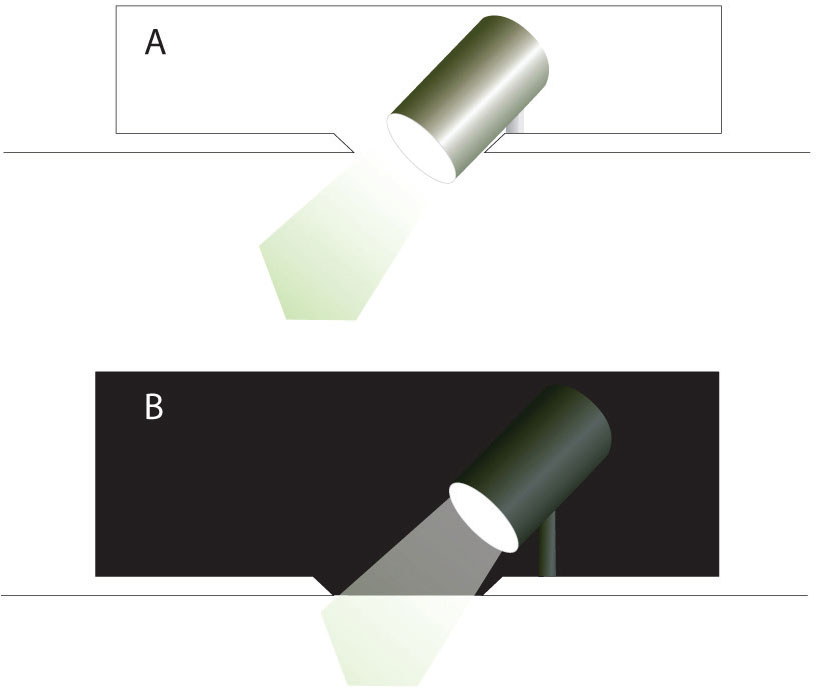
Figure 6.04 A. Shallow, white gorge – Luminaire visible B. Deep, dark gorge – Luminaire recessed and not visible.
Direct visibility
Lights or their accessories may be too big and may not fit into the recess. Therefore, the luminaire or one of its components will stick out of the linear cove.
This applies mainly to spotlights in a trough. While the spotlight is allowed to be visible, the other components are not. This might sound obvious but often the luminaires placed into a recess come with additional accessories like tracks, brackets, louvres or drivers. They must also be placed into the recess and that is when it gets tight. A black matte painted cove hides all black lighting components well even when placed visibly into a slot. Any lighter-coloured linear cove, however, requires a good interior finish and all additional components to be hidden. When detailing a recess, one must consider that all components required have to fit into the space provided. If the space gets too tight, one should think about placing the necessary driver remotely if possible. If there is not enough space in the recess, the specification needs to change to accommodate all elements. If this isn’t possible, one has to negotiate a change of detail with either the architect or the interior designer.
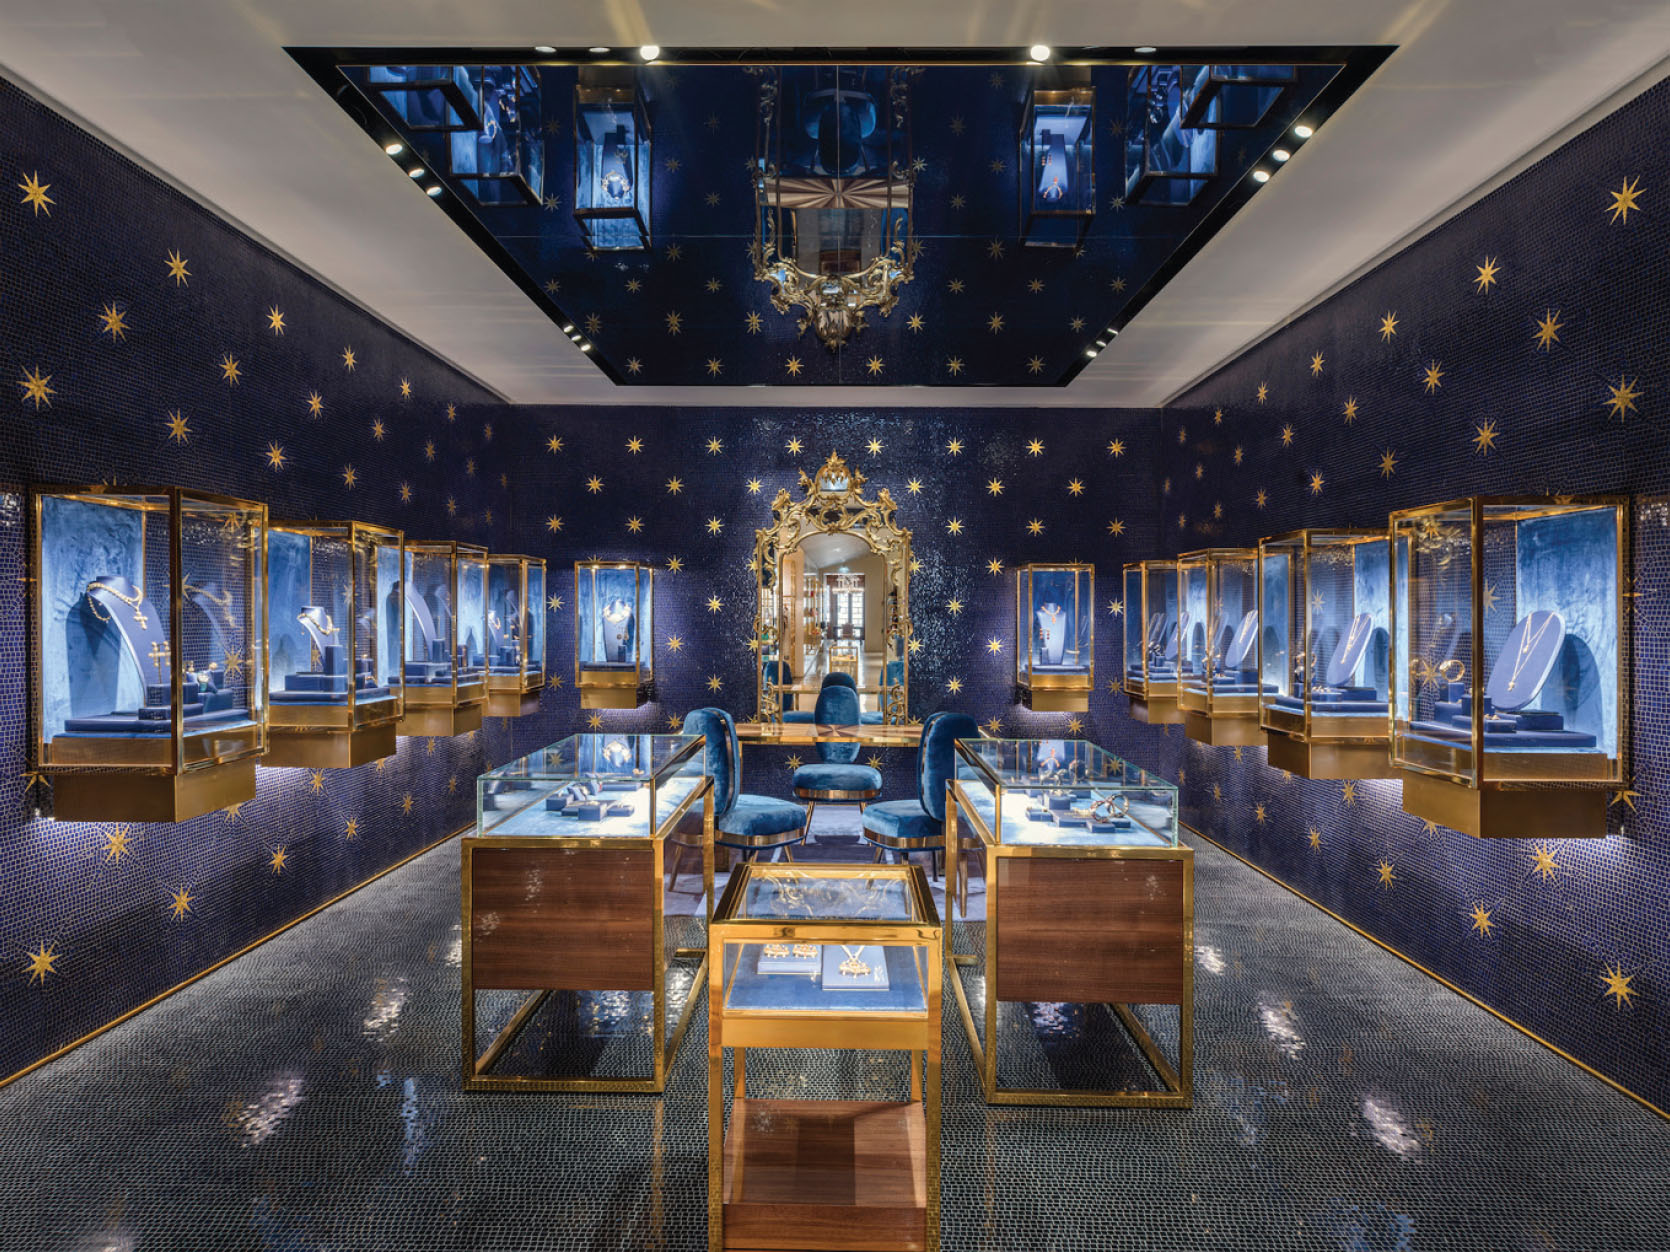
Figure 6.05 Spotlights are deep recessed, not visible and organized in group as it should be. Dolce and Gabbana. (Arch: Carbondale; Lighting: Mindseye; Photo: Antoine Huot)
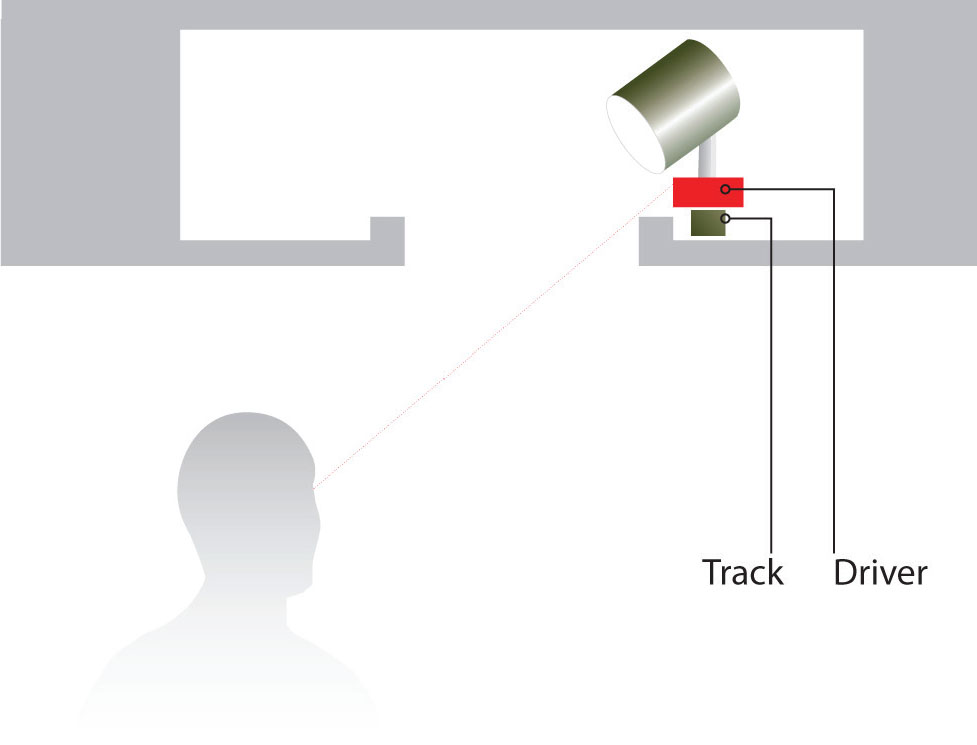
Figure 6.06 Track lifts the driver over the visibility edge
Visibility due to view angle
The light source may be visible due to the view angle. When standing in front of a wall treated with light, the light source in the ceiling/wall cove is not visible yet when one is standing almost parallel to the wall it is.
A detail has to work from all view angles. It is crucial to think how the luminaire will be positioned. It is almost inevitable for the light to be visible if the slot light is positioned on a corner, for example. The same applies to a very long wall and a wide slot.
The questions to be asked is: ‘Is the fixture visible if one stands almost parallel to the wall looking directly into the slot?’ Depending on the situation, one should consider the following solutions:
1. Changing the detail and making the slot narrower and deeper will make it considerably easier to hide the light grazing directly down a vertical.
2. Introducing louvres often helps to disguise direct light. The luminaire might still be visible but will not stand out as the direct light source is hidden.
3. If neither of the two previous solutions are feasible due to a low recess depth one can choose a nice-looking light source. This can help one to live with the fact that at some point the light will be visible.
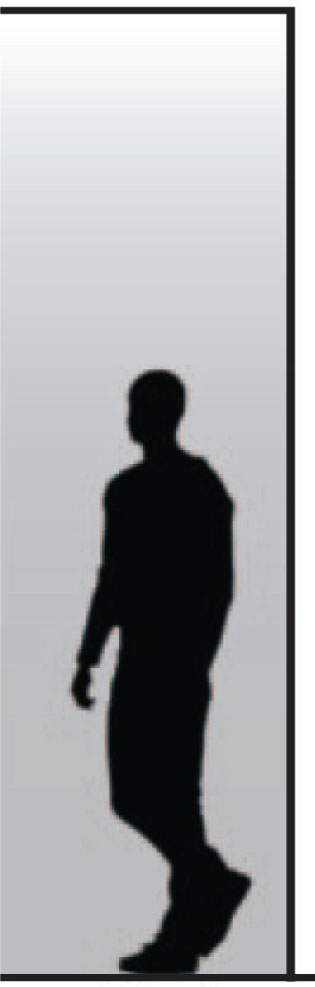
Figure 6.07 Luminaire not visible when standing in front.

Figure 6.08 Luminaire visible when standing on the corner.
Indirect visibility/reflection
Light may be visible in reflection as a reflective material exposes a recessed light source. Light placed discreetly to highlight the texture or material of a wall may get highlighted by its own reflection. There are two causes of reflection: a single reflective surface and two reflective surfaces. The latter makes it impossible to hide the light within the recess without it being visible on the reflective surface. Lighting surrounded by two reflective surfaces is only possible in a cove with the light not pointing at the surfaces but onto a third matte surface. With a single reflective surface, it doesn’t get much easier. For a light source not to be visible on the reflective surface the slot in the detail has to be very deep to hide a recessed luminaire.
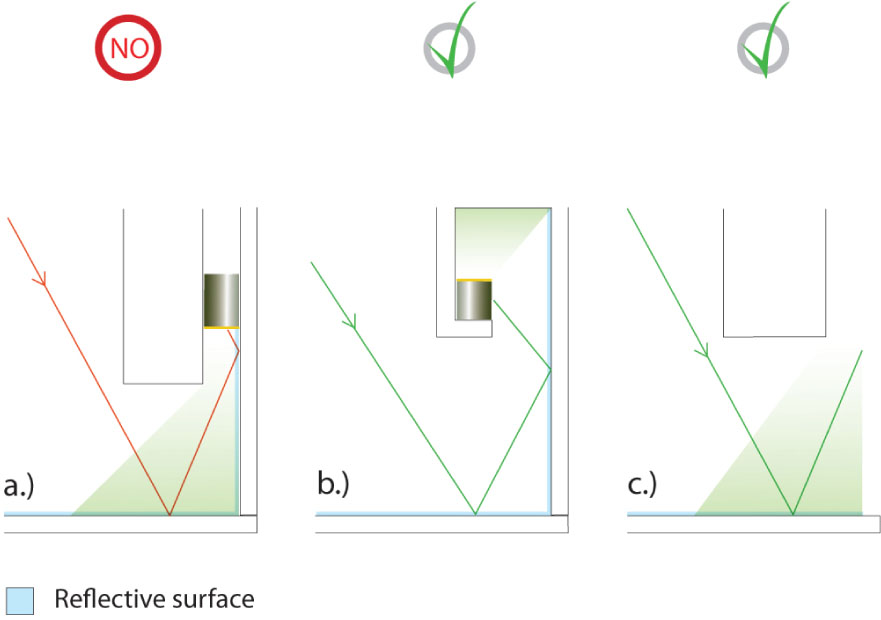
Figure 6.09
a.) Visible: The second vertical reflective surface reveals the
light
b.) Not visible: Cove + luminaire away from the reflective
surface.
c.) Single reflective surface-deep recess.
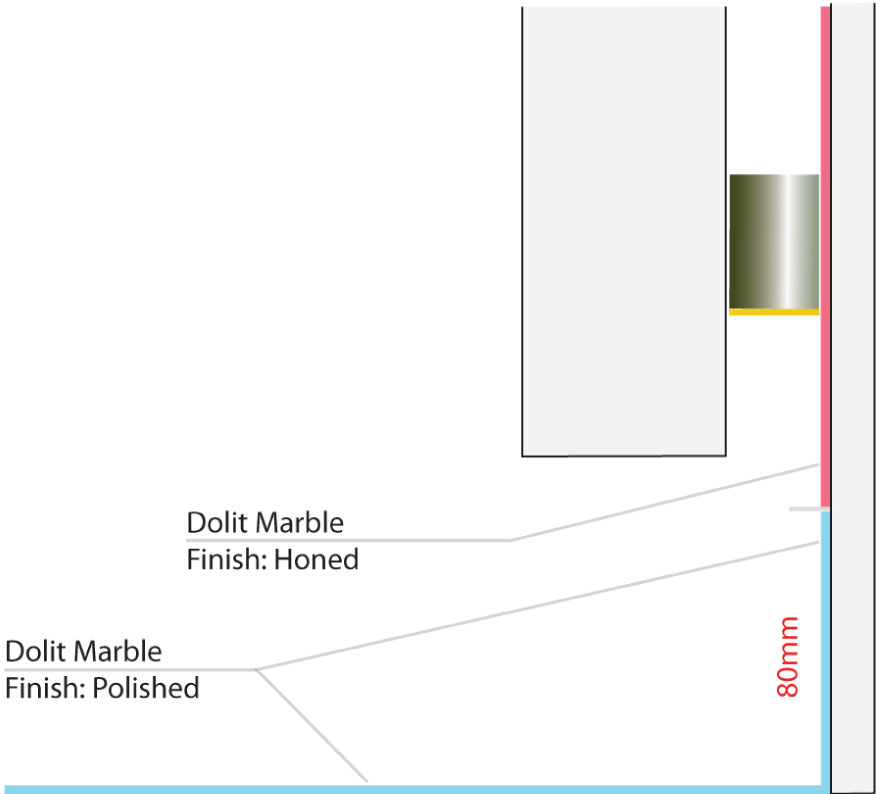
Figure 6.10 Indicate clearly the material change and its dimensions.
Alternatively, the light can be pointed away from the reflective surface. Louvres and glare shields can help to avoid the visibility of the light source. The impact of the light onto the polished surface has to be tested in any case. Plain glass or a highly polished stone, for example, are unforgiving and will mirror the light precisely. Other reflective materials can show a distorted reflection of the light that in some cases does look acceptable. It is important in any case to get a sample of the material and test the effect with both the original light source and the material. If, for some reason, the proposed measures to prevent reflections are not possible, one has to negotiate with the architect to make the material on the areas where the luminaire will be reflected matte. In this case it is essential that the architect and the lighting designer clearly communicate in their drawings in what areas the change of material treatment has to take place.
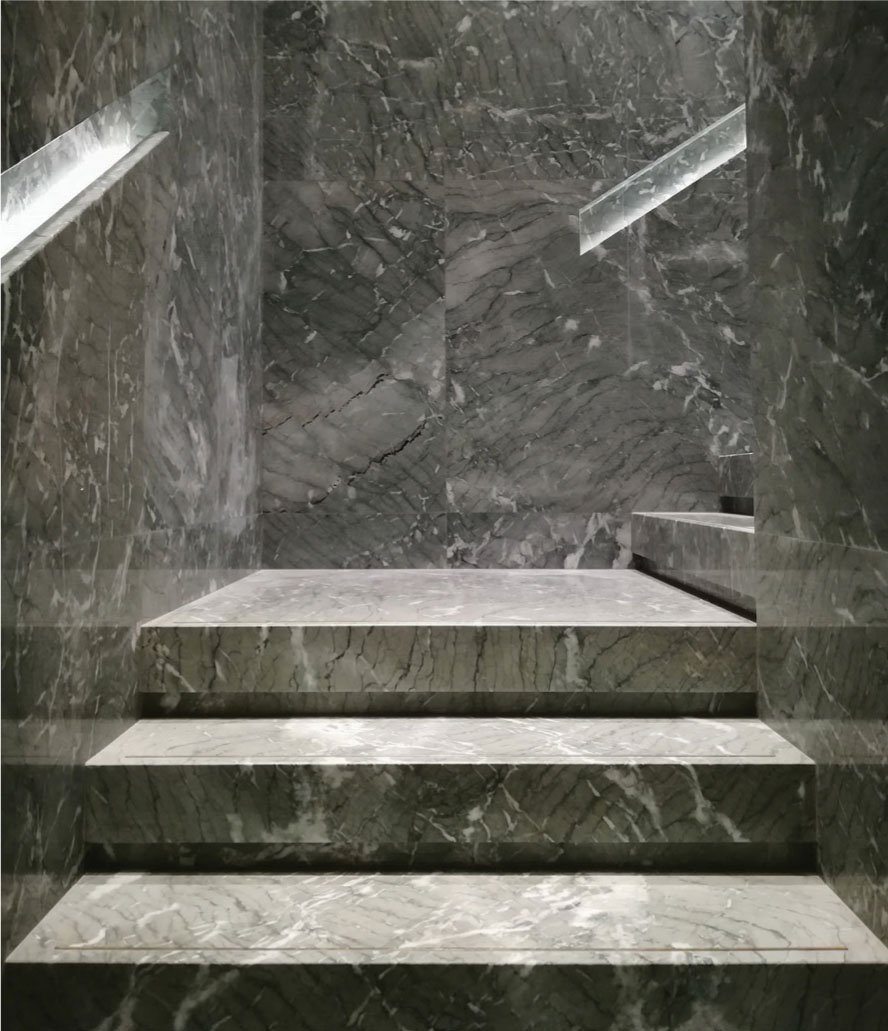
Figure 6.11 Handrail lighting not visible-the reflective marble made it difficult to hide the integral linear luminaire. (Photo: Antoine Huot)
SURFACE OR OBJECT COVER
Partial coverage
A light beam may leave the recess and not cover the object or a wall fully. This is a simple task that has to be checked every time. In an ideal world, a test with the light source can prevent some areas remaining in darkness. But what if I do not have the light source at hand or I am not sure what beam angle to use? In this case, a quick light-beam check in CAD can help, as explained in Chapter 5. Alternatively, a lighting calculation is useful.
Both actions are worthwhile as they allow one to check the light distribution and help to establish the samples needed. In summary, one can say that there are two theoretical ways of checking the beam angle, besides a practical way. The practical way is necessary to establish the quality of the light coverage. This method is usually used to confirm the effect of light grazing a wall. The theoretical ways, on the other hand, are used to establish or confirm the beam angles. They allow one to confirm, for example, a spotlight type and the quantity of lights necessary to illuminate an area.
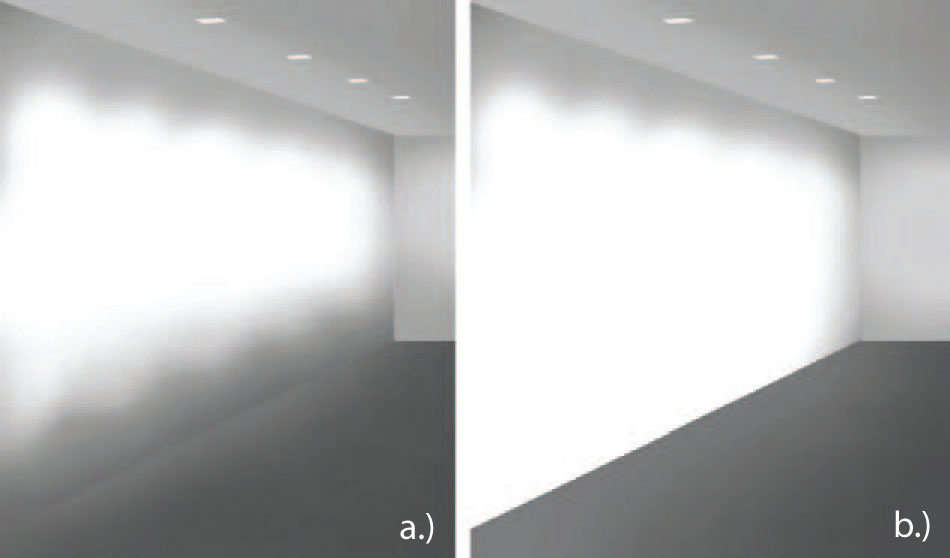
Figure 6.12 Lighting calculation of wall washers. a.) Covering part of the wall only. b.) While the right image shows full coverage.
Shadow gaps
When wall-grazing and bleeding one should make sure one gets a continuously lit surface, with no shadow in the middle or at the end. There are two main reasons for shadow gaps to occur:
1. The linear fittings do not cover the full length of the surface to be lit, therefore, the ends are left in relative darkness. Many linear luminaires come in standard sizes – usually in 1–4ft (30–120cm) increments. The wall might have a dimension that does not allow exact coverage with the specified luminaires. One must make sure the total length of luminaires covers the full length including the two ends. A respecification is necessary if the luminaires combined don’t allow end-to-end coverage.
2. A continuous light grazing the wall is interrupted by a dark area. The reason for this unwanted effect is that the linear lights used do not allow a seamless end-to-end mounting. The distance between the two linear lights is too big. The light escaping the slot doesn’t have the space to overlap. When it leaves the slot, these areas are darker. The solution to this is a deeper recess as it allows the light to overlap before it exits the recess. If a deeper recess is not possible, one has to use linear LED fixtures that allow an end-to-end mounting and do not create shadows when butted up against each other.

Figure 6.13 Unwanted shadow at the end.
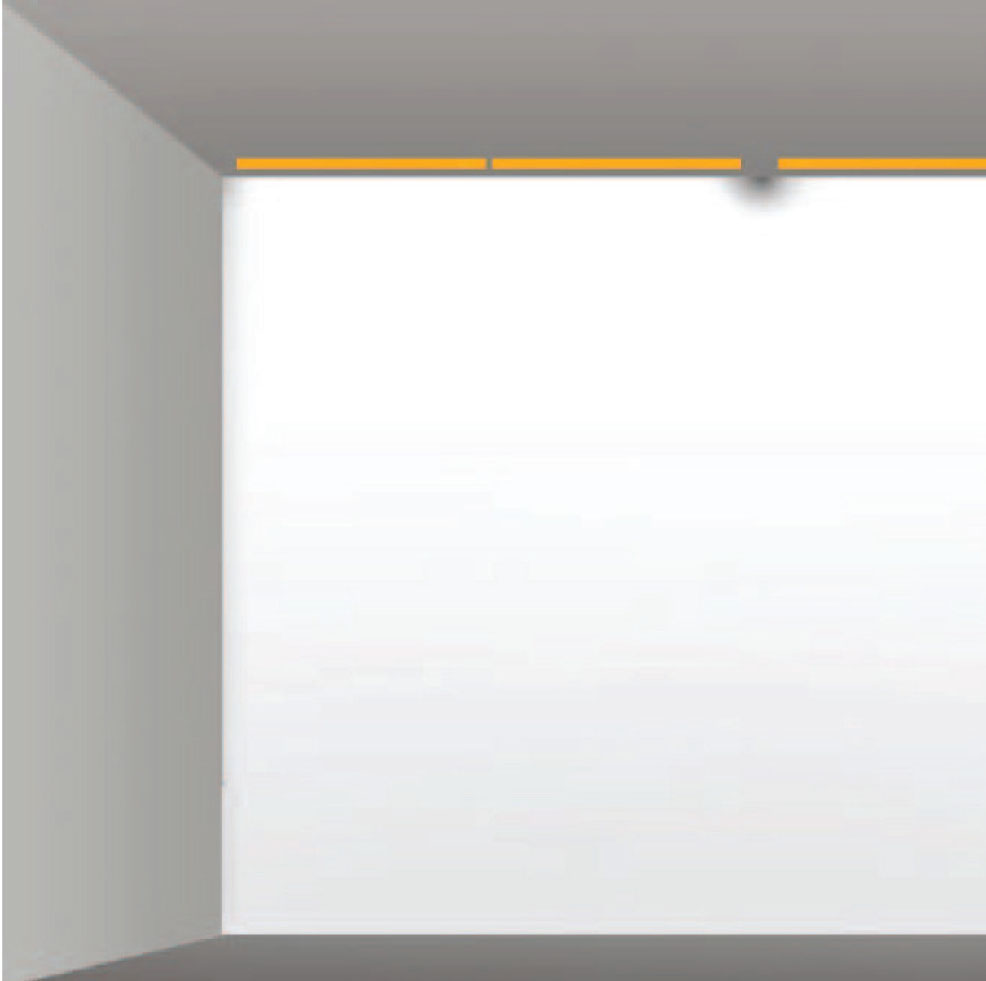
Figure 6.14 Unwanted shadow where luminaires are joined.
Light cones
The light may end with a cone on an adjacent wall. The light cone is probably less prominent and noticed than other pitfalls but nevertheless should be avoided if possible. When linear light finishes close to a wall, it creates a strong visible beam of light on the wall.
This can be avoided by making sure the light ends a certain distance from the wall. The ideal distance to the wall varies and depends on the light sources used. If possible, it should be established with a little mock-up.
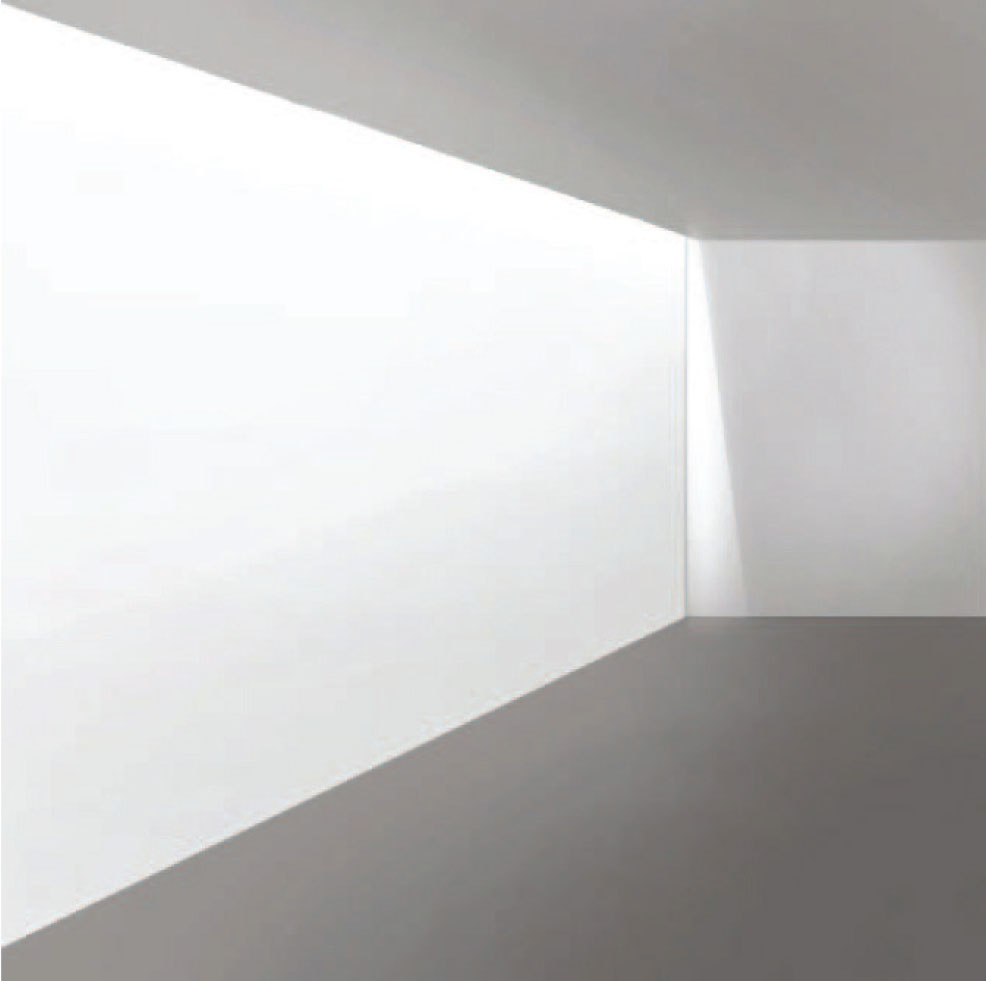
Figure 6.15 Unwanted light cone on the wall.
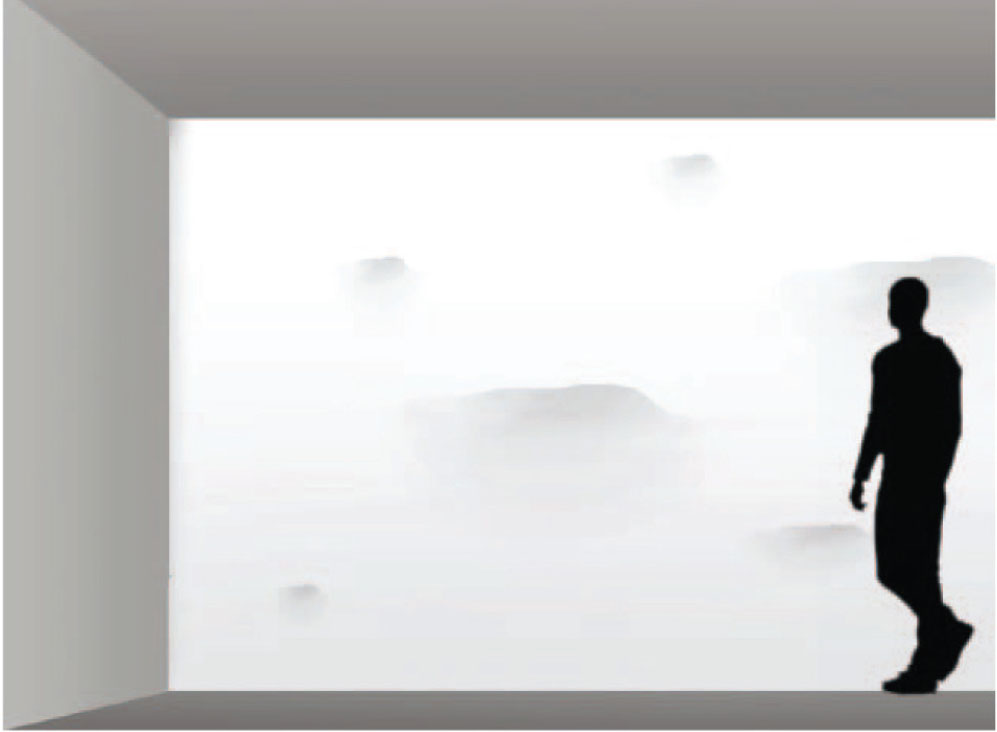
Figure 6.16 Light can reveal imperfections.
Your illuminated surface may not look good. Whether to light a surface or not depends on the quality and the finish of the surface. A plain plaster surface, i.e., without an image, requires a perfect and smooth finish. Any unevenness, marks and bumps are highlighted by the light.
The same applies to unattractive tiles with wide joint fillers. One can compare lighting here with makeup. Skin imperfections can be covered by foundation; the lighting design solution is to leave the imperfections in darkness. Attractive features, on the other hand, can be emphasized with makeup – in our case, we use lighting.
Light colour
Your white light may not be consistent, therefore, the surface is not washed in a unifying white light.
We have learned about the definition of MacAdam steps in LEDs. These days, many manufacturers guarantee a light fixture within two MacAdam steps’ tolerance. This should in theory guarantee an even white light onto a surface. The surprise can be big when testing the lights; each LED may emit a different white. When holding the light into a slot against a surface at a distance, the light may appear even. This is because the light mixes into a single white light. This mixed white light is within two MacAdam steps accurate to any other light fixture from this manufacturer. Not so each single LED within the luminaire. The MacAdam steps of each LED can vary up to five or more steps and allow these luminaires to be more cost-effective. The pitfall occurs when the fixture is positioned too close to a surface and the ceiling line. The light escaping each single LED does not have the space to mix well.
The distance of these fixture from the wall and the recess must be correct. They cannot be used in areas where their light source is directly visible, or the recess space is too restricted.
Figure 6.17 LED doesn’t have time to mix to a uniform white light.
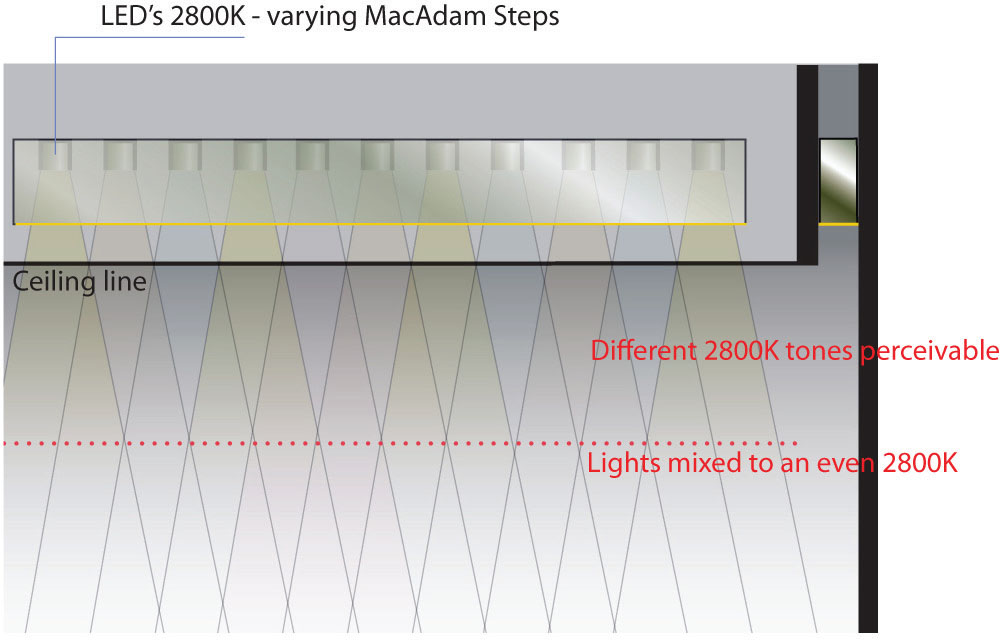
Figure 6.18 The right recess of a linear luminaire from ceiling line to avoid white-inconstancy.

Light stripes
Light may leave a slot in stripes. When light has to graze up or down a high wall one relies on LEDs with an extremely narrow beam angle.
Linear fixtures are actually LEDs lined up in a strand. Rather than using continuous LED strips, they use single high-power LEDs with a narrow beam angle joined in a line. Each LED is equipped with a narrow lens, i.e., ten by ten degrees. They are mounted onto a PCB board with a certain pitch. The stripes on the wall occur when the light source is mounted too close to a wall and ceiling line in relation to the LED pitch. The light of each LED does not have the space to mix.
This means that the LED pitch dictates the position of the fixture within the detail. A mock-up is essential to establish the right position of the specified luminaire. If the necessary detail depth isn’t available, one has to specify a linear LED with asymmetric lenses i.e. fifteen by sixty degrees. These lenses have a very narrow perpendicular beam angle and a wider parallel beam spread that mix the light onto the wall much sooner. Bear in mind that the asymmetric light will not reach as far down a wall as a ten by ten-degree fixture.

Figure 6.20 The right recess of a linear luminaire from ceiling line to avoid white-inconstancy.
INDIRECTLY LIGHTING OUT OF A RECESS
Lighting indirectly out of a coffer or recess means one wants to create a pleasant diffused light effect. The luminaire has to be disguised, creating either a strong indirect ambient light or a soft indirect linear light glow. Using chunky fluorescent tubes proved very challenging in earlier days but from 2012 things have become much easier with the introduction of compact LED technology. The space necessary to create light gaps and coffers has decreased significantly since then. However, the new LED technology has its own trickiness to consider. Depending on detail and material, there are various pitfalls to bypass when lighting indirectly.
Light shadow
The up-lighting may show a defined shadow edge. Whether up-lighting onto a ceiling or any other surface, one wants a smooth graduation of light. The light should fade gently away rather than stopping abruptly.
The cause of shadowing is an LED placed either too deep or too close to the cove edge. The edge upstand creates an unwanted shadow on the surface when hit by the light emitted by the linear LED. By using shallow cove profiles, one can avoid shadowing. Where shallow cove profiles are not possible one should make sure the linear LED fixtures are positioned so the light does not hit the cove edge. This can either be established with a CAD drawing showing the beam angle of the light source or by testing the luminaire within a mock-up.

Figure 6.21 The light of the LED is cut by cove ledge, creating a strong shadow rather than smooth graduation.
Light image
The up-lighting may not fade smoothly. Fluorescent lamps emit light in all directions, creating a nice diffused light effect as light bounces off all surfaces within a cove. One gets a smooth fade of light on the lit surface. Achieving the same with a linear LED proves more difficult. Placing a linear LED upwards and simply hoping for the best isn’t enough in most cases. Linear LEDs have a defined beam angle based on their design. The beam angle in most linear strip LED is 120 degrees. The linear LED’s light cuts off differently, depending on its design. A very shallow cove will reveal the cut-off of a linear LED shining indirectly against a surface.

Figure 6.22 The light of a linear LED doesn’t have space to gradually fade.
In many cases, the light stops abruptly, leading to an unwanted quick change between the light and dark areas. The more distance the light has from the surface, the better. In the following image, for example, the light has enough space to diffuse and fade.
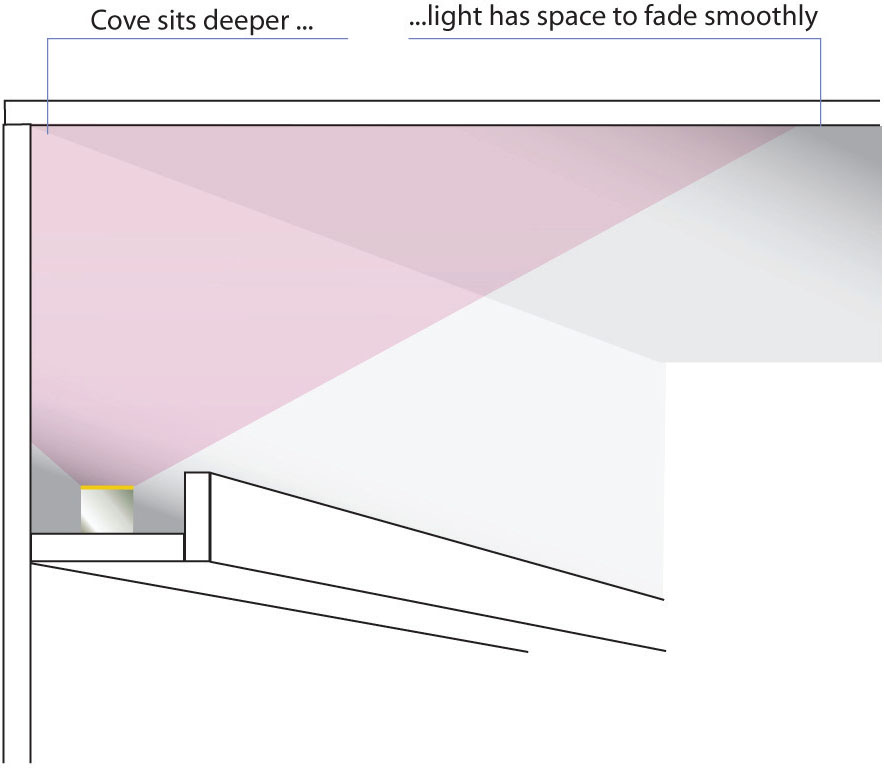
Figure 6.23 A good distance of the cove to the wall, but the defined beam angle of the luminaire creates a shadow on the ceiling.
If the cove is shallow, one should use linear LEDs with a nice, smooth cut-off angle. They come with a diffuser softening the light cut. The tilting of the light source can create a similar effect. The light has space to fade out naturally. In this case, the back of the cove will not receive any light and will appear dark. This might not be a disadvantage if the back of the cove is a dark material or not visible.
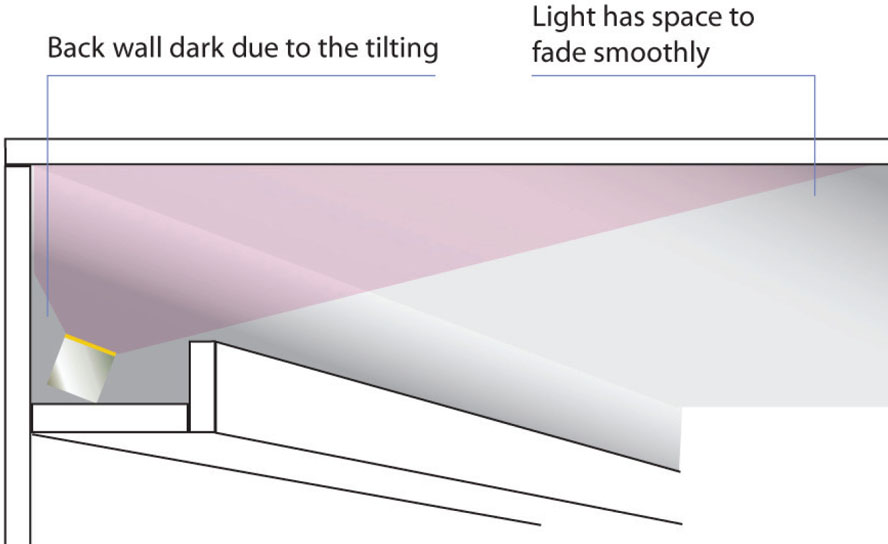
Figure 6.24 Tiltable uplights within the coffer allow us to correct the light beam direction if necessary.
Figure 6.25 A well-lit coffer using tiltable linear LED – standard 120 degrees.
One can use LEDs with beam angles of 180 degrees or more. They guarantee almost in all cases a good light image on surfaces. This brings us to the colour of the cove. The lighter the colour inside the more light bounces out of the cove. If the cove is deep, it relies on the light bouncing within the cove. In this case, is important to make sure that the drawings specify all inner cove surfaces to be painted matt white.
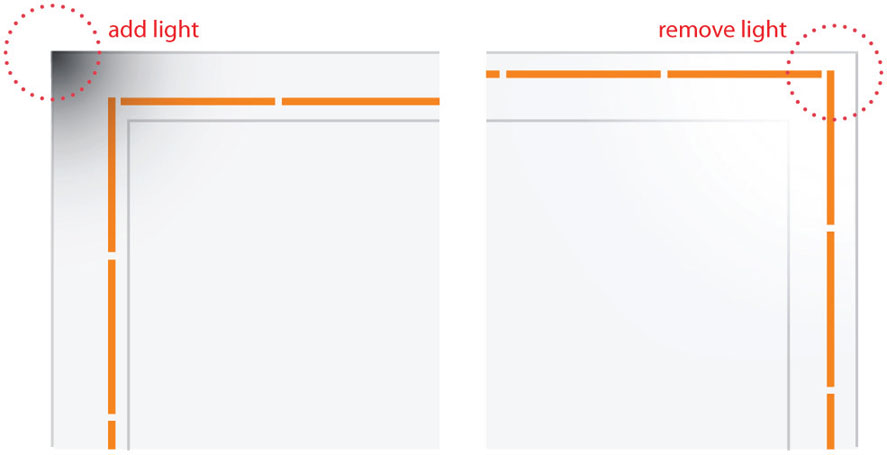
Corner irregularities
The corner in a coffer may either be too bright or darker than the other areas.
With fluorescent tubes there was a set of rules to be applied when they were used in coves. This does not apply for LEDs anymore. Depending on their emitted beam angle, type and detail the set-up can vary significantly. The general rule here is that one linear LED starts where the other, usually perpendicular, linear LED finishes. This creates the right amount of light for the corner. This might change if, for example, the distance of the LED to the wall or ceiling is not sufficient. In this case, the LED has to finish earlier to avoid an over-lit corner. The opposite is the case if the distance to the wall is too great or the beam angle of a linear LED is narrower than usual.
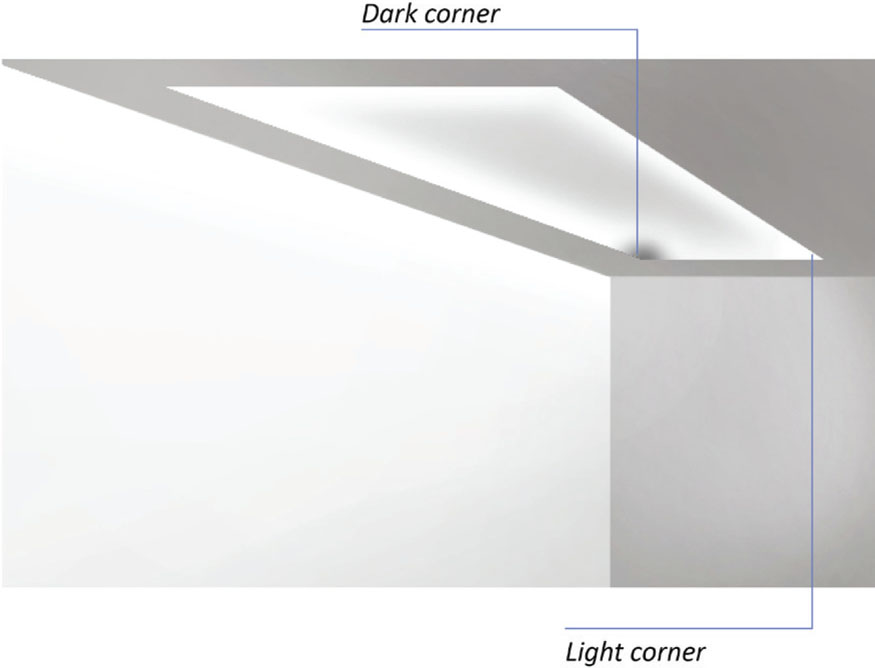
Figure 6.26 A coffer showing unwanted dark and bright light-corners.
In this case, one has to add light in the corner by, for example, extending and crossing the linear lamps. Thanks to the compact dimensions of LEDs, coves have become smaller; at the same time, lighting them correctly has become harder. Each LED type needs a little mock-up to test its performance.
LUMINOUS SURFACES
Backlighting: dotting or visible lines
A backlit surface may show a lamp image in the form of dots or lines. Backlighting a stretched ceiling panel or etched glass allows one to push a lot of light evenly into a space. The image one expects of the backlit panel is an evenly lit surface. Lamp imaging is unwanted and happens when the distance of the light source to the diffusing surface is too short. The light from each light source hasn’t got the space to overlap before hitting the diffusing surface. If the light sources are linear LED strips then lines will show.

Figure 6.28 Linear shadows visible on the backlit panel.
If one uses LED boards for backlighting, lamp images of dots can occur. The further the light source is away from the backlit surface the fewer lamps are necessary to achieve an evenly backlit surface. If the space is scarce, one has to use more but less intense LED modules to achieve the same light effect. The distance depends further on the backlit material. An opal glass or stretched membrane will be fairly forgiving.
Therefore, light sources can be placed further away from each other and closer to the diffusor. A more efficient opaque glass, on the contrary, will reveal the light sources more obviously. The lamps must therefore be positioned closer to each other to avoid lamp imaging. For the LED PCB board, this means that the LED pitch needs to be shorter. If the space is too shallow, backlighting become inefficient as it requires the usage of too many lights to guarantee an evenly backlit surface.

Figure 6.29 Section through a back lit panel with Linear or Dot LEDs layed out in a grid = x. Diffuser at different distances.
Edge-lighting: hot spots, dots and weak light
Light sources may be visible on the edge-lit surface. Edge-lit panels are mostly used in furniture and are integrated. The etched or foiled glass is lit by an LED strip from one or more sides. LEDs will typically show a hot spot of light on the first 30–50mm (1.2–2in) of etched glass.
One has to make sure the first 30mm (1.2in) are covered and thus do not expose the hot spots. The other detail to consider is visible dots if the glass edges are exposed and diffused. The thing to bear in mind is that dots from the LED strips will be visible on the flat polished glass edges.
If not detailed properly, the effect on the edge-lit glass can be weak. To guarantee a good effect, one has to use deep-recessed high-power linear LED strips and, if necessary, lensed LEDs. The achieved effect will never be an evenly lit surface but a nice gradient of light. As one can see, there are many things to consider when it comes to edge lighting, therefore, companies have specialized in manufacturing edge-lit panels. Covered with a diffused glass from above and with the edges sealed these provide an easy solution and guarantee an almost plain lit surface.
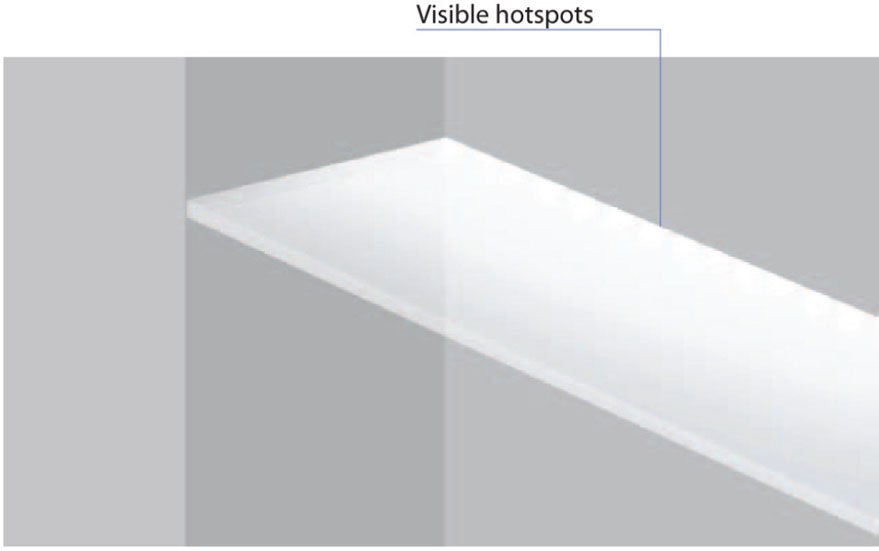
Figure 6.30 Hotspots.
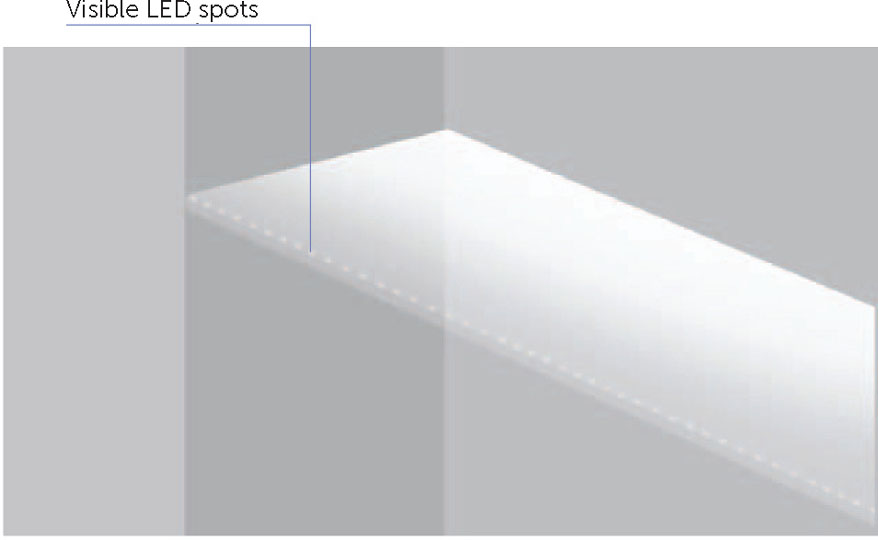
Figure 6.31 LED dots are visible on a polished glass edge.
THE NATURE OF GLASS
Glass = mirror
We have spoken about reflection but in the world of lighting the window needs special attention. Many tend to forget that glass not only allows light to pass through it but also that it reflects light very well. At night, this effect becomes even more prominent. All rules that apply to reflective material also apply to glass.
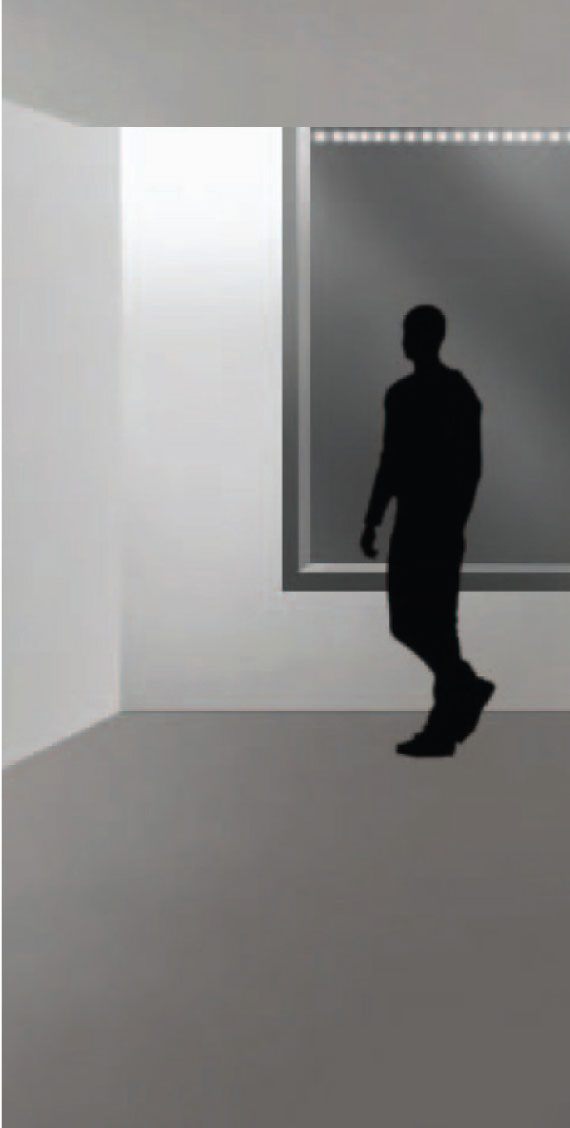
Figure 6.32 Glass as reflector.

Figure 6.33 Glass reveals.
What needs to be considered in addition is that glass exposes all lighting details when viewed from outside. This is not a problem if the building faces a wall or the glass is partly cladded. Otherwise one has to design the lighting details not only to work from the inside but also when viewed from the outside. This means one has to make sure no luminaires are visible and nobody is exposed to glare from them.
Internal light vs external light
Open as usual or closed? Even though this book is dedicated to internal lighting the lighting design of an interior space has an effect on the exterior observer. It is essential, for example, for shops and lobbies to signal that they are open for business. But in some cases, they don’t appear open. The space appears dark even though all products within the shop are well lit. The most common reason for this misconception is that surfaces facing the exterior are not being lit sufficiently. The internal space competes with the outside daylight. Dark surfaces are not visible through the reflective glass in daylight. As a result, the space appears unused.
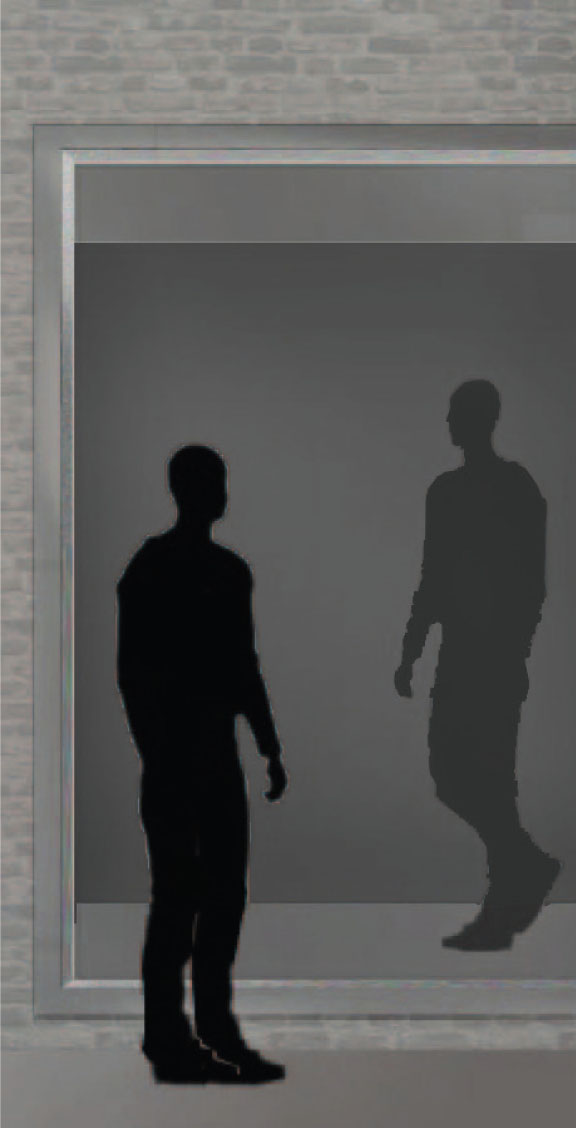
Figure 6.34 Unlit surface behind glass.

Figure 6.35 Lit surface behind glass.
Therefore, one must always make sure that the vertical surfaces are lit. Talk to the architect about this necessity. If the walls are not used as displays or don’t have a finish that deserves lighting treatment, make sure that this is understood, and the architect can address this issue.
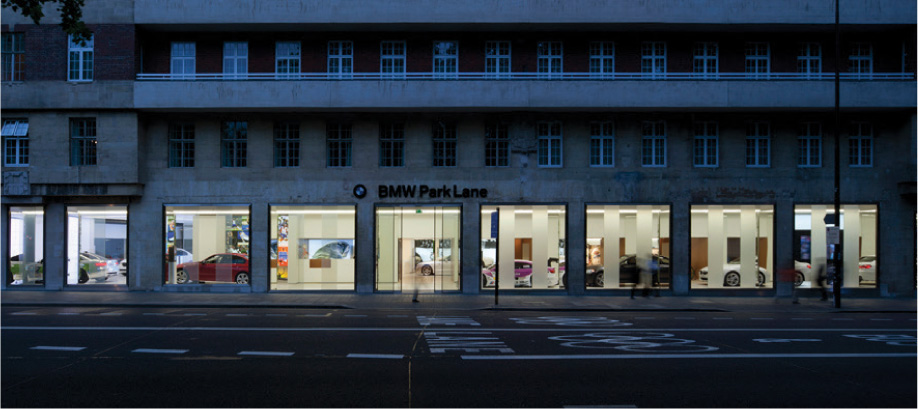
Figure 6.36 Most verticals are treated showing that BMW Park Lane is ‘open for business’.
External light vs internal light
It’s all dark outside, and where is my beautiful garden? What applies for the interior in daylight also applies to the exterior space in the night-time. A dark garden or courtyard is not visible through a window of a lit reception room. The reflection of lit interior space in the window prevents one from seeing anything that is outside. Often, outdoor lighting is not part of the budget, and if this is so all parties should be made aware of it. It is helpful to allow for some budget for the lighting of the exterior space.
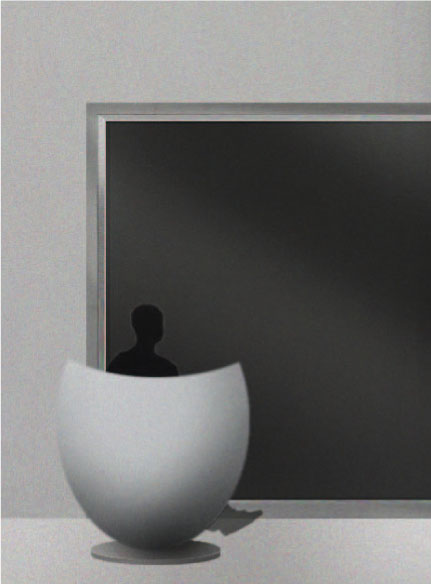
Figure 6.37 Unlit garden, exterior visible.
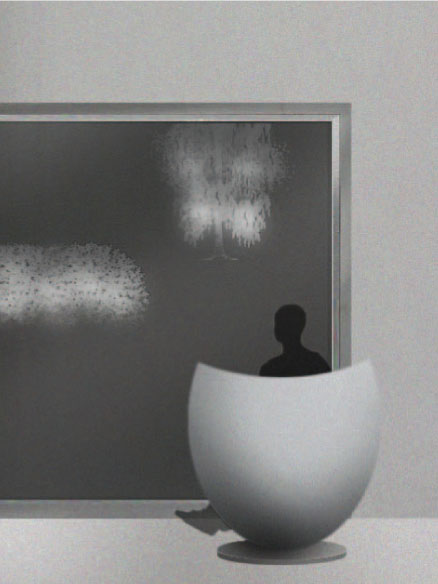
Figure 6.38 Lit garden, exterior visible.
A shop window may appear too dark or too bright. A shop window allows the viewer to conclude the relationship between exterior and interior. Shop windows are small, exterior-facing spaces and are therefore exposed to constant changes in light level throughout a day. The outer light level can vary between 10 lux and 30,000 lux. This means that the light inside needs to be powerful enough to be noticed throughout the day but at the same time not be too bright in the night-time. It is essential to allow for a lot of light in a shop window when the light outside is very bright
For the evening hours, bright shop window lights must be dimmed. For eyes that are used to a dark evening light level, shop window illumination can easily become too bright.
What applies generally to the interior space of a shop also applies to shop windows. One has to make sure the vertical surfaces are lit to set a background to the scene and create visibility.
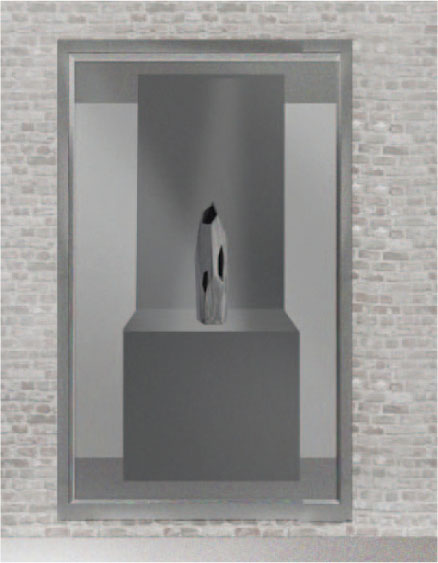
Figure 6.39 Shopwindow lighting not able to compete with bright exterior sunlight.
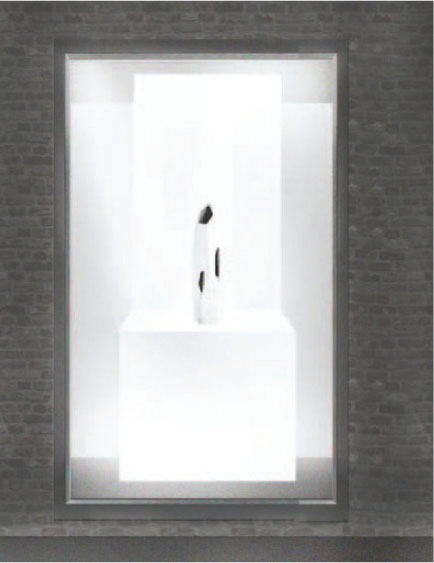
Figure 6.40 Shop window is perceived as too bright compared to the dark exterior.
MIRROR, MIRROR ON THE WALL...
Light exposed
Light or untidy detail may be visible though a mirror or polished metal. When designing with details in front of mirrors, one has to bear in mind that depending on the mirror position the light source in a cove, for example, may be fully visible. It is not only the luminaire but also the inner surfaces of the cove that will be exposed by a mirror. The same rule applies here as with details located beside glass. The detail must be designed and built bearing full visibility in mind. To avoid visibility, slots by mirrors are narrow and deep.
Accessing a luminaire isn’t always easy. This means that it is much harder to make and keep a detail by a mirror visually tidy.

Figure 6.41 Keep the cove tidy – the mirror reveals all.
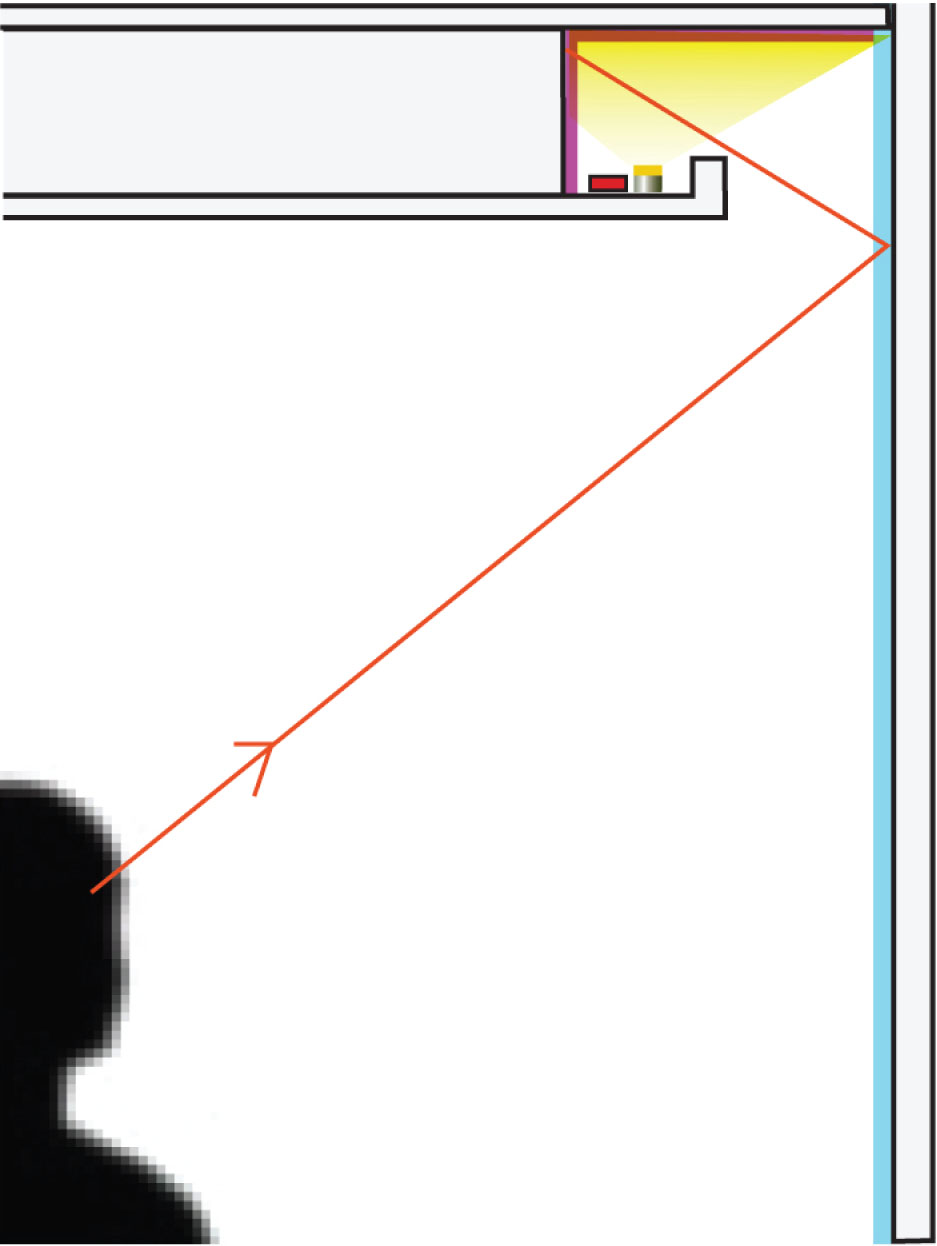
Figure 6.42 Shorten the mirror to avoid visibility or use a nice linear if you can’t.
One has to allow for enough space for the electrician to keep the detail tidy by placing the lights out of sight and hiding the drivers if there is no opportunity to keep them remotely. If this proves difficult, one can alternatively use linear fixtures in a deep recess. Diffused linear luminaires are designed to be visible and will deliver more light downwards compared to indirect light.
Alternatively, if a wider slot is needed to provide more light downwards, it might be worth having a talk with the interior designers. In this case, it will be useful to make the mirror shorter to avoid reflection. A few centimetres can help to prevent the luminaire being seen in the mirror. It might help to do a quick check in CAD as shown in Chapter 5 to establish the ideal mirror height and thus avoid the visibility of the light source.
Unflattering light
We have surely all experienced it – when looking at our own reflection in the mirror we don’t look always favourable. In front of some mirrors we look good, while others make us appear disadvantageous. This isn’t down to the magic mirror but to good or bad lighting. We have learned in Chapter 2 about the properties of various luminaires. A down-light with a defined beam angle placed directly over a mirror, for example, creates a crisp and contrast-filled light. This type of light is suitable for bringing out the best in beautiful objects, but on our faces it will cast stark shadows, and reveal spots and wrinkles. One solution to this pitfall is to use a diffused light source. The aim is to create a soft light not exposing irregularities and creating more even illumination. Linear details providing diffused light are a good solution. When using detail beside mirrors as a main light source one has to make sure there is sufficient light on the person standing in front of it. It doesn’t always need to be a linear light; it can also be a medium-sized diffused down-light or a big diffused light panel, as they also create a good light by the mirror. If one cannot touch the wall or ceiling one can position the light behind the mirror, creating a diffused indirect up-light. This works particularly well in lower spaces. Alternatively, a surface-mounted diffused light source is a good solution. The luminaire market offers plenty of good decorative and architectural diffused wall-mounted luminaires. And last but not least, don’t forget that mirror is a glass with a silver back-foil. If there is space, one can use partially etched mirror glass to deliver light from behind the glass.
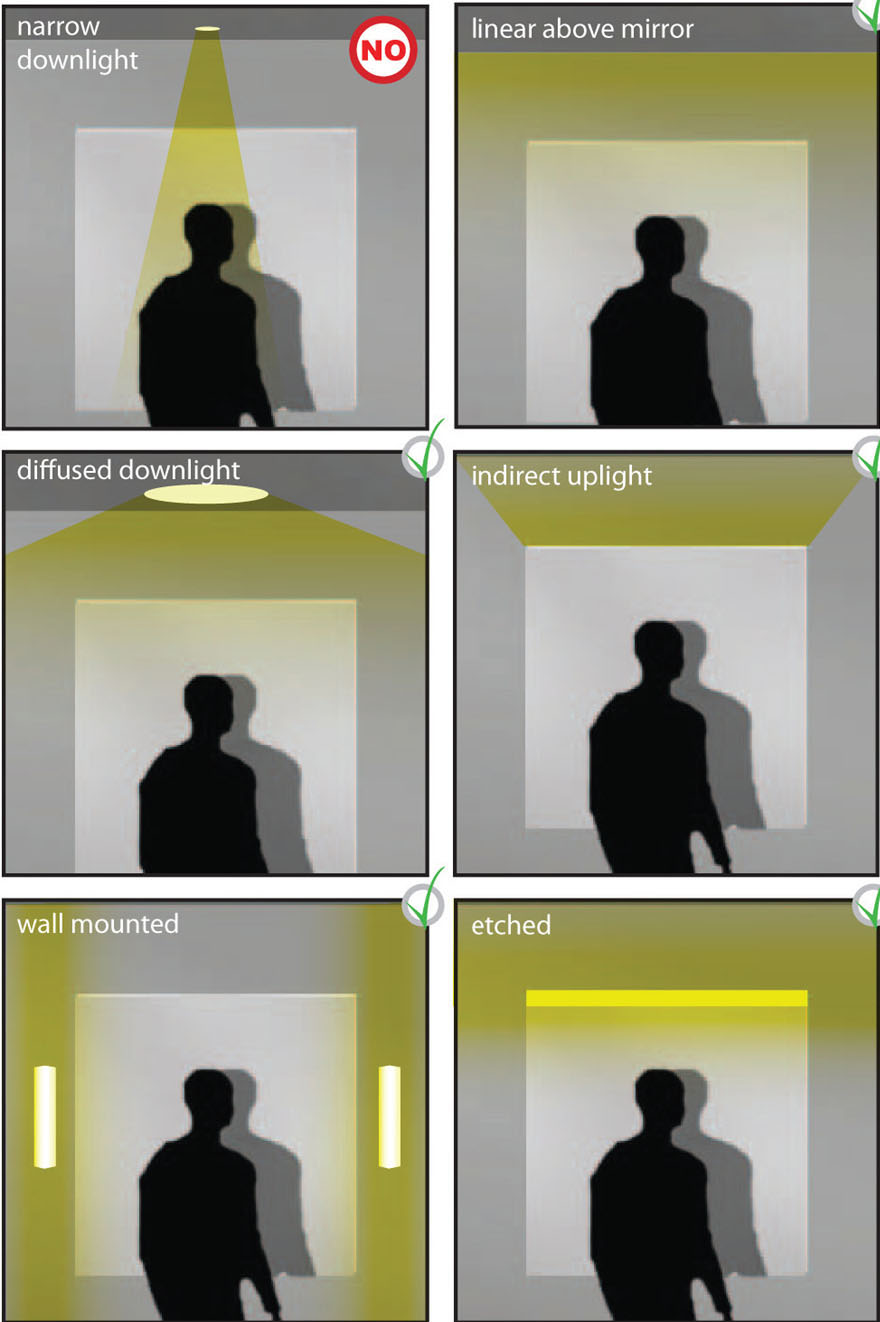
Figure 6.43 Mirror lighting.
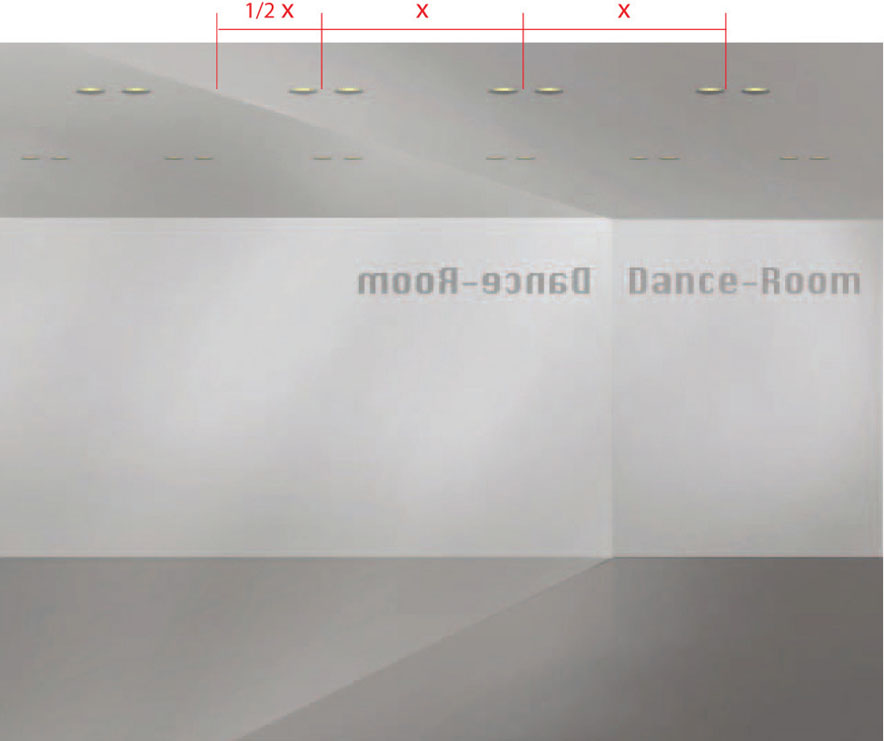
Keep the rhythm
Ones rhythm may be interrupted. Mirrors are used in architecture to make spaces appear bigger. When placing down-lights into a space one also has to consider what the effect will be on the mirror, especially when one has an array of down-lights crossing a space up to the mirror. To support this effect of a visually larger space, one should place the last light of the array at the right distance from the wall. The intention is to make the down-lights appear as if they would continue naturally into the mirror. This is best achieved by placing the last down-light by the mirror at half the distance it has from the other down-lights.
THE LUMINAIRE IN THE SPACE
Layers are key
There may be something missing but what? A good lighting scheme completes the good design of a space. What it cannot do is make average architecture look outstanding. A soulless lighting scheme, however, can ruin a space. All details may be working well, and there may be no glare, but the space still feels wrong. This is often down to incorrect lighting. Some lighting schemes fail to address either architectural elements or vertical surfaces. Other schemes are too contrasting and general light is missing or overused. For example, using general light also as task light leads to a dull and uniformly lit space. Using only task lights can create uncomfortable contrast and will not provide sufficient light in other areas. The reason for unsuccessful lighting is often a lack of layers or too many layers of light. Make sure you use layers according to the space. A simple corridor, for example, won’t require too many layers. An accent light illuminating the wall can supply sufficient general light yet accentuate the wall at the same time. A hotel lobby, on the other hand, will usually need all lighting layers from general light, accent light and task light to decorative light. A balanced scheme is a lighting scheme that respects the hierarchy of the space by the number of layers it uses.

Figure 6.45 The relationship of layer versus hierarchy and space complexity.
Light may be hanging too high or too low. Pendant luminaires form an important sector of decorative luminaires. Equally important are the technical pendants, which can provide, for example, combined up- and down-light for a space. When up-lighting is part of the provided luminaire feature, one must make sure that there is sufficient space between the luminaire’s up-lighting light source and the ceiling. The light needs the room to bounce off the ceiling into the space. The light is mounted too high when the up-light creates a narrow line of light on the ceiling. It not only looks unappealing but it isn’t efficient either as a lot of the light will hit the pendant rather than continuing its journey toward the table. The other pitfall is if the light hangs too low. The lower the light is positioned, the weaker the effect of the upward light is, as the light has to travel more.
The ideal distance of a technical light from the ceiling depends again on the beam angle of the up-light and should be tested or sourced from the lighting manufacturer. The ideal rule of position for decorative pendants is ‘not in the way and not out of sight’. With ‘not in the way’, one means the luminaire should not be visually and physically obstructive. With ‘not out of sight’, one means that it should be positioned to still perform its purpose by visually enhancing a space.
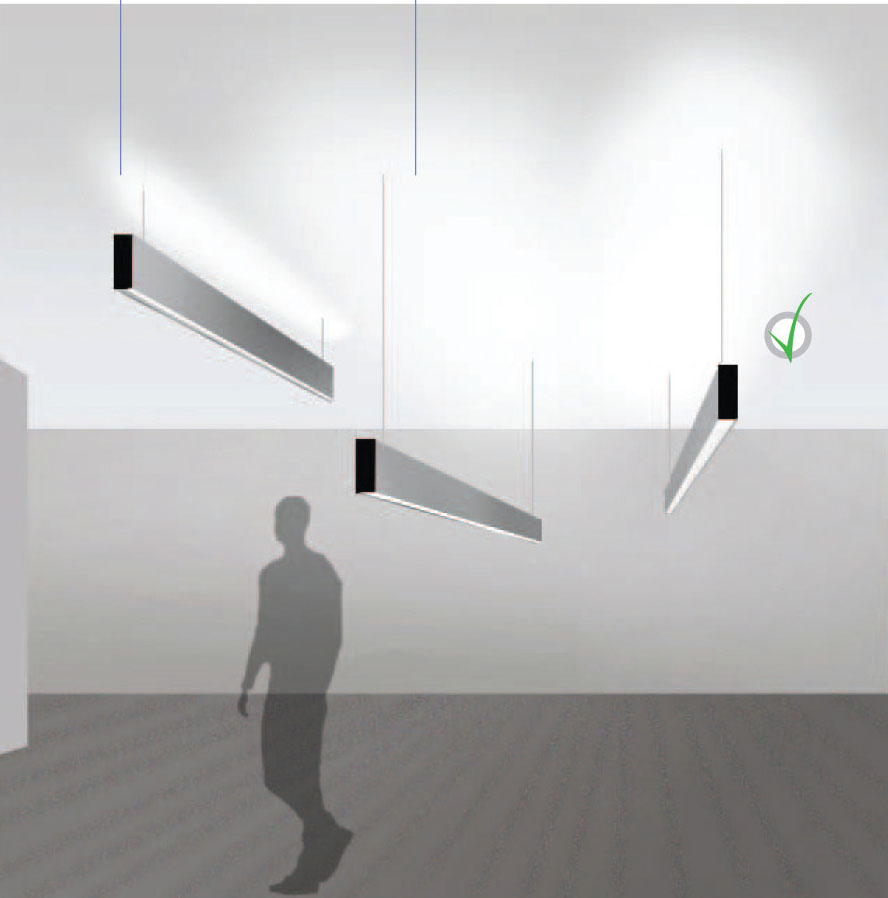
Figure 6.46 Pendant up-downlight.

Figure 6.47 Pendant suspended in the right height. (Arch: AHMM)
The right size
Lighting may feel too big or too small within the space. The integration of luminaires into a detail defines the size of the luminaires. So does the design of a space – it not only dictates the type but also the dimensions of the luminaires.
It can happen that a 1m (3.3ft) light panel looks lost and small in a 10m(32.8ft-) high hotel reception, while the 200mm (7.9in) down-light in a corridor is perceived as large in dimension.
As general rule, one can establish that small fixtures are suitable for small or low rooms while higher and bigger rooms are more forgiving with bigger luminaires. As with many things, the exception proves the rule, such as a big diffused light at the end of a corridor or an array of small luminaires, creating a cluster of lights in a lobby. This brings us to the quantity and position of luminaires.

Figure 6.48 Left. 1.5metre luminaire in a massive space. Right. 200mm luminaire in a small corridor.
Lack of contrast
There may be too much light. We have talked in Chapter 3 about how to lay out and group luminaires in a space to create a base light level. A lighting calculation can be helpful to check the general light level, but it can also be misleading. The false colour imaging exaggerates the not-so-bright areas. In a false colour image, 50 lux can look dark, but in many cases it might be more than enough. To establish whether the lux level is sufficient, a lux meter might be of help for the unexperienced. Measure your office environment and you will soon find out that what you thought is dark might actually be an acceptable light level. Checking the environment with a lux meter helps to re-tune one’s perception. The mistake one often encounters is that the base light is too high. It is often ignored that light needs contrast to make objects stand out. Too much light is used when there is no notable rhythm between accentuated lighting and generally lit space. It is of course possible to dim the lights to correct over-lighting. But what if that many lights weren’t necessary at all? Knowing when and where to omit lights requires some experience, courage or the lux meter in the office.
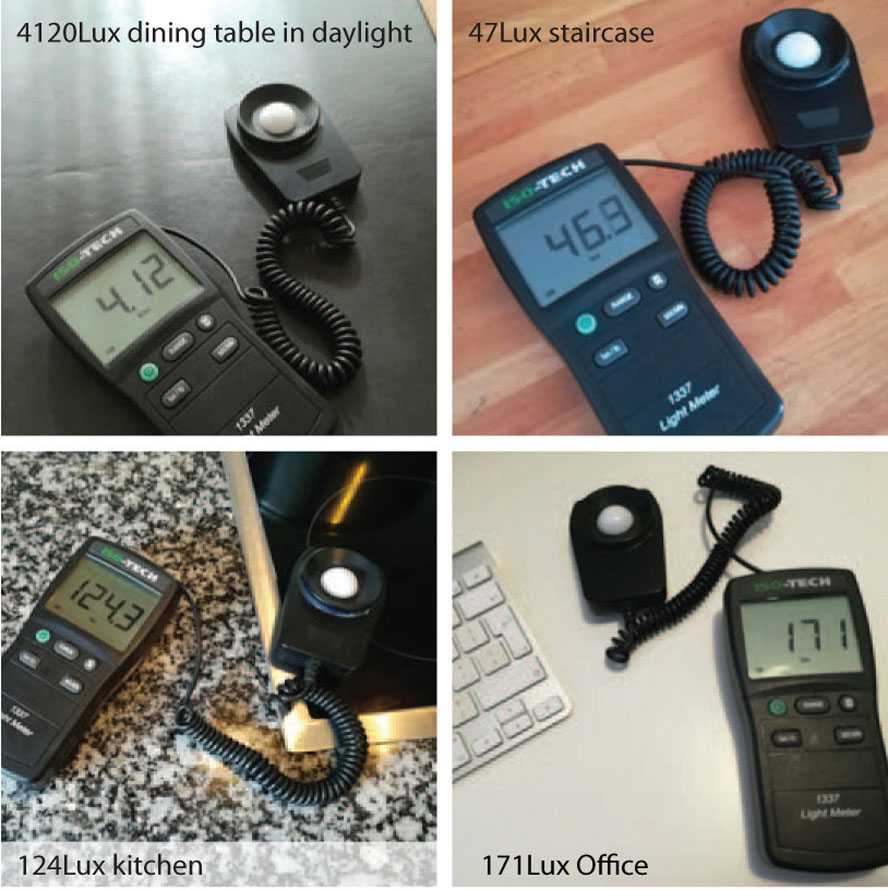
Figure 6.49 Different zones in a house compared. The staircase, office desk and kitchen top are perceived brightly even though the Lux level figures are ‘low’.
The right amount
Having too many luminaires or falling in love with a particular luminaire can be an issue. Having a lot of light in a room doesn’t necessarily mean that there are many visible light fixtures. One can provide a lot of light in a space by using various lighting tools. The luminaires in the space shouldn’t overpower visually but blend in nicely. To achieve general light, task light and accent light using only one type of light fixture yet having a balanced luminaire arrangement is hard to accomplish. One needs a lot of down-lights, for example, to generate all three lighting layers. In a confined space, the usage of many down-lights will make the ceiling appear crowded. As we know, variety is the spice of life so removing some of the downlights using wall slots can calm the ceiling visually. The reason for using too many luminaires of one kind can be varied. We might get to a point where we have our favourite manufacturer or light fixture. But that doesn’t mean that this luminaire deserves a space in a lighting scheme. One should not aim to achieve a lighting scheme with ones favourite fixtures but with the right tools. The aim is to arrange a composition of luminaires to accomplish the right lighting for the space without letting one luminaire type dominate it visually.
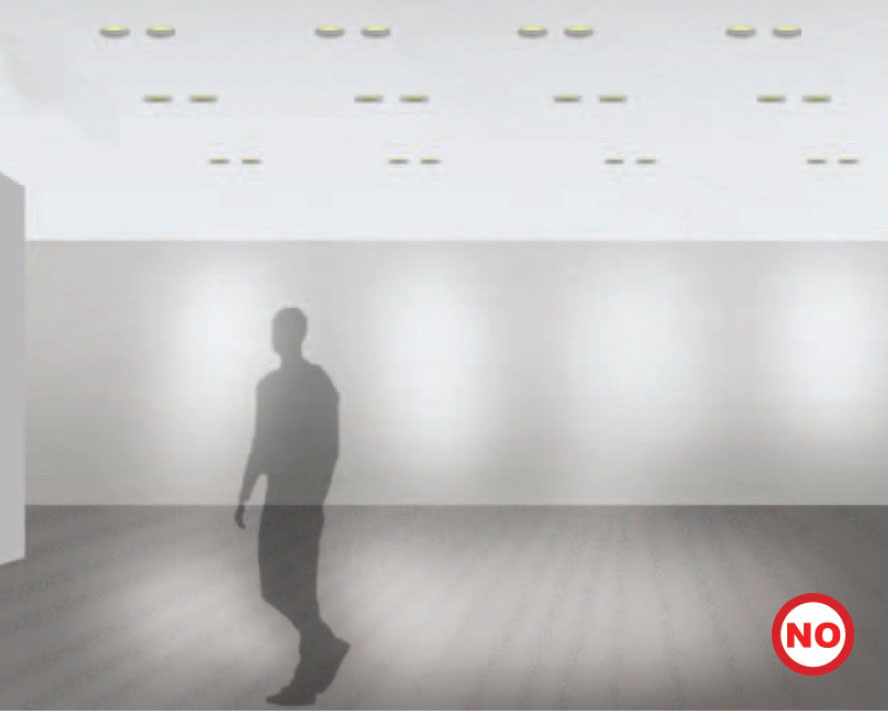
Figure 6.50 Top-heavy - single luminaire usage.
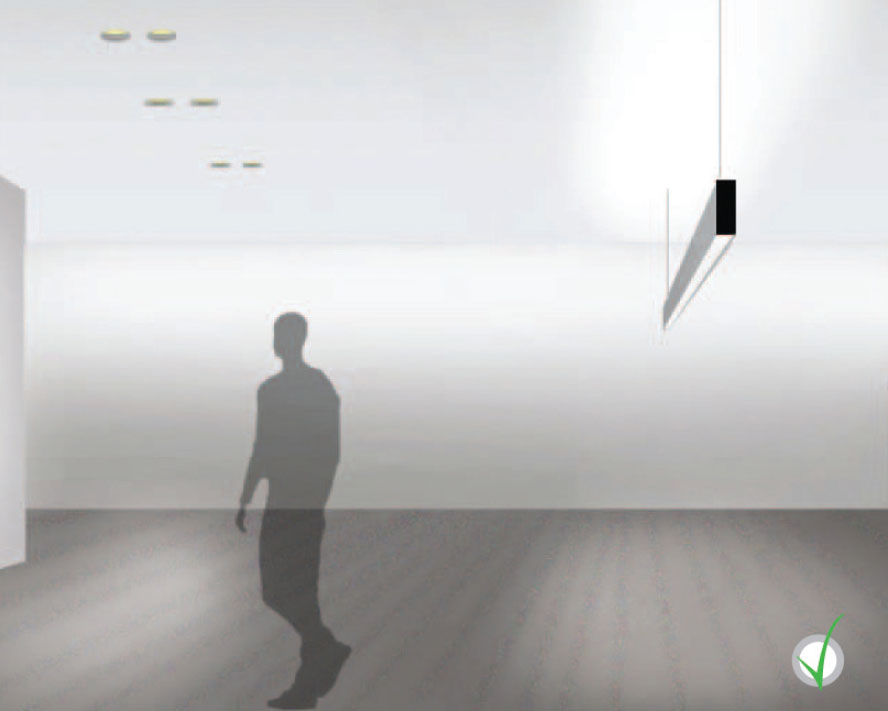
Figure 6.51 Balanced - mixed luminaire usage.
The right distance and size
Grouped down-lights may be set at the wrong distance. Most manufacturers define the position of their wallwasher down-lights from the wall and from each other in their catalogues and web pages. We assume that everybody reads and obeys this recommendation. There is not much space for creativity and to play here. We have spoken in Chapter 3 about grouping the lights and how to organize the ceiling. Defining the distance between the grouped down-lights can sometimes prove difficult. The different light fixtures in a group can be either too far apart or too close to each other. If the down-lights are adjustable, it doesn’t affect the light quality and is therefore often neglected. It does, however, affect the visual appearance of the space. There is a quick method to check the right distance. Print and cut out circles in the size of the down-lights. Put them on the floor and play with the distance until it looks all right. This applies not only to adjustable lights but also to standard down-lights or grouped linears. This method is not only helpful for establishing the distance between luminaires but also when it comes to defining their size. One can discover using this method that the lights are too big or small when laying them out physically.

Figure 6.52 Test: paper cut-outs of 60mm and 150mm laid out onto the floor.
Missed target
Adjustable luminaires are often used as a miracle cure. They are tempting as they allow one to adjust the lighting when things on site change. They are also used when the design for a space remains unclear at the time the lighting design is taking place. Due to their functionality, good adjustable down-lights look slightly different to regular down-lights. They are bigger if they allow for good adjustability. Adjustable down-lights that look like standard down-lights have a very limited adjustability. The main pitfall with adjustables is that they may not reach the target even though one has checked it in a CAD drawing. We have shown how to define the position of an adjustable down-light in Chapter 5. The pitfall lays in the actual adjustability of the luminaire. To the lighting designer’s misfortune, some manufacturers do not mention in their information sheets that the beam angle of their product is compromised at maximum tilt. This is especially the case with the small deep-recessed adjustable downlights. Their shape doesn’t allow the light to physically escape the cylindrical recess. The maximal tilting angle of the lamp might be twenty degrees while the actual escape angle is only ten degrees.
These are beautiful little fixtures, but the beauty comes at a price. They are nevertheless a favourite fixture with many lighting designers. If designers decide to keep the specification of a deep-recessed small down-light, they must be aware of the limitations of the fixture and use it accordingly. The same applies to some pinhole adjustables. Pinhole adjustable downlights have the right design, allowing the light to be moved into the right position. Their mechanism allows for precise tilting but once the faceplate is put back one discovers that it cuts off some of the light beam. The price to be paid for a good functioning adjustable down-light is its bigger size.
Adjustable down-lights need to be tested for full functionality before being specified. If none of the envisaged adjustables are suitable even though they are fully adjustable, moving them might be the only option.
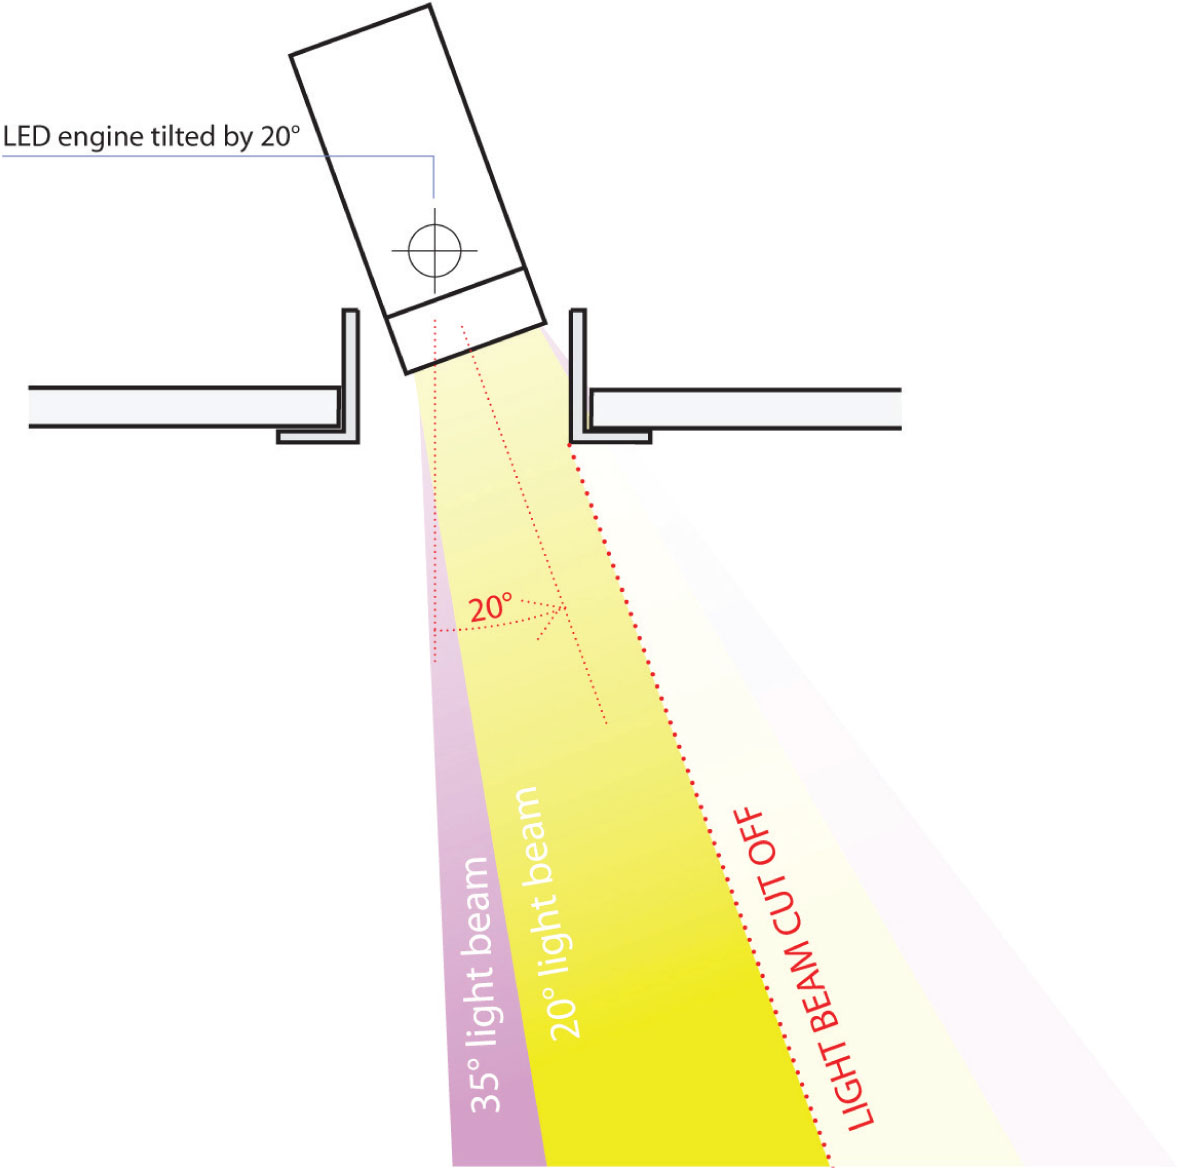
Figure 6.53 Light beam obstructed and cut to half
Figure 6.54 Light beam escaping without obstruction through a pinhole.
There may be an issue with glare on the stairs. Stairs are particularly hard to illuminate. A position of a luminaire or detail that works perfectly in a normal space might not be suitable on stairs. Simple down-lighting, for example, is sometimes not possible as the geometry of the space is too complex. It is often not possible to use ceilings to place a luminaire. The stair above might be in its way or the ceilings may simply not be horizontal. A carelessly placed down-light on an angled ceiling can cause glare to a person walking down the stairs.
Even a floor-washer can, when not placed properly, cause glare. A stair can have two vertical surfaces – the inner and the outer surface. If a wall-mounted floor-washer is positioned on the outer vertical surface, glare can occur under some conditions when walking up the stairs.
If possible, one should place floor-washers on the inner side of the staircase. A person, whether walking upwards or downwards, is more likely to look towards the outer side of stairs. It also keeps the staircase visually cleaner.
Stair illumination can also be delivered via a lighting detail. Whether under-handrail or under-step lighting, the visibility in staircases is high. A staircase can create various unusual viewpoints. This allows one to look into details that would normally not be exposed. With this in mind, details need to be planned even more carefully. Viewpoints must be checked in 2D CAD drawings or, even better, in 3D CAD models if available. One should avoid linear LEDs where dots are visible but rather use opal diffused linear LEDs as it is most likely that the light source is visible.
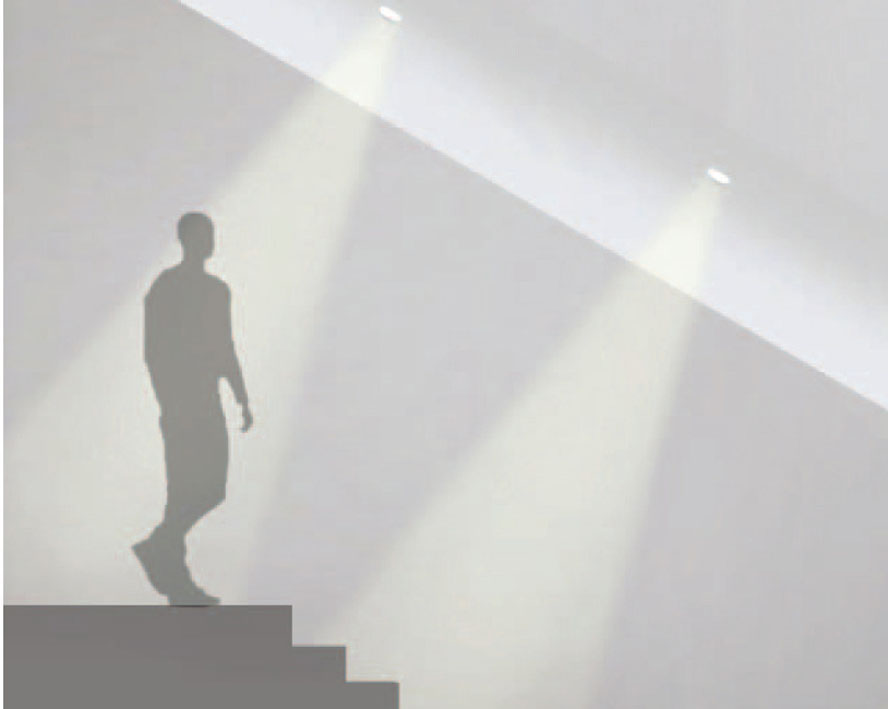
Figure 6.55 Glare caused by staircase lighting.
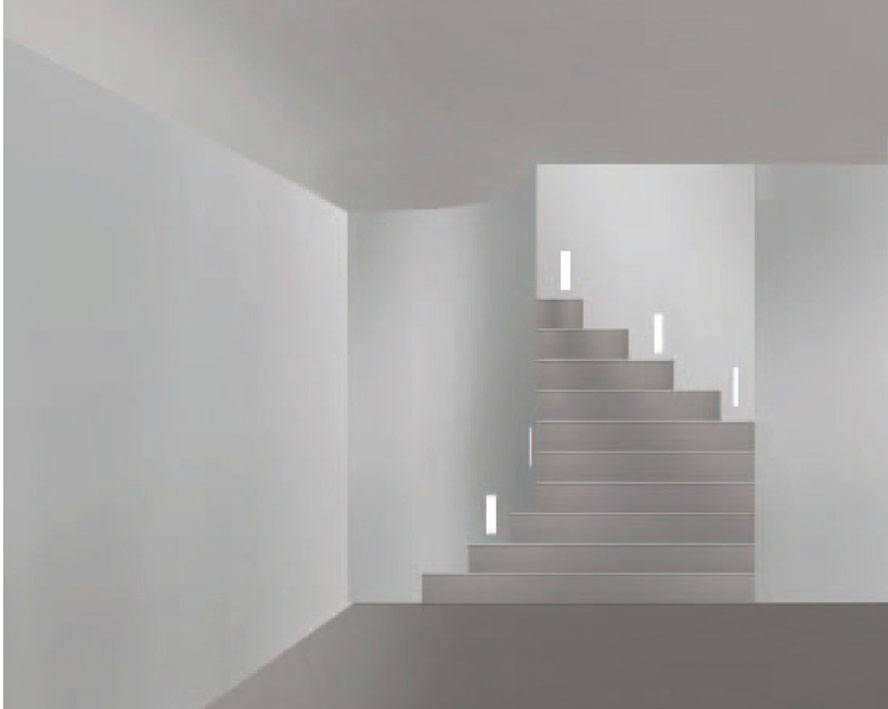
Figure 6.56 Walking up or down the stairs – outer luminaires perceived more.
From above
One may see the light fixture, including the cabling, from above. Standard details are designed to work in normal room geometry. Light fixtures and accessories are exposed the moment the room geometry changes and new higheror lower-view angles appear.
One has to be cautious and consider this new viewpoint. For example, cabling in a cove or an edge lighting will be visible when observed from above. Typical architectural elements that should make the alarm bells ring when working on a detail are: stairs and their landings, bridges, floor openings and terraces. The design must consider that the light sources will be fully visible. If possible, the luminaires used should be architectural luminaires. Architectural luminaires have integral drivers and cables that can be hidden. The alternative is to use technical luminaires and cover them either with an opal sheet or hide them behind louvres and a glare shield. All finishes have to be good with a light source either not visible or creating a good level of diffusion. The level of detail depends on the distance to the exposed detail – the further away, the more forgiving. When designing the detail, one must establish the visibility line. Louvres and a shield must be used with light sources that have a defined beam angle used for washing or grazing. A diffuser would change the light completely and can’t be used with grazers and washers. The louvres and shield need to be positioned to not obstruct the beam angle and to hide the light from view. An attractive architectural light or an opal cover should be used when a simple diffused up-light is needed.

Figure 6.57 High level position allows to look into otherwise hidden lighting details.
The dark side
A corner, niche or space may be left in darkness. Contrast is an important part of lighting and the dark area is equally as important as the bright part of a space. One can illuminate a space perfectly with the right contrast between lit and unlit areas, yet sometimes areas are left out. This is not unusual and can happen with complex spaces. One should, in particular, pay attention to the underside of an ending of staircases.
Very often, these areas appear dark and forgotten in an otherwise well-lit space. A little glow is often enough to bring them into presence without giving them too much importance. The same applies to niches and corners. The reason these spaces are forgotten is because they are not accessed, they don’t have a function and are not in a major pathway. Lights are easily hidden in such spaces. The lighting doesn’t need to be sophisticated as they won’t be directly visible. A cost-effective, simple, surface-mounted light can do a good job. It is rare that the end of a staircase is celebrated with a light panel.
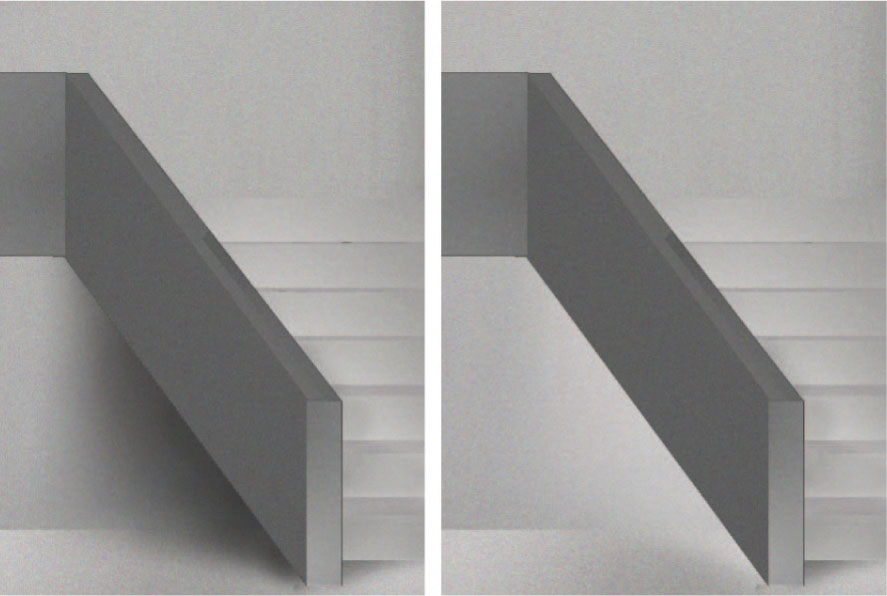
Figure 6.58 Dark areas under stairs deserve a glow.
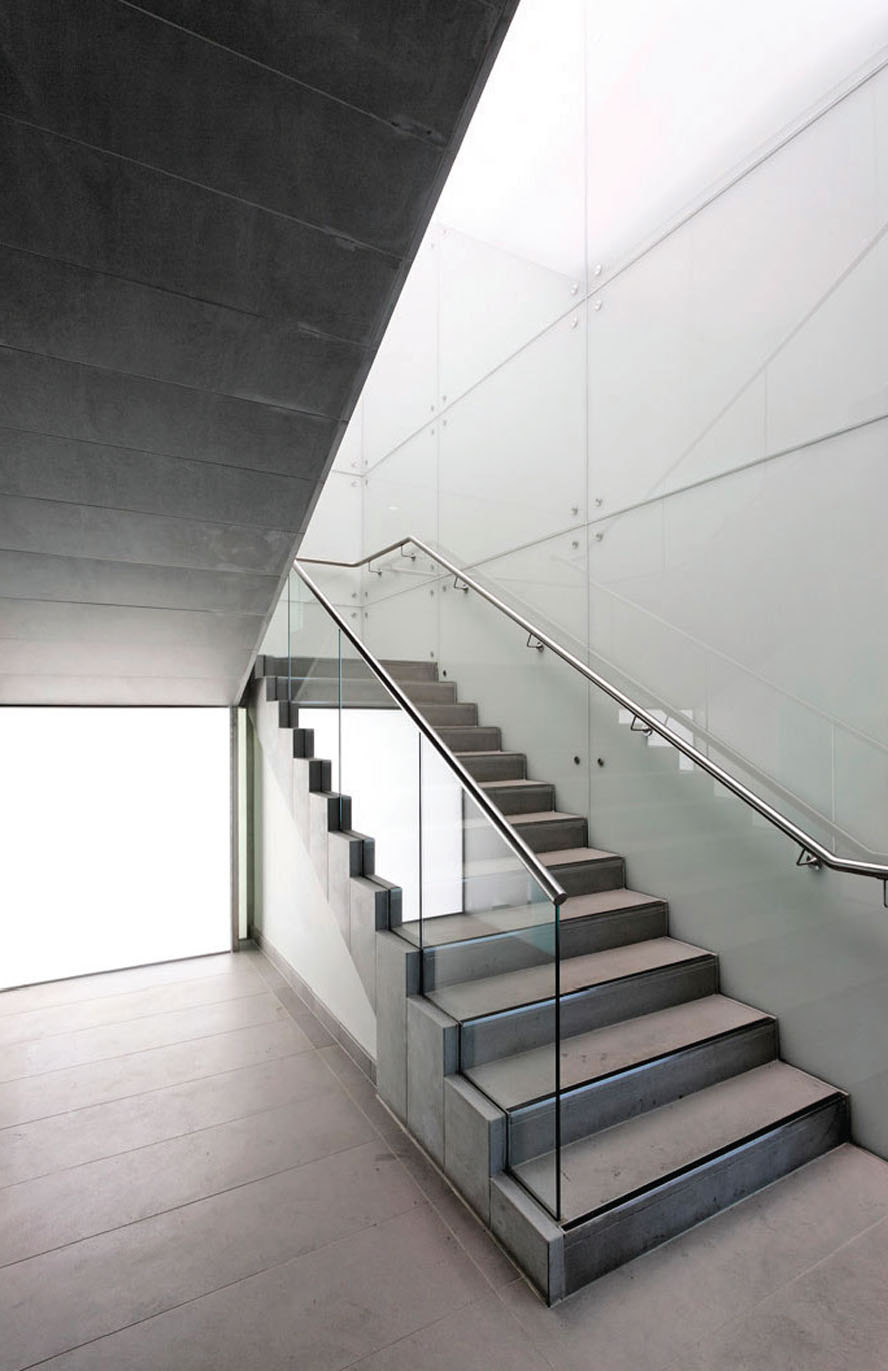
Figure 6.59 A usually neglected area gets special attention. (Arch: HOK and Seth Stein; Lighting: Mindseye; Photo: Andy Spain)
CONTROL IS EVERYTHING
Irregularities
You may have a great control system yet some lights are flickering, or the dimming happens only at the last 10 per cent. This is often frustrating. Even though the right control gear has been used with each luminaire, some light sources don’t behave as expected. The main reason for the malfunction is that some drivers are not compatible with the control system. To avoid this one should aim to use control gear from the control system manufacturer chosen for the project. All the drivers and gears of the control system manufacturer are optimized to work with its own control units. Alternatively, one can use drivers that have been tested with the selected control system. All good lighting manufacturers are interested in ensuring that their luminaires work with the major lighting control systems. They test their drivers and can guarantee good respond of their equipment. When it is left to the lighting designer to specify drivers, it is important to consult with the control system company about compatibility of the selected drivers. If there are doubts, one should look for alternative drivers.
Synchronization
Two lights on the same circuit may dim differently. Dimming many lights together that are on the same control circuit doesn’t automatically mean that they will behave in the same way. Bear in mind that lights that are on one control circuit will get the same control signal, but a down-light, a linear and the joinery lighting run on different drivers. All drivers may react differently to the control signal. There are two solutions to this. If possible, try to separate the lights into control groups. Down-lights should be on a different circuit to joinery lights, etc. This is not always possible due to budget constraints – remember, the more circuits there are, the costlier the scheme gets. In this case, make sure to get drivers from the same family to get similar dimming behaviours.
In practice
You may find that control practice deviates from theory. Once all scenes are set and the project is handed over to the client one should make sure that everyone understands that this is a first set-up. The best practice is to allow the client to live with the scene settings for a while. After some time, the client might have some adjustment requirements. The adjustments reflect the actual needs of the client and how they use the space in their daily life. If necessary, you may require a second session with the technician of the lighting control system to adjust the scenes accordingly.
Switches
Where is the light switch? A modern lighting control system comes with nice wall switches. Despite iPad apps and remote controls, a switch has still its place in a building, and switches may be placed in unusual positions, depending on the design of the space. The main rule is to allow for switches at space entries/exits. If a space is bigger, allow for an additional control point, ideally near the area where the user spends most time in the room. This applies to a bedroom where the light switches should be by the beds. Switches for bathrooms in public places should be inside the bathrooms since there is a lot of traffic, and someone could accidentally turn an outside light off while the bathroom is in use. In residential projects, wall switches can be placed outside the bathrooms.
JOINERY LIGHTING
Most of the aforementioned pitfalls can occur with joinery lighting as well. The same rules apply when it comes to highlighting texture or being careful with reflection and glare. However, joinery lighting deserves a section of its own, in particular with regard to lighting products. It is effectively lighting design for small spaces that are being observed by giants from above. The light distances, light intensities and view angle are different.
Half-lighting
Why is the shelf only half lit? Not using joinery lighting when it is actually necessary is the first pitfall in joinery lighting. Local joinery light gives a product a presence and makes it stand out. It does, however, add to the lighting budget and is therefore not always possible. It is best to show all parties involved with a little section diagram why the product cannot be lit from above.
One should consider using joinery lighting if a product isn’t fully coverable by ceiling light due to a shelf design or ceiling restriction. A half-lit product must be avoided if possible. If the budget doesn’t allow for integration of light, try to change the shelf parameters together with the architect. Otherwise, use joinery lighting where desired and necessary.

Figure 6.60 Diagram showing that light is not reaching products.
Partial coverage
Perhaps a product is lit only partly. Unlike when lighting a space, there are no regulations to comply with for joinery lighting. Ones wellbeing and safety do not rely on joinery lighting. But whether a product sells or doesn’t depends partly on lighting. To guarantee a good light level, the same rigor must be applied here as when lighting a space. The distance to the lighting target is less, which leads to much wider beam angles. If spotlights are used, they must cover the product fully. They have to cover it from the front and illuminate the depth.
The best practice is to check the detail in a mockup. The layout can be applied onto all shelf types in the project after the ideal set-up has been approved. This can be achieved by a beam-spot check on CAD as explained in Chapter 5. This is important for each shelf type and will prevent products being lit only partly.
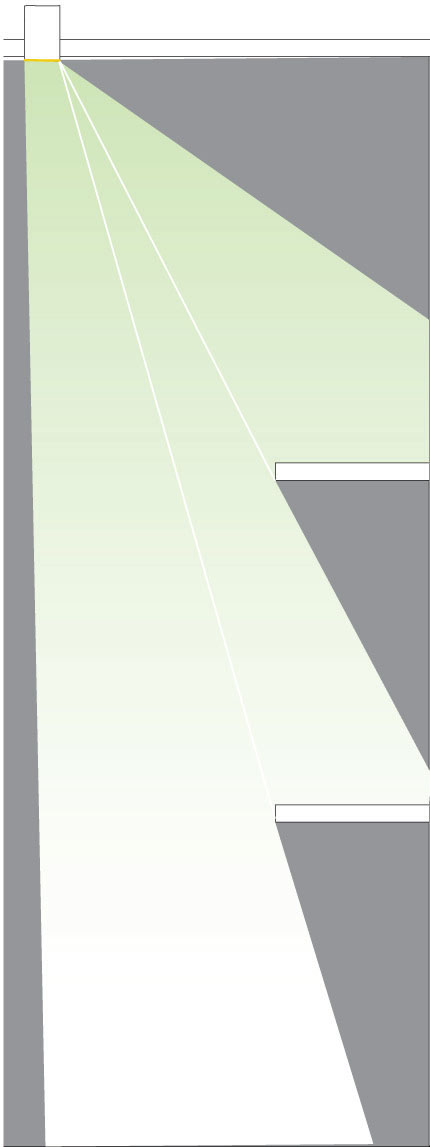
Figure 6.61 Product on the floor not lit well.
‘Copy paste’
Light sources may be clearly visible in shelves. ‘Copy paste’ or thoughtless repetition is the main culprit for this pitfall. Lighting down onto a shelf from the shelf above is an easy exercise – the lights are placed under the shelf and are therefore disguised by the shelf holding them. But one can do this only up to a certain height. If the shelves are at a 1.7m (5.6ft) height, down-lights start to become visible to some people. At 1.9m (6.2ft), the under-shelf lights are visible to most of us. If the luminaires can’t be hidden in a detail from the direct view, one must make sure that shelf lights are installed on the bottom shelf, lighting upwards. When doing a detail for a shelf, one needs to consider the position of the shelves and that a second detail might be necessary.
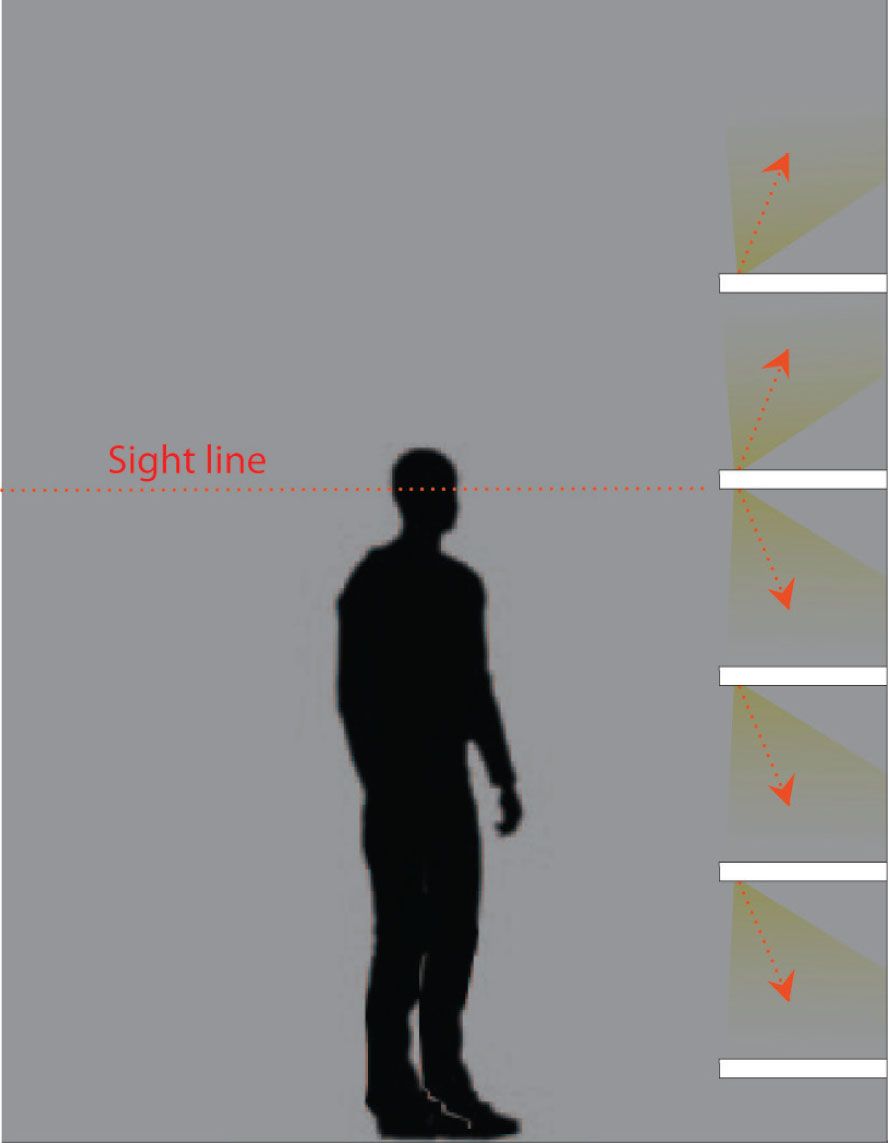
Figure 6.62 Integral lighting above the red sight line cannot be placed under the shelf otherwise it would be visible. The product must be lit from below,
Deep dark
A shelf may appear dark even though the product is on or within lit joinery. As mentioned previously, low, deep shelves are difficult to light fully. One is not able to illuminate them entirely with ceiling luminaires only. The last part of the shelf will inevitably look dark and dead. This can be resolved with joinery lighting in most cases. Sometimes even integral lights will struggle to light the deep areas, especially if the shelves are made out of dark material. Why light a shelf fully if the product is already lit? As mentioned before, joinery lighting has to be approached like lighting spaces. In this case, the space is in need of a second layer in the form of an additional light. This can be another point light, or a linear vertical or horizontal light placed at the end of the shelf. The aim is to add a graze or bleed light to invigorate the shelves that would otherwise be perceived as dark.
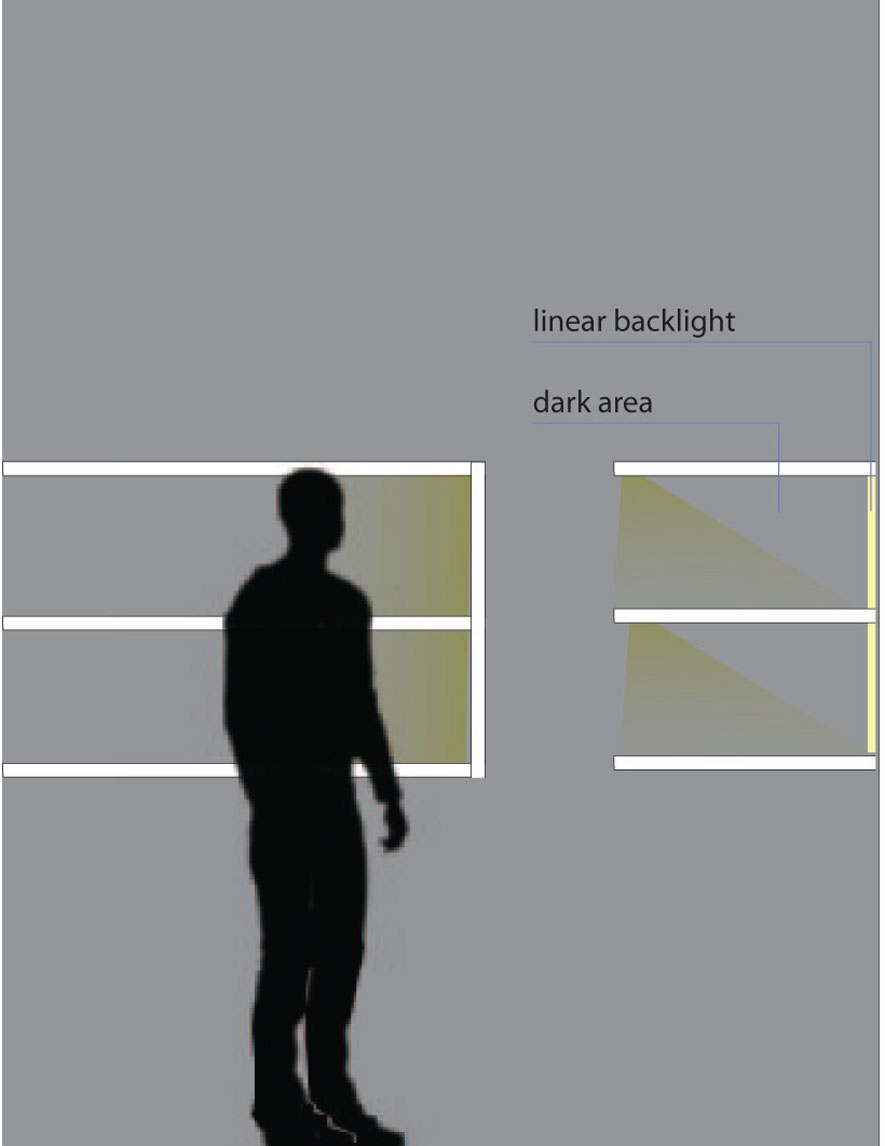
Figure 6.63 Linear accent light compensating the dark area in the back of the dark shelf.
Appropriate intensity
A shelf may be brightly lit from the back, but the product remains dark. Another method to enliven a shelf is to backlight it with a light panel. The pitfall occurs when the backlighting in the shelves is too strong. The backlight can bathe the entire shelf in a pleasant light and give a nice halo to a product. But one should bear in mind that backlight is not illuminating the product; it provides the secondary layer only. The primary layer, which is the front light, is missing or is not perceived. If the front light is not sensed, this means that the contrast between the light hitting the eye from the light panel and the light bouncing off the product is too high, in favour of the backlighting. Therefore, when planning to use backlight, one should make sure that there is a very strong front light. The key is not making the backlight appear too strong and dominant. The easiest way is to test the effect upfront and change the intensity of the backlight accordingly. If there are many different backlit shelves and the details vary, make sure to set one backlight level for all shelves. Bear in mind that less backlight is more and don’t forget that a nice backlight is the secondary layer only.
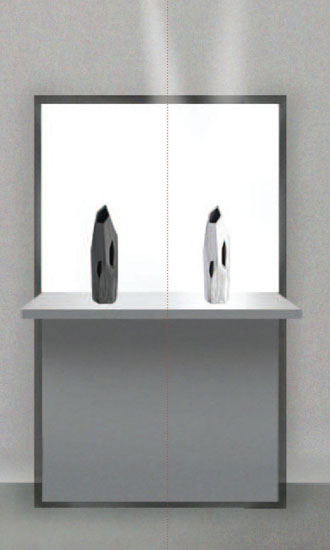
Figure 6.64 Left side shows backlighting with a light panel. Right side adds front light to the backlight.
Stealing the show
Joinery lighting may steal the show in a display. Joinery lighting is mainly used to illuminate a product, keeping the visual impact minimal. If one struggles to integrate lighting into display tables, for example, a good way to light the products is to use LED spotlights on vertical supports.
They are small and deliver the light where needed. But they can steal the show if not carefully used. Be careful when positioning the luminaires as they shouldn’t stand in the way. Group the lights by placing two lights together and don’t use too many luminaires. This is a good way to reduce their otherwise strong visual presence. Using two lighting poles to light a small ring will be perceived as exaggerated and can be considered stealing the show.
With a group of big watches, on the other hand, one will barely notice the two poles doing their job, providing that the light poles are minimal in design and correspond in material, size and height with their environment.
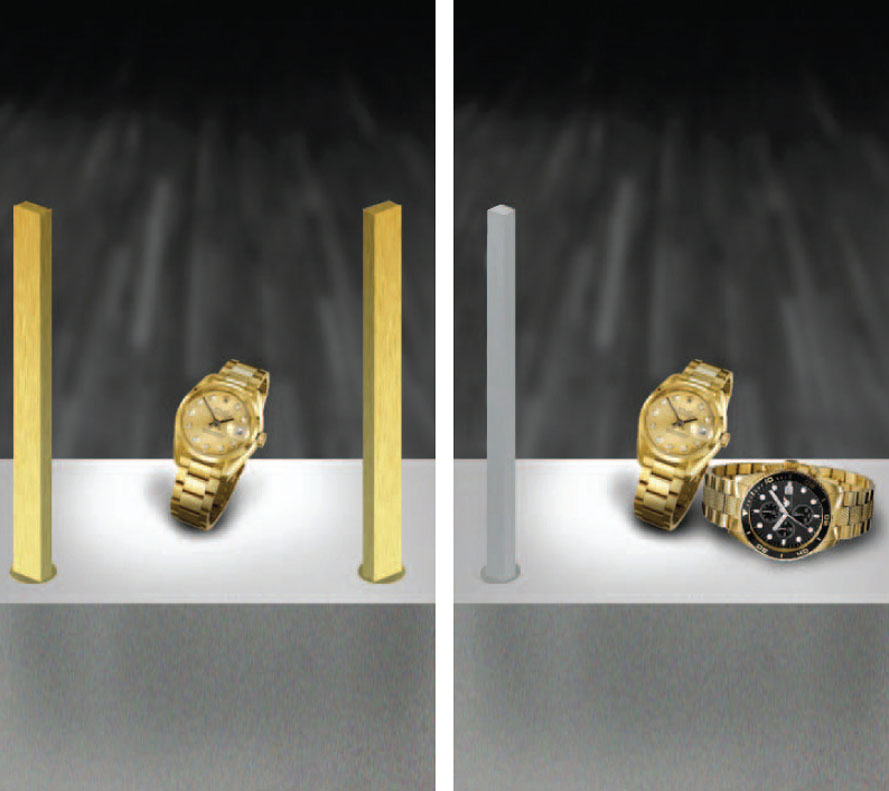
Figure 6.65 Left side: the two display lights steal the show. Right side: one discrete light source.
Figure 6.66 Spotlight highlighting the sparkling stones and the leather structure.
Type
There may be enough light from the joinery, yet things don’t feel right. The type of light used is very important, especially when lighting products. The wrong light either makes the product look too flat or there are too many reflections visible, distracting from the view of the product itself. One has to ask the right questions: is the shelf displaying shoes, leather goods or is it going to show clothes or sunglasses? The general rule is that the majority of products, in particular sparkling and shiny objects, profit from spotlights.
The same applies to textured products as the point sources emphasize the textures by creating light and shadow. A linear or panel luminaire will distribute diffused, flat light, making the product appear flat. Their strength is to illuminate products with a large reflective surface like sunglasses, smartphones, model cars, etc.
Point sources here would create undesired strong reflections accompanied by indirect glare.

Figure 6.67 Light panel over the BMW create swage line on the car. Spot light are hidden in the slot. (Arch: Carbondale; Lighting: Mindseye; Photo: Andy Spain)
CHANGE OF SPECIFICATION
A change of specification usually occurs between Stage 2 and Stage 3 of the lighting design process, due to design changes. It also can happen during the building process when, due to alteration on site, a specified luminaire doesn’t fit physically. This is not necessarily a problem as long as the change of specification is dealt with by the project lighting designer. In some cases, alternative luminaires are proposed by the contractor or the client’s project manager due to existing agreements with lighting manufacturers. This is where most pitfalls lie.
Ticking the boxes
The luminaire on site may not be right. One should make sure that all the boxes are ticked when approving a specification change. Make sure the plaster-in/ seamless fixture is truly seamless, that the new size is still compatible with the detail and that the beam angle is the same. Check the changes against your specification sheet.
All boxes may be ticked but still something is not right. When writing a specification, some of the specifications may be particular to a certain luminaire. The lighting designer will be familiar with the specific nature of the fixture, but this may not be noted in the specification sheet. Make sure that an adjustable luminaire retains the same level of adjustability, that the diffused linear that you specified is indeed a linear and that the LED dots are not visible in the new luminaire. This proves difficult if one doesn’t have the actual replacement on ones desk. Whenever possible, try to get samples of the alternative luminaire so you can compare its performance with the original specification.
CONCLUSION
There are numerous pitfalls listed in this chapter and they might be overwhelming at the first read. Yet the number has been kept below fifty and to ease understanding they have been separated into sections. The sections and their pitfalls form a checklist shown on the next page. This can be used to verify whether all pitfalls have been considered. It can equally be used as a design guideline or reminder during the design process of each project. Over time, the list will become unnecessary as your project experience and wealth of knowledge about lighting design grows and grows. Good luck!